Top Banner #
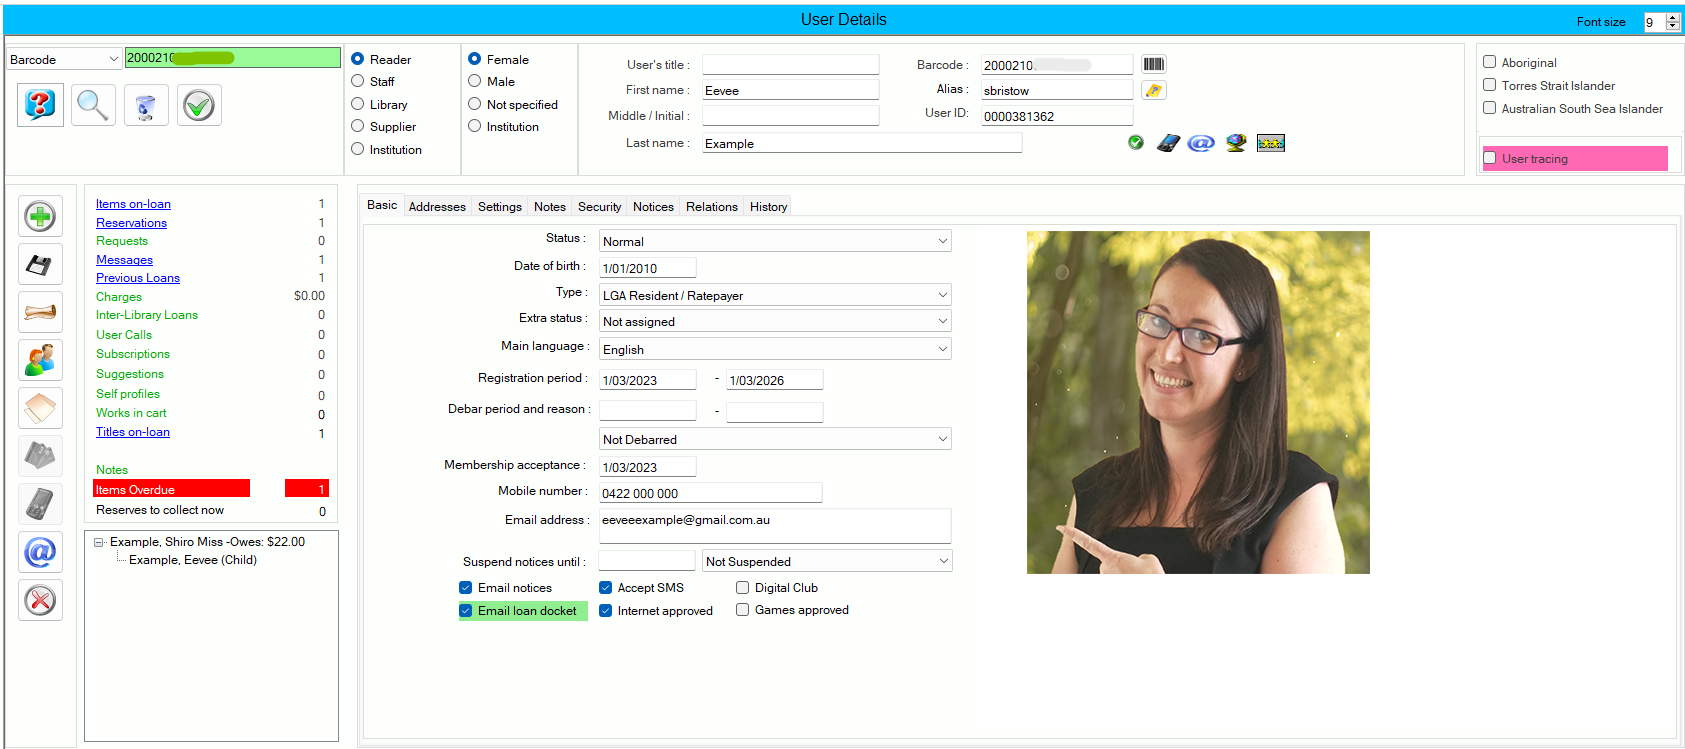
The display shows a consistent view of essential details, such as name and barcode, with additional elements displayed in separate tabs within the overall form. From left to Right
- Access panel – with Command buttons
- Category Selection Radio buttons
- Gender selection Radio buttons
- User Identification panel
- Ethnicity tick boxes

Access panel #
Retrieval of user details can be by a control number. The combo selector offers choice of:
- User barcode, which can be read in by device or keyed in
- User ID (the internal Aurora user key)
- Alias – a user self-chosen memorable id
Command buttons #
Four buttons can be found in the Access panel:
 Hint – this allows an overlay to be shown, detailing shortcuts available in this screen
 This option opens the Quick Find panel
 The wastepaper bin icon is used to clear the user barcode or id text box. Occasionally, this box may not be selectable by mouse, but clicking this icon will allow clearance, in readiness for entry of a new user id.
 This ‘onscreen return’ allows the simulation of a return key by mouse action. Note that this will not be enabled until you have entered at least one character for searching.
Category #
The set of radio buttons for category allows the operator to determine the category of the current user:
- Reader
- Staff
- Library
- Supplier
- Institution
Gender #
Another set of radio buttons determines the gender of the user – male, female, non-specific, or ‘institution’ where gender is not appropriate.
User identification panel #
On entry of a key – from direct entry or from linkage from another function (such as Quick Find) – the user’s name details are now displayed, with separate boxes for title, first name, initials and last name. Note that these details can be amended directly (but changes must be saved).
Below the name, the barcode is repeated (note that if the Aurora User id is used as the retrieval element, then this barcode will need still to be shown here); and an optional field for ‘ Alias‘ is provided.
Changing a user barcode #
If it is necessary to change the user barcode – e.g. where a card has been lost or simply damaged – then the new barcode can simply be entered over the existing Barcode in the lower box labelled ‘Barcode no.’. Details must be saved in the normal way.
Alias #
This optional field is provided to allow users to elect to have a name element that may be used in public areas of Aurora, such as Reviews in Webopac, allowing the Reviewer to be identified by their Alias, but not their real name. This Alias may also be used by the user to login instead of their barcode, and by staff to get to user details.
Flash indicators #
A constant set of flash indicators can be displayed immediately below the user details in the User identification panel, showing specific settings for the user, full details here
Hint presents a range of keyboard shortcuts for use in the current screen See the hint page for full details.
Ethnicity #
At the far right of the top panel, a set of checkboxes allows recording of ethnicity. For Australian libraries, this is shown as separate boxes for:
- Aboriginal
- Torres Strait Islander
- Australian South Sea Islander
Multiple boxes may be ticked if appropriate.
Side Bar #
Command buttons #
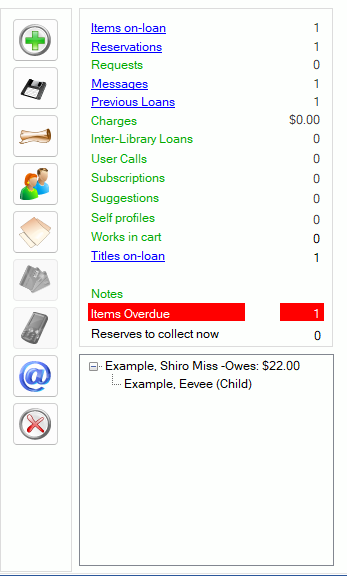
The following command buttons are provided in a vertical panel:
 This green cross allows addition of a new user record.
 The disk icon allows added and amended data to be saved.
 This option allows creation of a new user registration record, by copying the existing one currently displayed.
 The house icon allows replication of address details from the current user to linked relations.
 This allows the printing of a user card.
 This button is only enabled where the Aurora Label application is installed and available to the workstation. Clicking the icon automatically allocates the next available user barcode in the library’s defined sequence – this can then be printed on a card for the user. The previous barcode is simply overwritten, and now is no longer accepted.
 This button allows the library to send an adhoc SMS message to the current user
 This button allows the library to send an adhoc email to the current user
 This icon allows deletion of the user record.
For Further details on the command buttons and their functions see the User Detail Command buttons page

Summary #
Aurora also provides a display of User Links, and this shows any user activity as counts on the lower left-hand side of the display. Note that if items are overdue, or reservations are ready to collect now, then this information is shown on a red banner to alert the operator.
The summary provides tallies of:
- Items on-loan
- Reservations
- Requests (for homebound users and Libraries for the Blind
- Messages
- Previous Loans
- Charges
- Inter-Library Loans
- User calls
- Subscriptions
- Suggestions
- Self profiles
- Works in cart
- Titles on loan
- Items Overdue – this is highlighted if there are such items
- Reserves ready to collect now – highlighted if reserves are ready
The Summary [Note that Self Profiles are not on the User Links summary] is explained and detailed on this page.

Relations tree #
An optional tree display of the user’s relationships is shown next to the User identification panel.
This is only shown if the user has relationships defined. The display shows the relationship and allows selection of other users in the tree view – i.e. if a child is displayed, then clicking the parent name will select the parent for this User Details display.
Basic tab #
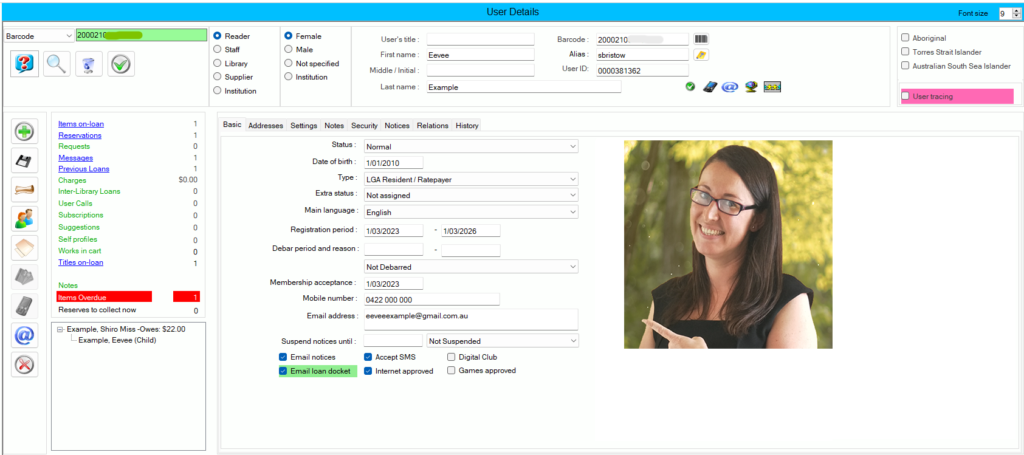
The Basic tab presents the options that most immediately affect the user in context of loans
Status #
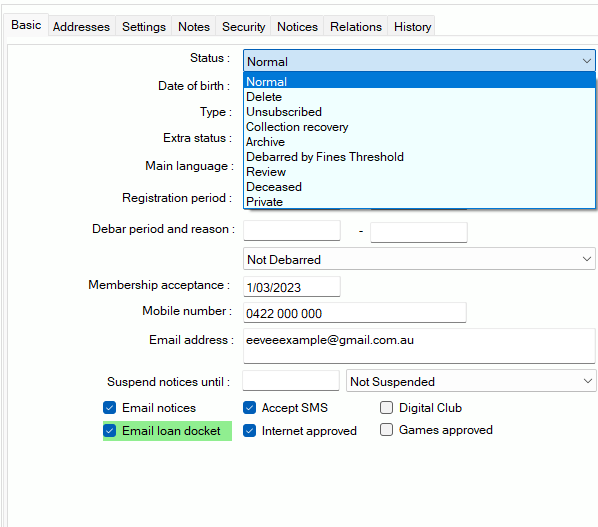
All user statuses are defined at a system level in Aurora – and cannot be locally redefined.
A status may be applied by selection [and save]; a status may be cleared by deleting the applicable status in the selected display.
Many status are applied as part of other processes e.g. if enterprise parameter UserToReviewOnChangeDOB is set then if the Users DOB is changed their Staus is changed to Review by the system.
- Normal
- Delete – This can be used by libraries that do not give user delete permission to all operators. A User can be marked as Delete and they do not appear in regular user list searches.
- Unsubscribe
- Debbarded by Fined threshold
- Archive
- Review
- Deceased – a user can be marched as Deceased in the system
- Private
Removing an abnormal status #
A status can be manually removed by resetting the status to ‘Normal’. If an abnormal status is set for the user, a flash indicator will show above the tab displays, and a button will additionally show to the left of the status selector, ![]() Clicking the button allows immediate clearance of the abnormal status and return to Normal.
Clicking the button allows immediate clearance of the abnormal status and return to Normal.
Date of birth #
This element is optional, and may be used in Aurora Updater functions to allow automated change of user type according to age – e.g. where a young adult reaches their 18th birthday, to automatically adjust their type to ‘Adult’. Date of birth is indexed and can be used in reports and statistics.
Note that if the date of birth is not recorded, an indicator ![]() is placed on the user details when displayed in Loans.
is placed on the user details when displayed in Loans.
Type #
All users must have a user ‘type’, and the types are defined by the library, using System Parameters / User Types. A user type may be changed using the selection options.
Extra status #
The extra status options are provided to allow the library to identify a specific user characteristic, as defined by the library, which can be used as a means to select and report on. It has no system significance. The codes are set in System parameters / User Codes / XST
Main Language #
This option allows recording of the primary language for the user – this may be used for statistics, or for provision of language materials:
Registration period #
The user’s registration period is detailed here. Note that a final date is not required, but if entered, then Aurora will enforce it, so that when the date is past the user will be inhibited from use of the library and the record will show an alarm clock flash indicator ![]() .
.
Renewing the registration #
When the user’s registration is expired, then the user is inhibited from loans, and an alarm clock flash indicator is shown. In addition, ![]() button will show to the left of the Registration period details, and the registration end date will be highlighted in red. [Note that this will not show if the user has an abnormal status].
button will show to the left of the Registration period details, and the registration end date will be highlighted in red. [Note that this will not show if the user has an abnormal status].
Clicking this button will ![]() re-register the user according to parameters set in the User Type parameters. If these are not set, then no action will be able to be taken.
re-register the user according to parameters set in the User Type parameters. If these are not set, then no action will be able to be taken.

Debar period and reason #
If a user is debarred, dates may be provided – allowing deferred or temporary debarral if required. Note that a ‘From’ date is required; if no ‘To’ date is given, the debarral is interpreted as permanent.
The library can define a number of reasons for the debarral action. Selection may be made from the available options, noting that some options are automatically applied by Aurora processes. When the debarral setting is saved, the user record will show a red ‘alarm’ flash indicator.
Removing the debarral #
To remove a debarral, the option ‘Not debarred’ must be selected, and the record saved. This may be performed manually using the combo selections, or by clicking the ![]() button to the left of the debarral settings:
button to the left of the debarral settings:
Membership acceptance #
Where the library requires a system record of the user’s acceptance of membership conditions, then a flash indicator is displayed above the tabs. This textbox is used to record the date of that acceptance – a ![]() button is placed to the left of the box, and simply clicking will record the current date:
button is placed to the left of the box, and simply clicking will record the current date:
Note that the flash indicator will change to indicate the acceptance.
Mobile number #
If the user is to be enabled to receive SMS messages, their mobile number must be stored here, and the checkbox ‘Accept SMS’ must also be ticked.
Email address #
If the user is to be enabled to receive email notices, their email address must be stored here, and the checkbox ‘Accept Email’ must also be ticked.
Checkboxes #
Six separate checkboxes are provided to allow the library to set the user up for special actions:
Accept SMS – Indicates that the user is enabled to receive SMS messages. Note that the user must have a mobile phone number to allow the record to be saved if this checkbox is selected.
Email notices – Indicates that the current user is enabled for email notices. Note that the user must have an email address to allow the record to be saved if this checkbox is selected.
Email loan docket – This setting applies if the workstation is set up as having a docket printer, e.g. for a Loans desk computer. The appearance of this option in the system is controlled by an Enterprise parameter, and in combination with a specific user enablement (provided by checking this box), this then allows details of loans to be emailed to the user’s address, rather than outputting to the docket printer itself.
Digital club – [Vision Australia specific] indicates the user’s membership of the club
Games approved – Indicates that the user has been approved as an Internet user and may use the library’s computer gaming facilities. This applies to under-18s only.
Internet approved – Indicates that the user has been approved as an Internet user and may use the library’s internet facilities.
Suspend notices #
Libraries can suspend notices until a certain date for individuals. There is a ‘suspend until’ date field, and a combo to select a reason code for the suspension. This code is held in the User_UserCodes parameter table, which is currently not accessible via interface – please contact AIT if additional reasons are to be set.
The reasons are presented on a combo, with ‘Not suspended’ set as the default:
When the suspension is applied, the date is highlighted in yellow and a flash is shown in the top bar: ![]()

User image #
If an image is to be associated with the user record then this is set on the Security tab, and this will be shown here.
Addresses Tab #
The Addresses tab holds information on all addresses recorded for a user, and allows Identification of the default address, using the Address focus check box
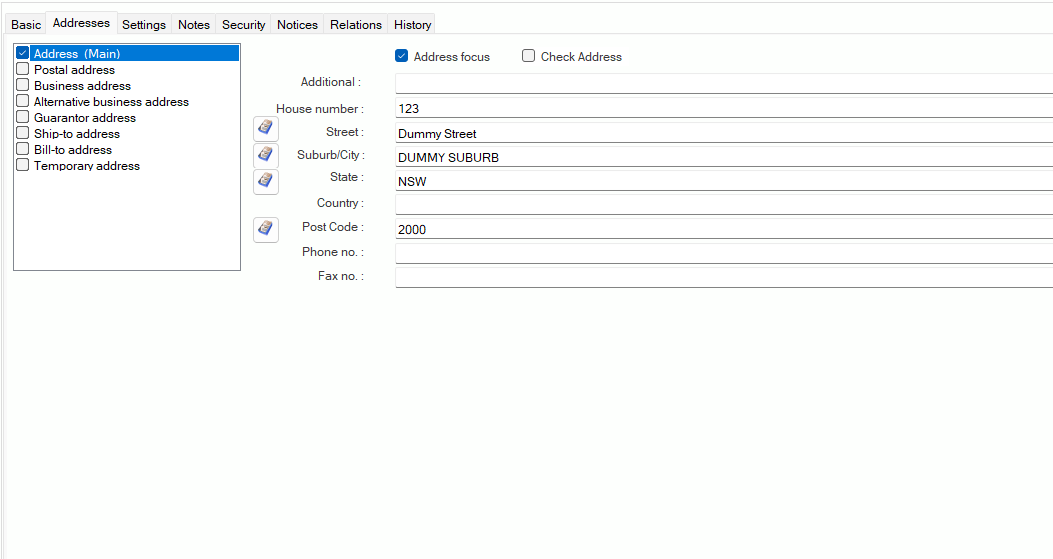
Address Types (Left Panel) #
A user record may have multiple addresses, and these can be added and saved as required. Note that options are provided for Ship-to and Bill-to addresses, but these should only apply to the library’s own record, for Acquisitions purposes.
The Address type panel selections allow the library to determine the current address for the user, i.e. the address to display on the user details Basic tab, and to be used for printed notices, with the use of the address focus check box when the specific Address type is also selected.
Note that checkboxes are provided for all defined address types in the library’s user parameter setup, not the actual address types associated with a user.
Address details #
For each address the following elements may be recorded:
- Additional element (e.g. Unit 1 in a numbered house)
- House number:
- Street
- Suburb/City
- State
- Country
- Postcode
- Phone no.
- Fax no.
Note that Mobile phone number and email address are not associated with a specific address and are entered on the Basic tab.
Address information check #
Aurora provides support for association of a postcode with an address. Each of the elements: Suburb/City, State, and Post Code is linked to the Post Code data. Each element has a small button associated: ![]() – clicking this button, or double clicking in the element will invoke the matches described below.
– clicking this button, or double clicking in the element will invoke the matches described below.
Suburb/City #
A string – either from the beginning of the suburb name, or anywhere in the description – can be entered in the appropriate textbox. Using the button then invokes all matching postcodes containing the string:
State #
By entering a state (using standard abbreviation) in the State textbox, and using the button, it is possible to see all listed suburbs for that state:
Post Code #
If a Post Code is entered, and the button is clicked, Aurora Desktop will display all suburb names associated with that code.
In all cases, a specific suburb can be selected from the displayed listing – and this automatically writes across Suburb/City, State, and Postcode from the defined parameters – overwriting any existing data but ensuring consistency in approach.

Printing a user label #
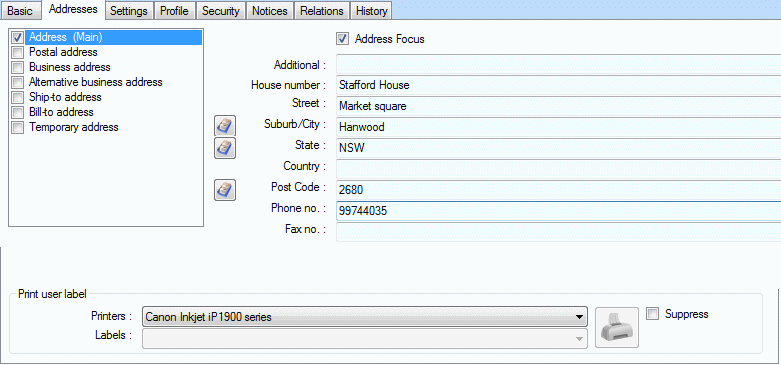
This function is primarily provided for Libraries for the Blind and allows an address label for the user to be printed.
Settings Tab #
The Settings tab contains details of the user in regard to their institution, their home library, and personal circumstance details.

Settings – (Left hand Panel) #
- User Institution – The User Institution control will normally only have one choice.
- Home Library – Users always have a Home Library (Branch) with which they are associated. Any reservations will be default be collected at the home library. The choices are determined according to pre-set library parameters.
- Reading level – Each user may be associated with a reading level – broadly equivalent to the bibliographic reading levels defined in MARC21. Reading levels are used in profile matching to ensure that titles selected are of the appropriate level for the reader. Choices are pre-set in the library’s parameters; additional codes may be set – please contact AIT if this may be required.
- Authorisation level – This setting determines the user’s authorisation level – that is the privilege they have to be able to see documents, and parts of documents through the Aurora system. The levels are pre-set in parameters and may be absent.
- Disability – A special encoding allows for a user’s specific disability to be recorded (primarily for the use of Libraries for the Blind).
- Residence – The residence field is designed to hold an indication of the user’s residence characteristics, and is primarily used in Libraries for the Blind, e.g. to denote if the user is in care, hospice, etc. It may however also be used to record user residency/non-residency for statistical purposes and many user reports can be pulled using this setting.
- Employment status – An employment status indicator may optionally be set for a user. There are settings which allow indication of work area (e.g. to identify non-residents who work in library areas)
Profile – (Right hand panel) #

The Profile tab allows the setting of specific preferences related to the quality of materials – e.g. to determine acceptability or otherwise of material.
These settings may be reflected in bibliographic details for works , and then used in Libraries for the Blind and Homebound operations.
All elements to do with the user’s preferences with regard to generic book types are recorded here (but note that SIC requirements are handled under Profile allocations), allowing you to record here if the user has a distinct preference FOR or AGAINST any of the prescribed settings. If they have no preference, leave the setting as ‘Don’t care’ and no action will be taken to match this preference in the automatic allocations processes
- sexual content – Options = ‘Don’t care’ – ‘Must Not be……’ – ‘Must be……’
- coarse language – Options = ‘Don’t care’ – ‘Must Not be……’ – ‘Must be……’
- short books – Options = ‘Don’t care’ – ‘Must Not be……’ – ‘Must be……’
- long books – Options = ‘Don’t care’ – ‘Must Not be……’ – ‘Must be……’
- male narrator (for audio) – Options = ‘Don’t care’ – ‘Must Not be……’ – ‘Must be……’
- female narrator (for audio) – Options = ‘Don’t care’ – ‘Must Not be……’ – ‘Must be……’
- violent content – Options = ‘Don’t care’ – ‘Must Not be……’ – ‘Must be……’
- accented narrator (for audio) – Options = ‘Don’t care’ – ‘Must Not be……’ – ‘Must be……’
- Synthetic speech – Options = ‘Don’t care’ – ‘Must Not be……’ – ‘Must be……’
Notes #
Security Tab #
The Security tab displays the user’s privacy settings, allows addition, change and deletion of a user’s PIN/password, can disable the user from tele messaging, and provides means for recording additional information on the user:

Privacy #
Six checkboxes are provided for determining the privacy elements for a user:
- No Restrictions – this checkbox clears the following three and removes any restrictions applied. This must be saved to have effect
- No Marketing information – this setting means that the user does not want any promotional material from the library it-self
- No information to other organisations – this sets a flag to identify that the user details must not be made available externally.
- No email reminders – allows the user to set it so that they do not receive reminders that items are about to become overdue.
- Hide date of birth on OPAC – this option is provided to allow the user to set their birthdate as hidden in OPAC, and so cannot be seen over their shoulder in a public environment, when that user is examining their own details.
- No Telemessage calls – this allows the library to set (manually) a flag to suspend telemessage calls, e.g. if following feedback from the telemessage service. If this is set, this will immediately show the flag as a flash above the tabs.
- No previous loans – this setting inhibits the recording of this specific user’s previous loan history. It does not prevent recording of transaction details for all loans and renewals.
- No Promotions & Offers – This is Similar to No Marketing Information and can be used by libraries in creating user lists based on privacy settings
Users with any of these settings can be listed using the User Lists ‘With’ function, where the Privacy settings checkbox is ticked.
Password/PIN #

A separate panel allows definition of a user’s password and PIN, used for access to personal secure information via Montage, it is also can be used for Access to 3rd party application like elibraries and access to PC management systems in the Library:
As part of implementation, choices will be made whether to use passwords or PINs for user access, or both.
- A password may be up to 12 characters long;
- a PIN can be up to 4 characters.
Any changes must be saved using the Save command button.
Command buttons #
The Password/PIN panel has two command buttons:
 Allows the save (note for changes to PIN or Password only)
-
 Allows the removal of any automatic OPAC block incurred after repeated failed login attempts. Before the unlock card, process is completed for an individual user the following prompt is shown:
Montage options allow a user to select their own password. This password can will be visible to library staff using the Security function as above if the enterprise parameter is not set to hide pin/passwords.
Added user information #
Below the Privacy and Password panels, a series of separate combo boxes provides facilities to add further information on the user. The combos are arranged, so that the first holds fields for selection; and the second will then display available subfields within that selected field. The final box is provided to allow data entry.
Note that all of the elements need to be saved using the main Save button on the User panel (not the Save button in the Password/PIN panel).
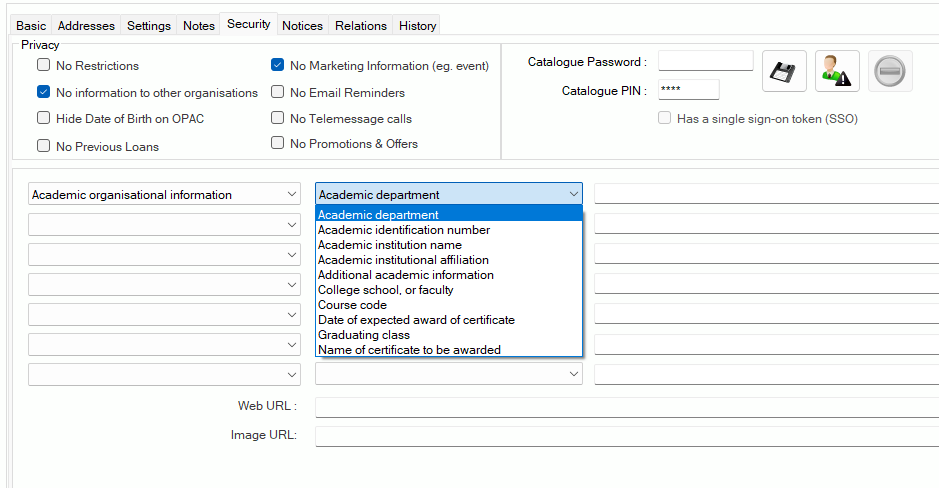
Web link #
This tab also allows entry of a web link, e.g. an image of the user. You can either paste a URL, or drag and drop a link from a Browser, and this will auto put the URL or path into this field. The image is then visible on the main tab.
There is a small pop-up menu associated with the web link entry and this has two options:
- View in browse window – this allows an immediate check of the URL or path and filename, showing the image as an overlay
- Paste – to paste in captured details of the path, or the URL
Notices Tab #
The Notices tab provides options to review the notices (Overdues and Reservation notices) that have been sent to the user, and provides some verification of the process, allowing action to be taken if there are errors.
The screen initially shows the communication methods, and panels for the detail of any notices that have been produced:

Communication methods #
This panel will display (where appropriate) the recorded for the user. Note that if the element does not match the expected format (e.g. correct number of digits for a phone number, or correct formulation of an email address) then the offending element will be highlighted in red.
- Mobile phone no.
- Email address
- Residential phone no.
Command button #
 A single command button is provided: Show notices
When this is clicked, any notices that have been sent to this user will be listed. Both types of notices will be shown.
The notice details are displayed in two panels:
- Notice documents – this shows the actual notice itself
- Notice lines – this shows the specific detail contained in the notice
When a notice is selected in Notice documents, it will be flagged with a Notice symbol ![]() , and this symbol will also be shown in the Notice lines panel, indicating the items referred to in the notice.
, and this symbol will also be shown in the Notice lines panel, indicating the items referred to in the notice.
Overdue notices #

If the user has been sent overdues, they will be listed showing the date sent and the level of the notice. The Notice lines details may often be for multiple titles.
Reservation notices #

If the user has been sent reservation notices, these will be listed, showing the date sent and the method of delivery. Usually there will only be one item associated in Notice lines.
Viewing the actual notice #
The Notices tab gives the brief details of the notice – showing that it was sent and what it covers. Your library has options to record the full notice that has been sent: there are three Enterprise parameters: UserCallNotices, UserCallNoticesEmail and UserCallNoticesPost, and if these are set, then the actual notice can be seen in the User Calls display.
Relations #
The Relations tab allows the recording of any family or custodial relationship between users. Recording a family relationship provides for a dynamic linking of the user records in the family, allowing easy movement between family members, listing of all current items on loan and therefore renewal in one pass (subject to conditions), listing of all previous loans for the family group, and the facility to update the home addresses of all linked users, when they change address within the library area. Facilities are also provided to allow recording of more formal arrangements, such as guardian.

Guardian Dropdown panels #
The Guardian panel presents an array of drop-down menus for the definition of guardian details.
- The first column presents the ‘field’ for selection of the responsible relationship
Note that only the one option ‘Individual relationships (Responsibility)’ is currently available. Further types of relationship, e.g. nursery school leader, training course coordinator, may be added if required. Please advise AIT of any such requirement. - The second column of combos presents the subfields within the relationship definition:
To define the relationship details (in this case a guardian), select both field and subfield details, with repeats as necessary, and enter the specific information for the guardian:
Please note that this is not dynamic information and will not show in the same way as a family arrangement. If the guardian is to receive the notices for the user, please enter the focused address for the nominated guardian in the Addresses tab (it would be advisable to enter the guardian’s name as ‘Additional’)
Family relationship tree #
You can connect different users together through the relationship tree.

Searching for user #
- Type of search dropdown – Options include, User Barcode, User ID, Name Browse, Name search, Address Search
- Input search box – input a search value in the empty box
- Command buttons The
 Invoke button runs and the
  clear button removed the value in the search box.
The search results display in the results box below the search input.
Creating relationship #
- Select a user from the Search results box
- Select The relationship that user has to the user identified in user details.
- Click the
 Blue arrow to add the relationship.
Deleting a Relationship. #
- Select the name from the relationship tree you wish to delete (note this cannot be the user selected in user details)
- click the
 Delete the relationship button.
 - Accept the Pop Up question confirming the deleting the relationship
History
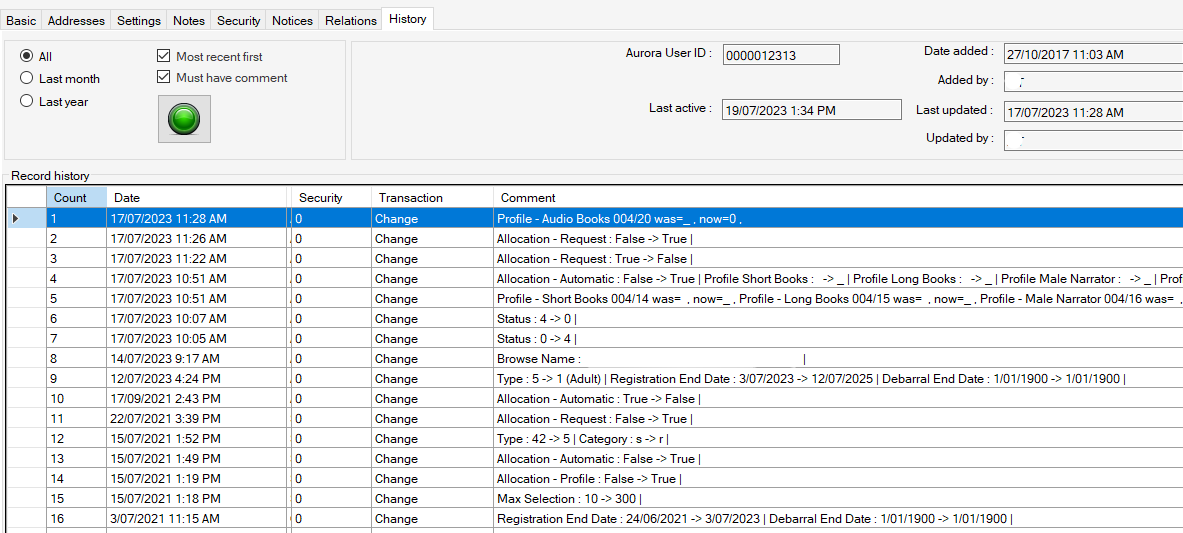
The history tab allows the viewing of specific changes related to the user details.
To View the History of the changes
- Select one of the three date ranges with the radio buttons
- Select or deselect the checkboxes for ordering the results to most recent first and show only results that have comments.
 click the Green button to run the search and show the history.

