Local settings  #
#
Aurora Desktop includes this Local Settings section, which provides both information in support of system diagnostics, and also allows a measure of local customisation for the workstation.
Tabs #
There are four separate tabs:
- Connection
- General
- Docket printing
- Server files
- Service settings
- Mailing templates
#
Three separate command buttons are provided – common for each tab [Note that there additional buttons available when Server Files is selected]:
 upload change to AIT
 Saves any changes applied
 Exits without saving
Connection #
The Connection tab presents a number of important elements in relation to the specific implementation. All of this information is fixed and cannot be updated here.
The information is presented so:

Right panel #
Licences – The section on the right details licence arrangements for the institution:
- Number of licenced users. This is the number of licences owned by the institution.
- Number of workstations.
Note that if the number of workstations exceeds the number of licences, Desktop will inhibit Circulation actions.
Numbers of workstations by category:
- Staff
- Public
- Kiosk
- Other
Infrastructure – This section:
- Displays the currently installed AWS version id. This should be quoted in support calls.
- Displays the current version id for Desktop – this also should be quoted in support calls.
- Shows the external institution id
Database schema – This indicates the current database schema version and may be requested by AIT.
Offline exceptions – Each day, on start-up, the local workstation can pull down details of debarred users and reservations, for use on Offline operation. This section provides tallies of the detail.
- Debarred users
- Reserves trapped
- Reserves untrapped
- Title Level
- Item level
Directories and Flies Used #
This section will define the local paths used for folders utilised in Desktop operations. This will always be in a local area on the workstation, according to the current user logon, and in folders headed by the name (code) of the external institution id:
- General work Area
- User / Institution (docket files)
- XML Parameters Files
- Offline Transactions
- Work area special folder
- Environment special folder
- application startup folder
Work subfolder - orders subfolder
- boxes subfolder
- loader subfolder
- finance subfolder
- collection recovery subfolder
Files #
- workstation INI file location
- Desktop ini file location
- Predefined fields cataloguing location
- Predefined fields Digital Cat location
- Docket print Setting Location
Web Links Used #
- AWS Live url
- AWS test url
- AWS z3950 url
- Internet check site – Default to google
- Web template url
General #
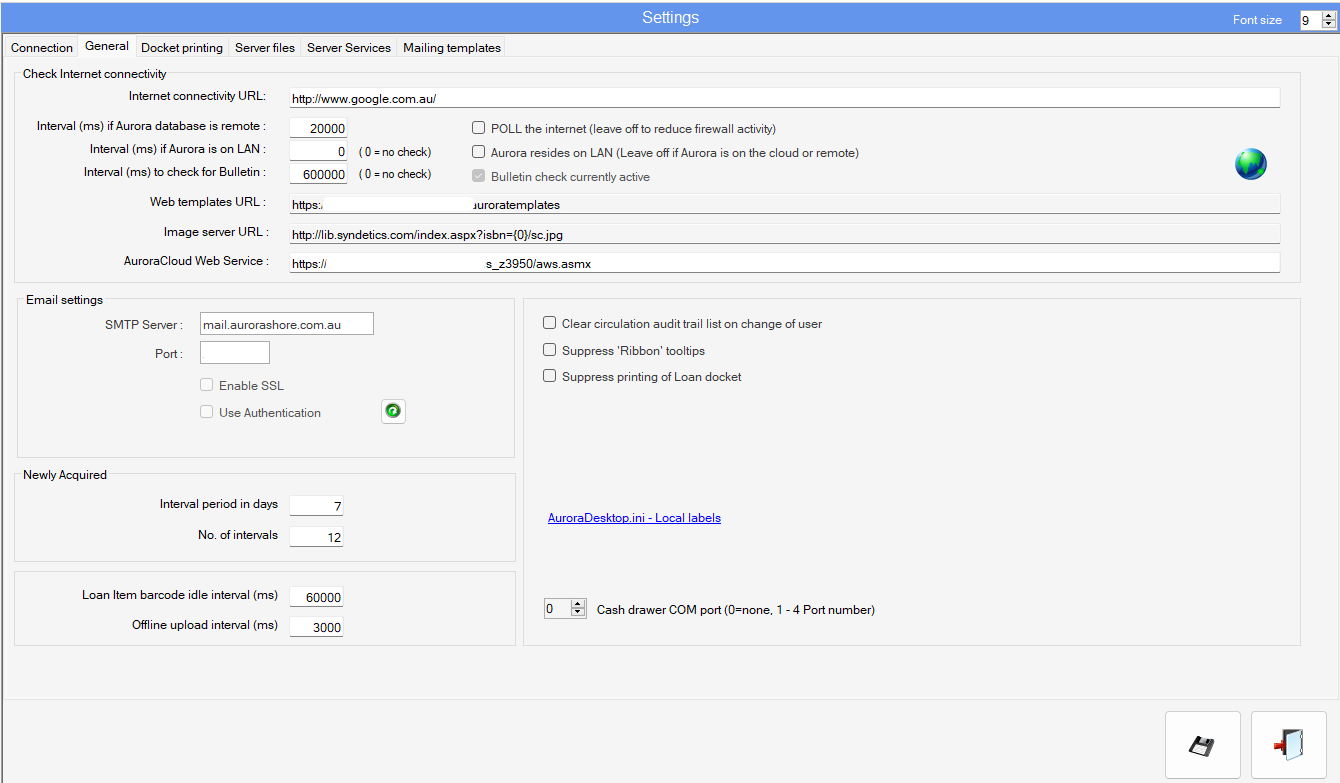
The General tab provides fundamental settings for Desktop operation, as described below.

Check Internet connectivity #
This panel defines:
An Internet connectivity URL to connect to, to confirm that Internet is connecting correctly. A constant Net presence such as Google is recommended.
Within this check, there are the following additional aspects:
The interval between checks to the defined URL (where the database is ‘remote’ [OR] the interval between checks, where Aurora is on a LAN – but note that
- There is a checkbox to indicate a LAN presence and so reduce the need for high frequency of check. Indeed, an option of ‘0’ is available, allowing the check to be suppressed.
- Bulletin check currently active checkbox- for internal library information. Development in progress.
and three further settings:
Web templates URL – This setting defines the path for the Web templates used in Notices. The path is formally defined – for each specific workstation (if required) – in the Workstation ini file. In a hosted implementation, this path should be similar to – https://www.SERVERNAME.com.au/auroratemplates/<INSTID>/ – where the server name may vary and the InstID reflects your own library’s ID
Image server URL – This setting defines the URL for the cover images service for use in enquiries/Montage. AIT will advise on the correct setting for this.
AuroraCloud Web Service – Where your library subscribes to the Cloud service for Z39.50, this setting gives the AWS URL required. This service allows free pass-through of network traffic without local network constraints of having to permit ports to breach council firewalls.
Email settings #
The Email settings panel reads the default SMTP server setting from the Enterprise parameter, and allows specific port value to be set here, as well as controls for SSL and Authentication. If in any doubt about the settings that should be in use, please contact your local network administrator.
Newly acquired #
This panel defines the number of intervals to be made available for New Books display, and the number of days per interval. This then is reflected in Montage too.
Interval settings #
Here, the interval between item barcode entry – in Loans – is defined. If the time is exceeded, and the same user remains selected, the operator is asked first to confirm that this is still the correct user. The interval before offline upload is also defined here.
Both intervals are defined in milliseconds.
Workstation settings #
A number of checkboxes are placed on this panel, each with specific function in Desktop:
- Clear circulation audit trail list on change of user – When this box is ticked, the audit trail display of the immediately previous transactions for the current user is cleared when a new user record is accessed. This is useful in circumstances where the Loans screen may be visible to the public, and so show other users what has been borrowed and by whom. This does not affect the overall recording of transaction history but is a display issue only.
- Suppress ‘ribbon’ tooltips – This is a specific function which may be advised to be used by AIT. It is provided specifically to counter an unresolved problem with some HP workstations, which caused Desktop to crash while performing a return transaction simultaneously with the display of a tooltip.
- Suppress printing of loan docket – This setting determines the state of the checkbox ‘ Suppress printing loan docket’ in the Loans screen. If the suppression is to be the default, tick this box and the corresponding loan checkbox will be fixed as ticked and therefore suppress. If left unticked here, the Loan checkbox is under local dynamic control and can be switched on and off as required.
AuroraDesktop.ini – Local labels #
This hyperlink opens the AuroraDesktop.ini file, which defines the local Aurora Work folder for holding temporary files.
Cash draw number box #
These control the Port: if a cash drawer is in use, the COM port is specified here.
Docket Printing #
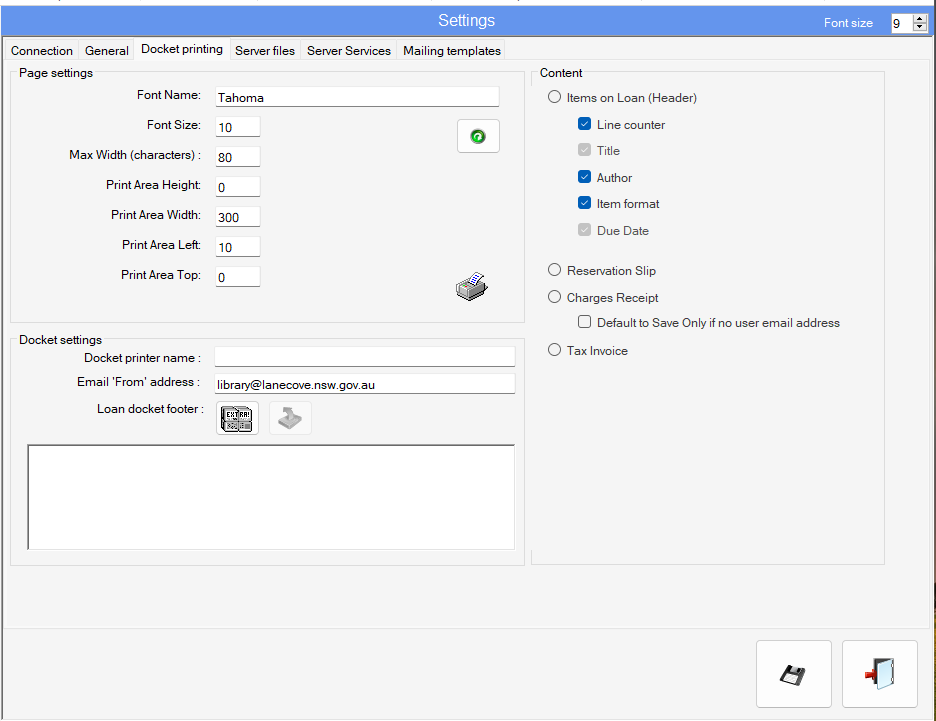
The Docket Printing tab provides a variety of options for viewing and changing docket printer settings. Making any changes should be checked thoroughly, particularly in respect of actual print output.

Page settings #
This panel allows basic settings for the font and font size – which may depend on the printer capability and the actual delivery. It also defines the actual print area, to ensure that data does not bleed outside of the printer page, and also does not waste excessive amount of paper.
Docket settings #
- Docket printer name –
- Emails ‘From’ – While not strictly a docket printer setting, the libraries ‘From’ email setting is given here. If this is not present, then no adhoc emails can be sent.
#
A footer may optionally be added to the loan docket and can be viewed here. It may not be edited here – the content is pulled down from the central AWS folder, where the file is called: Docket_LoansFooter_<INSTID>.txt
Content #
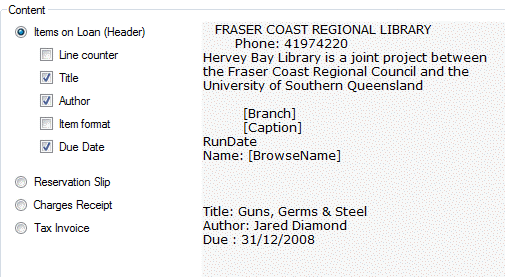
The Content panel allows the library to perform some simple experimentation with output content, to determine the best output options. * This is for experimentation only – this function does not save the required template details – these need to be edited individually. *
Four docket outputs are provided for this:
- Items on Loan
- Line counter
- title
- Author
- Item Format
- Due date
- Reservation slip
- Charges receipt
- Default to Save Only if no user email address
- Tax invoice
so with the default Tahoma 10 point and all elements showing, this appears so:

and adjusted with removal of line counter and item format, and set in Verdana 9 point, this shows differently:

Reservation slip template #
Libraries where workstations are attached to Docket Printers can set up Reservation Slip templates, to allow a slip to be produced when a reserved item is trapped at the collection location.
The following reserved keywords can be used on the Reservation Slip
| Keyword | Comment |
|---|---|
| RunDate | The date of the slip production |
| [InstitutionName] | Library formal name |
| [WorkstationHomeDesc] | Branch name |
| [ExpiryDate] | When the reservation collection period expires |
| [CollectAt] | Branch to collect the reserve at |
| [ReserverNameFull] | The user’s name in full |
| [ReserverNameLast] | The user’s last name |
| [ReserverNameGiven] | The user’s first forename |
| [ReserverNameInitial1] | The user’s first initial |
| [ReserverNameMiddle] | The user’s middle name |
| [ReserverNameAlias] | The user’s alias |
| [Reserver] | The user’s name |
| [USR_UID] | The user’s Aurora User id |
| [USR_Barcode] | The user’s barcode |
| [UDR_200$k] | The user’s Phone number |
| [USR_Mobile] | The user’s mobile phone number |
| [UDR_200$m] | The user’s email address |
| [Title] | The title of the reserved work |
| [ItemCallno] | The reserved work’s call number |
| [Issue] | If a magazine, the specific issue being reserved |
| [ItemBarcode] | The item’s barcode |
| [RSV_Date] | Date when reserved |
| [UserType] | The user’s user type |
| [ItemFormat] | The item’s item format |
| [Comment] | Comment by staff |
Formatting can be applied as required, and all fields are optional.
Example template:
              RunDate
       North Sydney Council
       [WorkstationHomeDesc]

Pickup Expiry: [ExpiryDate]
Member name  : [Reserver]
Member email : [UDR_200$m]


Title        : [Title]
Item:        : [ItemBarcode]
Server files #
This tab allows for file transfer between the server and the local workstation – particularly in respect of hosted systems.
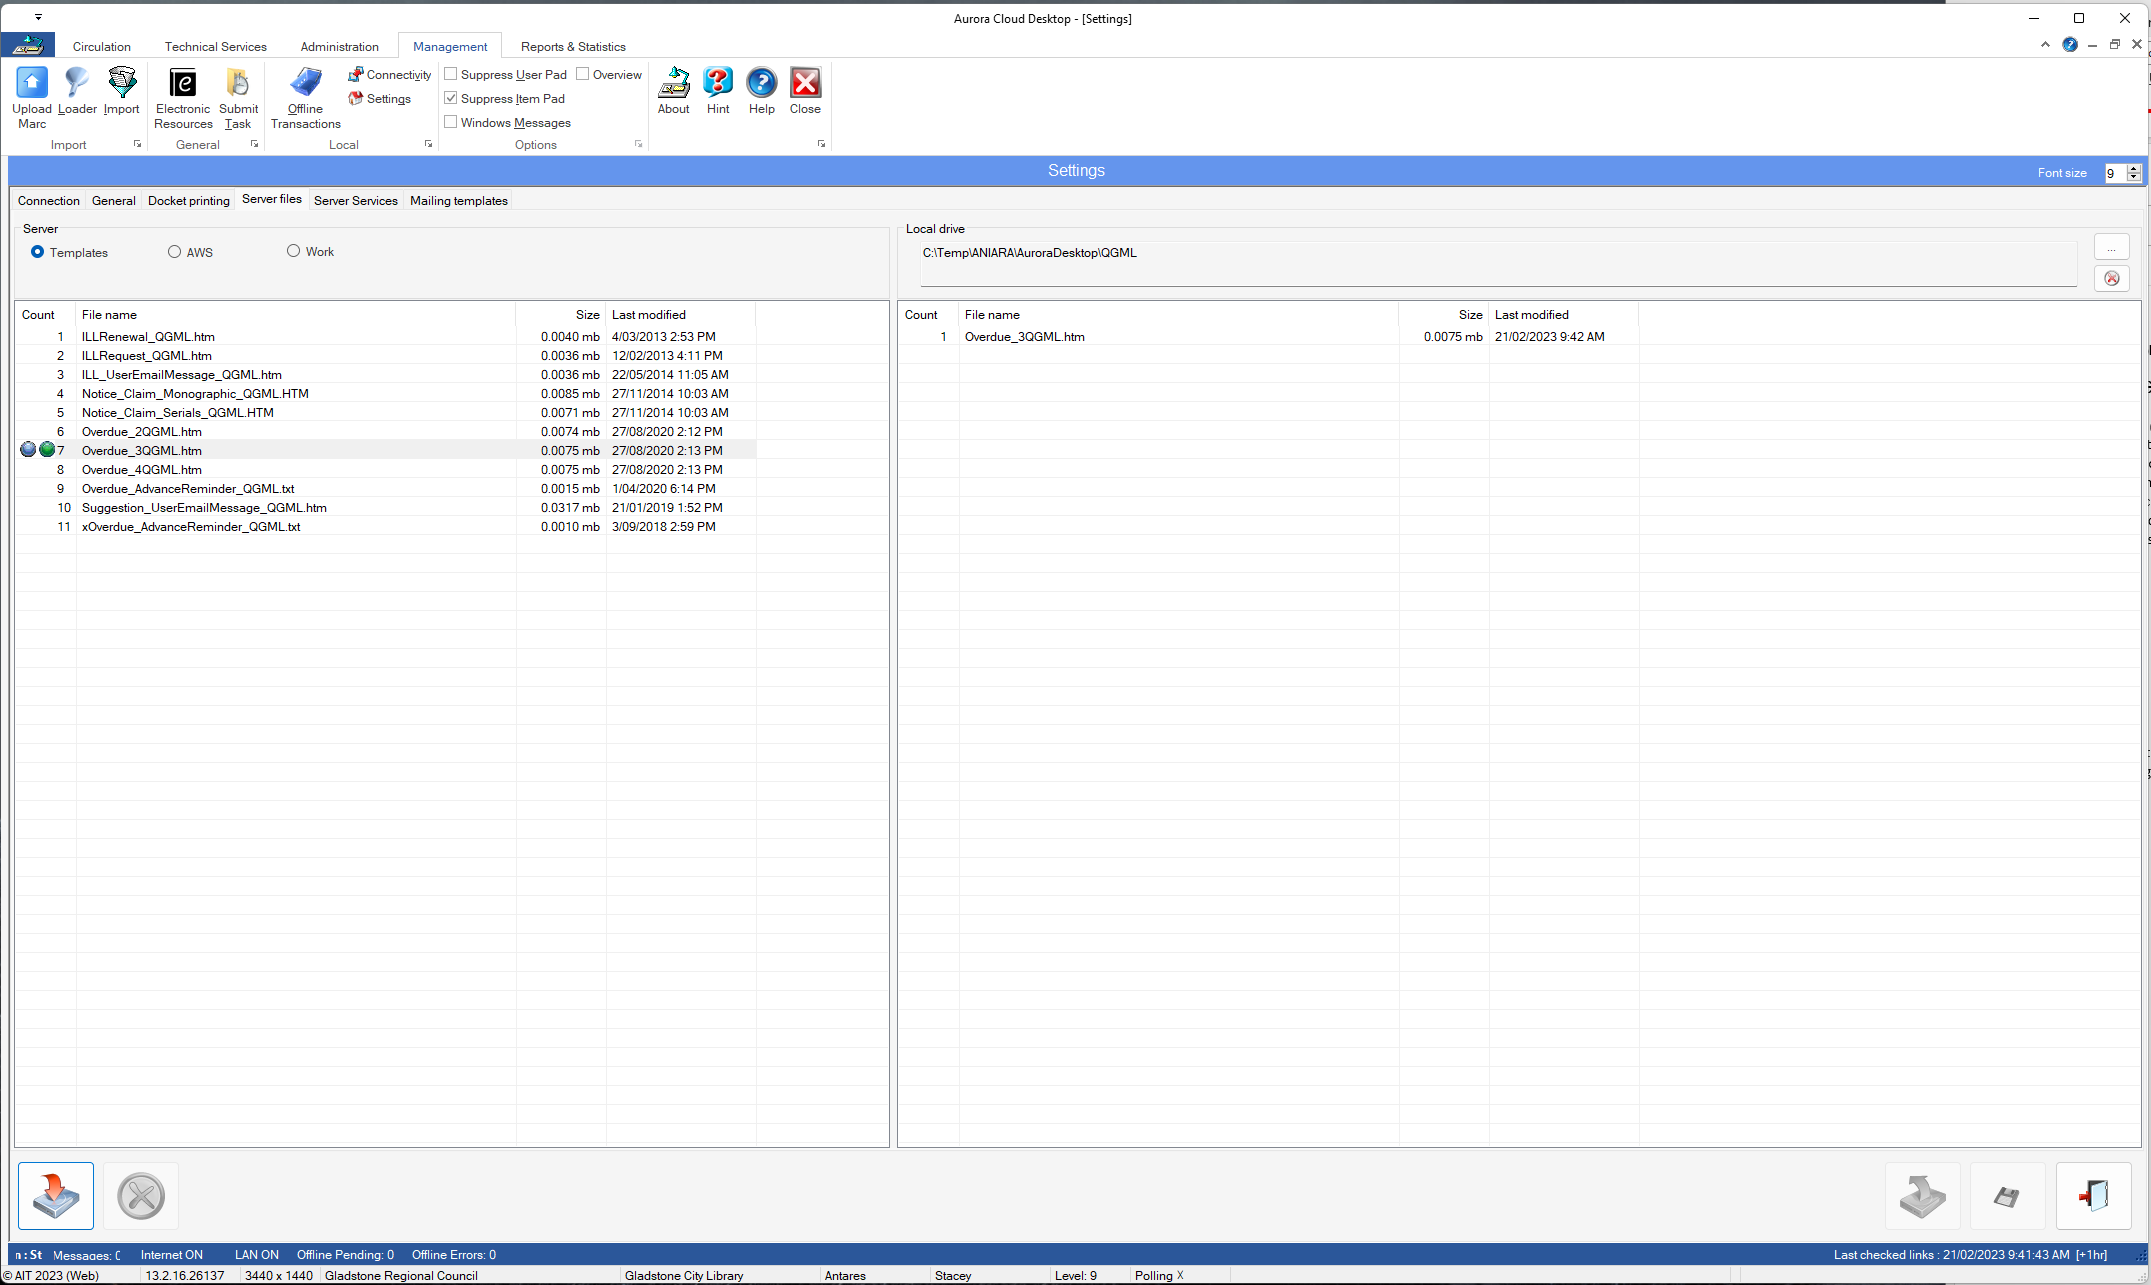
The screen initially presents two panels – the left showing a server view, and the right panel a view of the local drive:

Server #
Specific groups of files may be viewed by selecting the appropriate radio button:
- Templates – this includes all html communication templates, e.g. for overdue notices, reservation notices, etc.
- AWS – this includes all docket printer templates.
- Work – this includes temporary files in the server’s work folder.
Files #

Selection of the radio button allows the display of the matching files. For hosted systems, please note that a check is made of the workstation’s institution credentials, and only files matching that id are able to be viewed/downloaded.
#
A pop-up menu is available on each file presented, with one single option: ‘Download’. At the same time, selection of a file enables a Download button below the file listing. Multiple files may be selected for concurrent download – a blue dot will show current selections.
When a file has been downloaded, a green dot will show this.
Local drive #
The Local drive panel shows the currently selected path for both downloading target and upload source:

The default path is defined in the AuroraDesktop.ini file which may be accessed on the General tab. For purposes of locating a file to upload, a Windows Explorer option is provided with […] button to the right, and there is also a delete button here to clear Work files (to prevent bloat and excessive space consumption).
#
Clicking on a file provides a small pop-up menu with these options:
- Open – opens the file using the default program, e.g. Notepad, Word.
- Upload – this option allows the selected file to be uploaded to the server. When the file is selected, the upload button below the listing is enabled. Multiple files can be selected for simultaneous upload.
- Delete – allows the deletion of the selected file(s).
Editing Notice Templates #
Navigate to – Management Tab – Setting – Server files tab.
Downloading a Template
- Ensure Templates is selected. (Top left side of the screen)
- Select the template you wish to edit by clicking on it from the left-hand panel and it will be highlighted.
- Click ‘download selected files off the server button.’ Or right click ‘download’
- The file will appear on the right-hand panel and will be saved in the file designated at the top of the screen under local drive.

Settings – Server files – Templates
Editing a Template
- To edit the file either right click and open the file and it will open in your default file type to edit and save changes you wish.
NOTE If you would prefer to edit in another program navigate to the file location and open the file with another program e.g. notepad++ and save.
Uploading a template
- To upload the changes to the sever select the file on the right-hand panel and either right click upload or click the ‘upload selected files to the server’ button at the bottom.
The updated template will be uploaded to the server.
Server Services #
Lists all the server services running for the instance and their current status. Useful for determining, possible causes of why services such as sip2 connections to 3rd party products are running e.g. freegal.
From this screen you can start, pause, stop or refresh a service.

