Loan  #
#
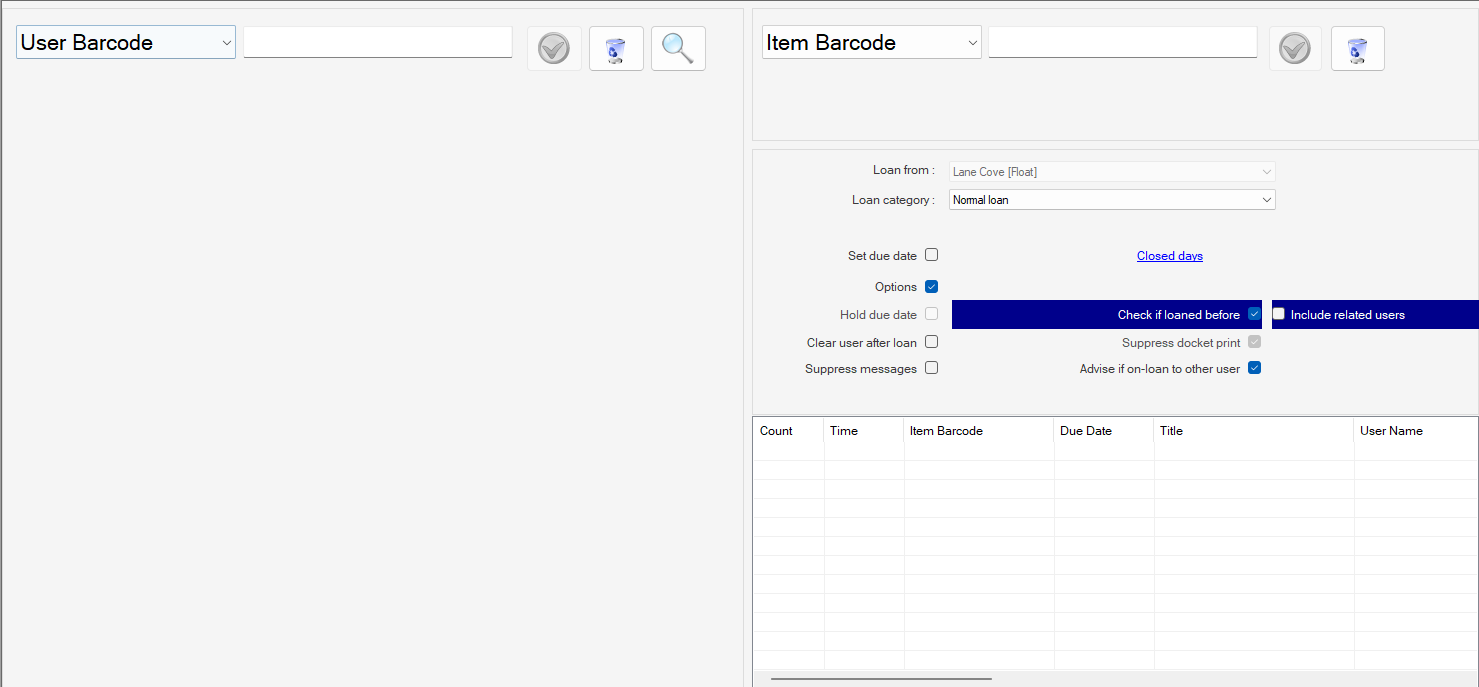
The Loan facility may be entered using the Loan button on the Circulation ribbon bar, clicking the keyboard shortcut: Function key F2, or taking the option ‘I want to Loan it to someone’ Link from the Workflow Tasks Item node, and displays a full screen for recording the loan details:
User ID #
All loans logically start with the input of user details. If the user has already been identified by a browse or search or is shown in User Details or User Links displays, then clicking the Loan icon will automatically select that user.
Control buttons #
The following control buttons are provided:
 This ‘onscreen return’ allows the simulation of a return key by mouse action.
 The wastepaper bin icon is used to clear the user barcode or id text box. Occasionally, this box may not be selectable by mouse, but clicking this icon will allow clearance, in readiness for entry of a new user id.
 This option opens the Quick Find panel
User detail display #
When a user barcode is read into the User panel, or the details are keyed in, or the user is selected from a Quick Find or Search operation, then Aurora will respond with the user details displayed in this panel:
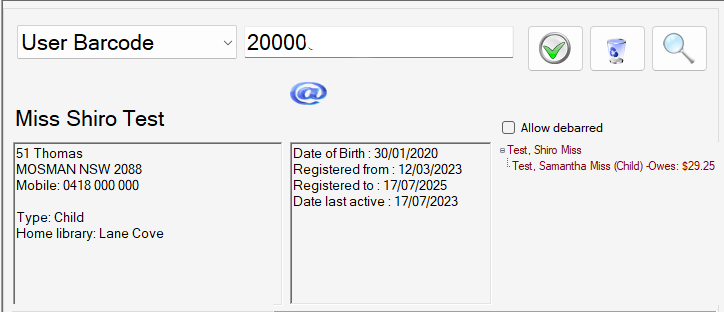
User information here provided in a fixed display format to support fast operations. The display information is divided into two (and possibly three) separate panels:
Address detail – User detail display #
The left-hand panel displays the user’s registered and focused address and user type. If the user has additional elements recorded that are involved in communication – mobile phone number, home phone, and email address – then these too are displayed:
Status information – User detail display #
The middle panel shows information on the status of the user’s record, with date of birth (if noted), registration date information, and if appropriate, debarral state:
Relationship detail – User detail display #
Optionally, if the user has relationships recorded, then a third panel will show the relationship tree:
This tree is active and dynamic – you can select another related user and click on that user to select that user in place of the current one for loans purposes.
User exceptions #
A number of exceptions can be raised in validating the user, e.g. registration expiry and debarral – these are described and detailed below An exception may be supported by a user flash:
User not on file #
If the barcode or other key entered does not match system records, then Aurora will let the operator know that the user is not on file, repeating the key that was input
Note that the input box will also show red to indicate that the transaction was not completed:
Note that if the barcode has been keyed, and an error has crept in, the input key may simply be edited and re-entered.
Tip: check that another operator has not changed the key type, e.g., switched to an enquiry via Aurora User ID.
Registration expiry #
If the user’s registration has expired, a flash icon [alarm clock] will be displayed, and a banner ‘Expired’ is shown at the top of the panel. The item barcode input box is not accessible until the exception is addressed.
The registration can easily be extended, by clicking the User Details icon and applying automatic reregistration. See User Details
Abnormal status #
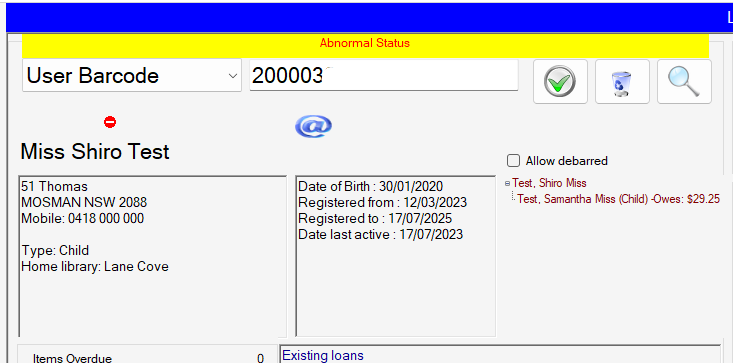
If the user has an abnormal status, then a flash icon [no entry sign] will be displayed, and a banner will display on the top of the screen. The user will then be inhibited from borrowing while the status persists. The item barcode input box is not accessible until the exception is addressed.
The status can be checked and the user easily returned to normal status, by clicking the User Details icon and restoring normal status.
Debarral #
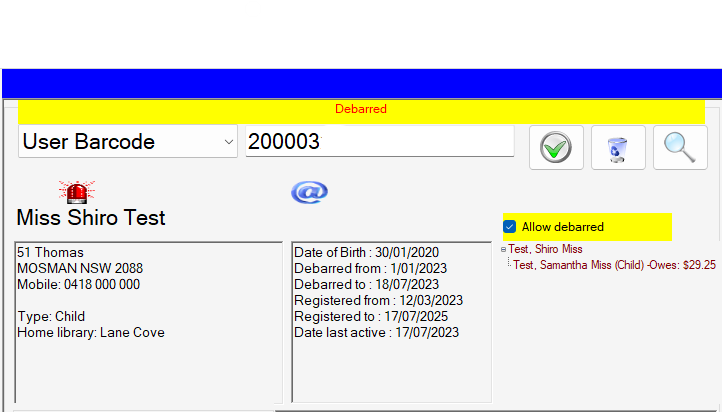
Note that Debarral is a severe form of abnormal status. The item barcode input box is not accessible until the exception is addressed.
Debarral can be checked and if appropriate, the debarral can easily be removed, by clicking the User Details icon and removing the debarral.
Override option #
Your library may opt to set an Enterprise parameter, AllowLoan_DebarredUser. If this is present and true, then an additional checkbox ‘Allow debarred user’ will be shown. if checked, the item barcode input box is unlocked.

User flashes #
A number of flash indicators may be found on the user panel above the user details, each denoting a specific attribute which may have value in the loans process.
| Flash | Description | Further information |
| Indicates the user’s registration has expired. | User Exceptions | |
| Indicates the user is debarred. | User Exceptions | |
| Indicates the user has an abnormal status condition | User Exceptions | |
| indicates that the user’s date of birth has not been recorded | Date of birth | |
| indicates that the user has calls recorded | User calls | |
| indicates that the user is enabled for email messages; equally absence indicates not enabled. | User Notices | |
| indicates that the user is enabled for SMS messaging; equally absence indicates not enabled. | User Notices / SMS | |
| indicates that the user is enabled for Internet access – they may book PCs in the library | Internet access | |
User Summary #
Aurora also provides a User Summary, and this shows any user activity as counts and tallies:
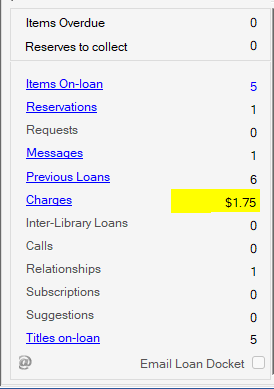
The summary provides tallies of:
- Items on-loan
- Reservations
- Requests (for homebound users and Libraries for the Blind)
- Messages
- Previous Loans
- Charges
- Inter-Library Loans
- Calls
- Relationships
- Subscriptions
- Items overdue
- Reserves ready to collect now
The Summary is explained and detailed on the user links page
Loans Snapshot (for Consortia) #
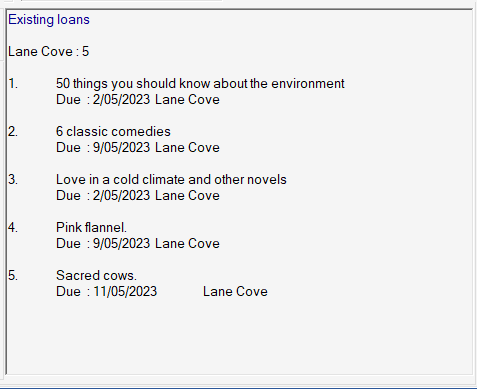
Where the system is a Consortium system, a panel is used to the right of the summary:
This will give a total of items borrowed from each location used by the borrower, and will also indicate when items are overdue, by highlighting the due date in red.
Email loan docket #
At the foot of the summary, a checkbox allows a user setting for emailing of loan dockets to be applied. The appearance of the checkbox is optional and controlled by an administrative parameter – this must be set to allow the option to be seen. The checkbox has three separate appearance states:
 – the email symbol is grey, text is blue, and the checkbox cannot be selected. This indicates that the user does not have active email, and so the option cannot apply.
 – the email symbol is blue, text is black. The checkbox can be selected.
 – here the checkbox is selected, and as well as the tick, the label is now highlighted in a green background.
When selected, normal docket printer output may be sent to the borrower by email rather than printed.
Item number #
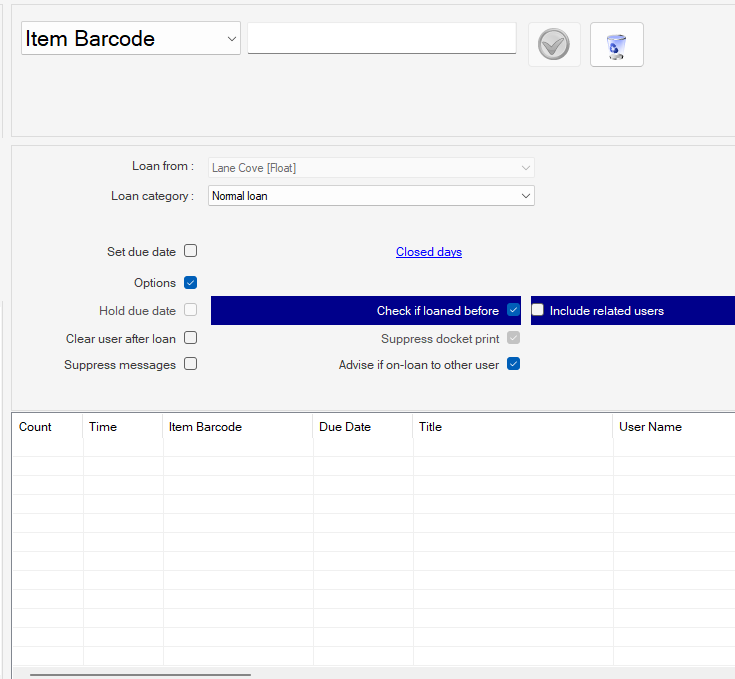
The relevant item number can be entered – by keyboard or reader – in the right-hand panel:
Note: if you cannot select the box to input the item number, check the user’s status – if the user is expired or debarred, then they are not able to borrow, and the item input box is locked
Pre-loan checkboxes #
A number of check boxes are available to control aspects of the loan, and these should be set before processing the loan:
- Set Due Date
- Hold Due Date
- Check if loaned before + Include Related User
- Suppress Docket Print
- Advise if on-loan to other user
- Suppress item messages
- Clear user after loan
Set Due Date + Hold Due Date #
Normally loans will be determined by the central parameter structures: however, when manually determined loan periods are required,
the operator must first set the due date by use of the checkbox ‘Set due date’.
Any future date may be selected and will be reflected in the due date box. Note that there is a further checkbox: ‘Hold due date’ – where this is ticked, then ALL loans will receive this override, e.g. to allow a skip over school holidays, or to set loan periods on a mobile library, where there is a need to vary from regular visits to a stop. When the due date is set manually a visual flag is also shown at the bottom of the screen:
When the Set Due Date checkbox is ticked, the operator may set the loan period by typing in the due date directly or by selecting a date from the calendar. Clicking the small icon to the right of the due date, a full calendar will open up for selection of the appropriate date:
Note that today’s date is always given – and highlighted in the display.
Check if loaned before #
If this is selected, then if the reader has previously borrowed the title, then the operator is alerted with a pop up question notifying the work has been previously lent and asking to proceed
- NOTE* that this checkbox setting is persistent – that is if set on (or off) for the workstation, then the setting will remain that way, including through program closure and restart
Suppress Loan Docket #
This checkbox is automatically selected if the workstation is not defined as having a docket printer. If a printer is attached and defined for the workstation, the checkbox is available for manual selection. Note that if a workstation is attached and defined, but this checkbox is ticked, and not accessible for unticking, then this may indicate a problem in accessing the Docket Printer templates – in this case, after local checks, please contact AIT for assistance.
Advise if on-loan to other user #
With this selected, if the item is recorded as already on loan to another user, the operator is alerted, and can choose to deny the loan. Note that if allowed, then the item is first returned from the current user, and if fines have accumulated, then these are applied.
- NOTE* that this checkbox setting is persistent – that is if set on (or off) for the workstation, then the setting will remain that way, including through program closure and restart.
Suppress item messages + Clear user after loan #
These two options are specifically provided for RFID implementations. Both checkboxes are highlighted if selected:
and if selected will retain that setting for the workstation so that the setting will persist following application close and restart. The first checkbox ensures that the RFID loans process is not interrupted by item specific messages; the second ensures that the user detail selected is cleared after each loan, preventing possibility of retention, and therefore loan to an incorrect user. These settings should not be used in normal everyday workstation practice.
Bulk loan #
Bulk loan of items may be possible, e.g. where the items have been added to an ILL box. See box of items for full detail.
Barcode entry #
When the barcode is read in it too is validated, both in terms of existence in Aurora, and then to check parameters to determine whether the combination of user and item is allowed.
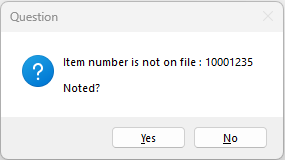
If the item number is not recognised, Aurora will issue a warning and the number input box will turn red – to indicate the error
When the number is ‘in process’ – that is details have been added but the Enter key has not been pressed – the box is white; when a transaction is successful, the box shows green.
Additional checks will then be carried out to determine the user’s entitlements, before Aurora will confirm the loan, and present a calculated due date.
Docket printer #
For details of Docket printer controls, please see the Docket printing page
Barcode truncation #
Where a library uses an extended barcode format, e.g. the format is 3474nnnnnnnnnn, and nnnnnnnnnn represents the running number, following the constant 3474, then entry of just the running number is allowed (subject to an Enterprise parameter setting). So entry of 54643 will automatically translate this to 34740000054643.
Note that if you have the truncation facility in use, then all item numbers will be subjected to the padding to fill the number out; if you are addressing a barcode from a different range, e.g. an interlibrary loan item, where you want to use the supplying library’s barcode, then Options on the ‘Other’ ribbon bar allow padding to be turned off – separately for user and item barcodes.
Loan exceptions #
A number of exceptions can arise in the loan process –
Where Aurora finds an error, this is immediately reported. There are two separate ways of error notification, identified by a severity determined by your library. In the case of a warning that is not serious, Aurora may simply be asked to provide a warning or a question, which the operator must simply answer to proceed:
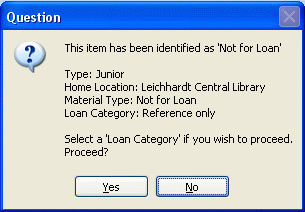
Item cannot be loaned #
It is quite possible that a borrower wishes to borrow an item which is identified as ‘Not for Loan’ in the library. In such a circumstance, Aurora will indicate that the item cannot be loaned; it is probable that the loan category that is set will need to be changed temporarily to allow the loan, and so the message invites the operator to select a Loan Category from the category combo to proceed.
If the operator says Yes, then the Category combo menu is enlivened, and the operator selects the required option. The loan must then be reinitiated by clicking the on-screen return, and the details will be stored, and the loan registered.
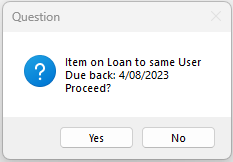
Item on loan to the same user #
If the operator repeats a loan, Aurora will simply report the detail and the loan can proceed, or be stopped, as the operator requires:

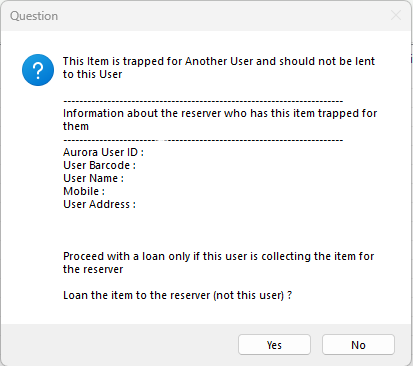
Item reserved for another user #
If the item being loaned has been trapped for another user, then an attempt to loan will be queried with a question: ‘This item is trapped for another user and should not be lent to this user. Proceed?’ The default here is No, allowing the operator to retrieve the item for its reserved user; however, if required, the loan may be allowed.
Loan success and completion #
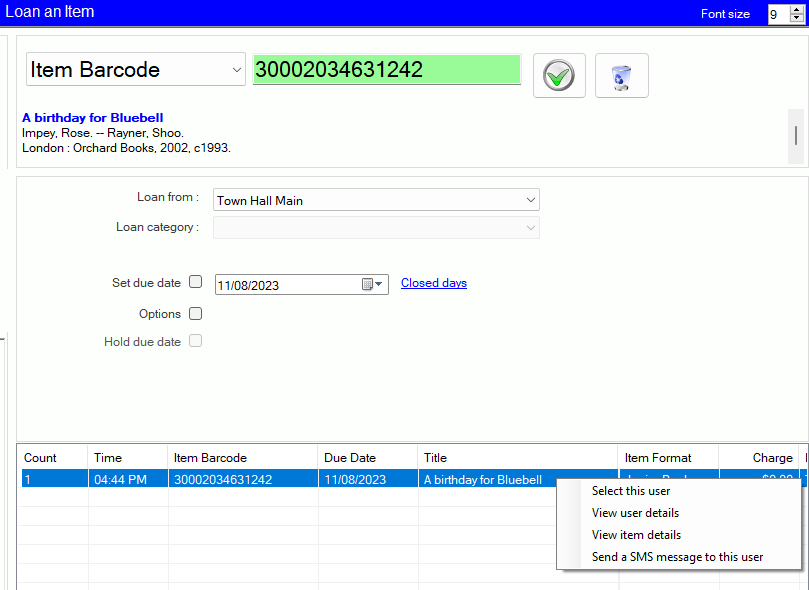
As indicated above, when a transaction is successfully completed, the barcode input box shows green and transaction details are written to the transaction log.
Transaction record #
A panel at the foot of the screen records the details of each loan transaction as it is completed, and so provides a means of reviewing the activity at the workstation, recording both borrower name and work title. As part of Aurora’s standard audit recording, details of all transactions are retained to allow statistical analysis of activity, whether loans, accounts, or simply overall business; however, no details are available for amendment.
A good deal of information is immediately available, including title details and the name of the user involved in a transaction (subject to privacy legislation). This can be useful if you need to check whether a transaction has been performed – the reader claims an action, and here you can check it, or move from the displayed information, using the pop-up menu
Pop-up menu #
A small pop-up menu allows connectivity from the completed transactions:
Allowing the operator to:
- Select this user – e.g. to loan further items to the user
- View User details
- View item details
- Send an SMS message to this user
The data is only displayed for the current session, so when Desktop is closed on the workstation, the panel is cleared, and restarted on opening up again, only showing new data. Of course, ALL the data is stored behind the scenes for use in statistics and reports and may be viewed through the History Audit facility.

User Address Labels #
Pending
