Loan parameters  #
#
The loan parameters screens allow for management and testing of loan parameter settings. The screen opens similarly to this:
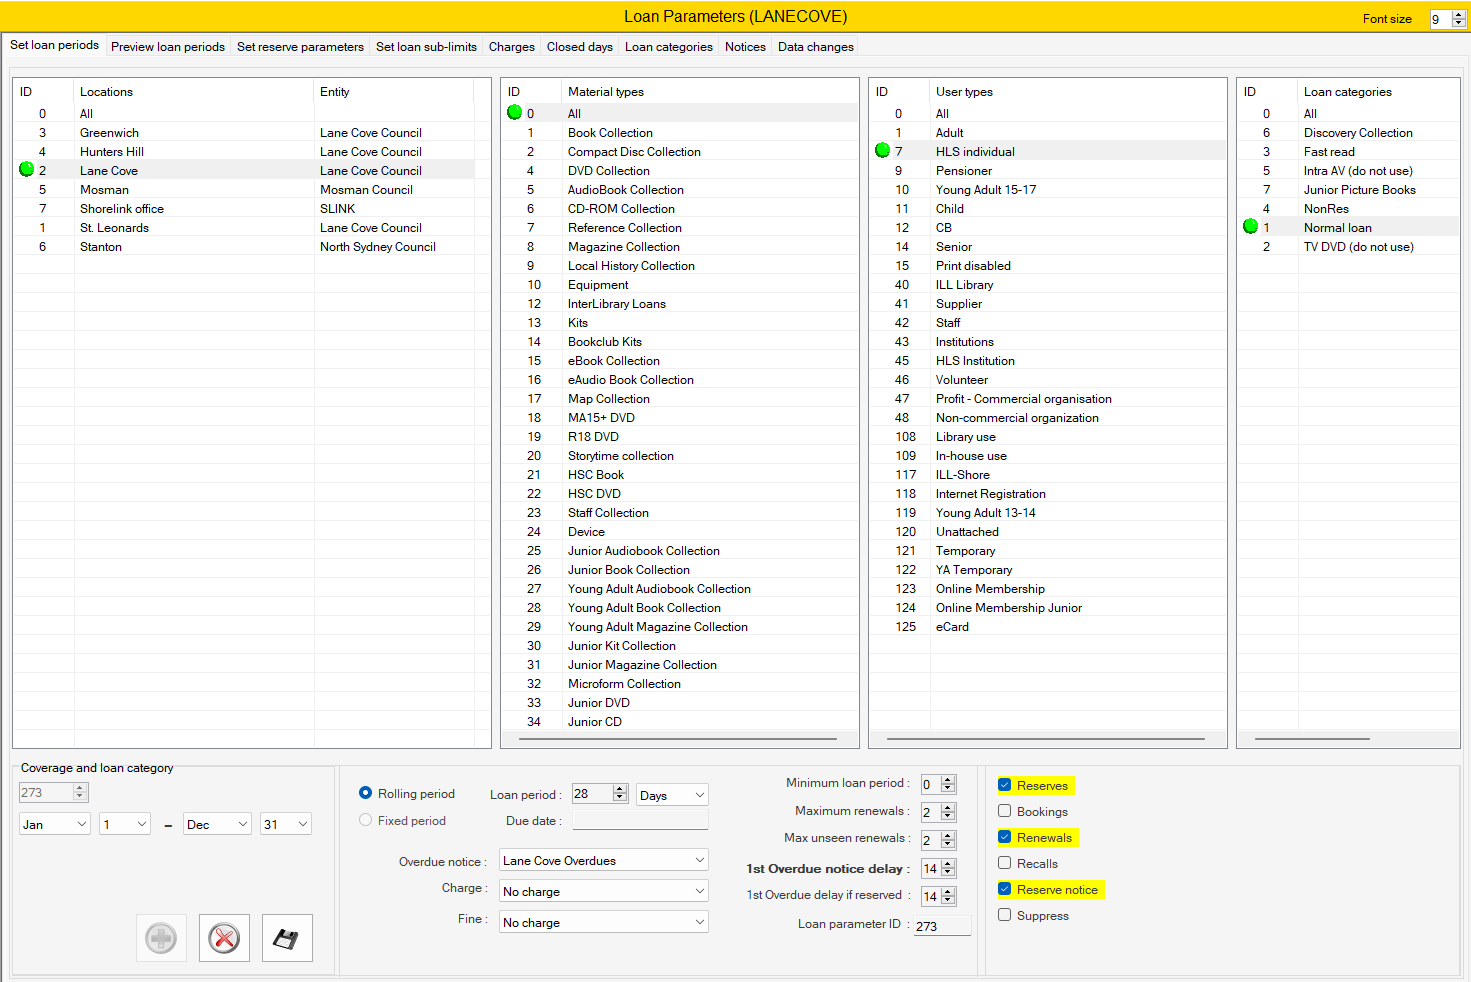
and presents 6 separate tabs:
- Set loan periods
- Preview loan periods
- Set reserve parameters
- Set loan sub-limits
- Charges
- Closed days
- Loan Categories
- Notices
- Data changes
Set Loan Periods #
This function presents your library’s Loan parameters, allowing display of current settings, and the ability to update them. The screen opens to display a number of separate panels, which are discussed in this page.
Main panels #
Parameter maintenance screens for Set Loan Periods consist of three initial panels, which can be individually addressed to produce a suitable combination for the parameters. These three elements represent:
- Locations
- Material Types
- User Types
The panels below these three selections will change according to the current combination.

Locations #
Loans and Reservation parameters are constructed on the basis of logical rather than physical locations, and this panel displays the defined logical locations for the library. Locations must be formally defined in the Locations structure, for both logical and physical locations. The current location for this workstation is identified with a large green flash.
When viewing the locations in a Consortium system, the Council will be shown in the Entity column. For all other installations, this column will remain empty.
Material types #
The second panel displays the range of material types in use in the library. Note that these can be collections of separate item formats, or parallel (one to one) to the defined item formats.
User types #
The third panel displays all user types that have been defined – whether these are circulation user types or not (e.g. suppliers). The user type must be defined in the User Types parameters.
Loan Categories #
The fourth panel completes the loan parameter by filtering by loan category which can be placed on individual items to create special loan period, Loan categories can be added in the Loan category tab of loan parameters and examples include normal loan, Restricted loan, Fast Read.
An example of use would be Fast Read Loan Category added to popular new items for a set period to get increased circulation while new and then changed to Normal Loan category for the remainder of its life in the Library.
Categories #
Aurora’s User Control extends beyond readers to include all individuals and corporate entities which have relationships with the library. These are defined across the Aurora system, and include:
- r readers (i.e. normal public membership)
- p suppliers (e.g. book or materials suppliers)
- s staff (i.e. internal library staff and processes)
- l libraries (for inter-library loan purposes)
- x institutions (such as corporate borrowers)
Types #
Each category is defined for the User Type which is determined as a numeric code (UT_ID). This code is used to identify the specific workform for entry of relevant user data, and also in the circulation system parameters. In future developments, types belonging to other categories will be used to identify specific characteristics as appropriate.
Institution #
Remember that Aurora can be used as a multi-institution system, and each user type can be related to separate institutions.
Dependent panels #
A series of panels below the main panels displays the specific setting for the selection.
Panel 1
When a valid combination is selected, this panel shows the dates of coverage and the loan category:
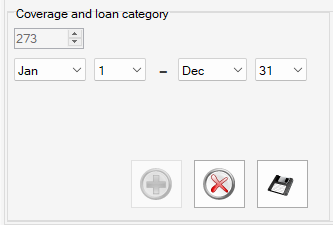
The panel shows:
- The parameter ID [273 in the illustration]. This is a unique reference id that is applied to the specific combination and is stored as part of a loan or renewal transaction. It is added automatically when a new parameter is created;
- Controls for month and day of the coverage – from and to – allowing parameters to be set to be valid for specific periods. If the parameter is not going to vary, then this should be set to Jan 1 to Dec 31
Command panel
At the bottom of Panel 1, a small command panel with command buttons:
 Add – allows addition of a new parameter
 Delete – deletes an existing parameter. A check should be made first to ensure that no loans are currently using the parameter in question.
 Save – saves the new or updated parameter settings
Panel 2
A second panel determines settings for the loan with regard to length of loan, overdues and charges:
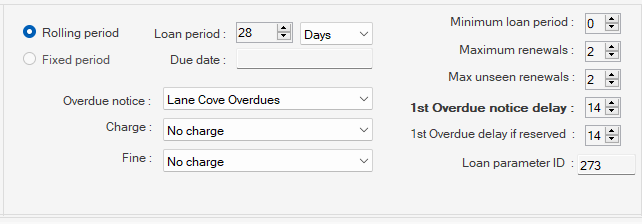
- Period Booleen options: parameters allow for different styles of loan according to the library’s requirements. If the style is a rolling loan, i.e., today for 12days, 30 days, or whatever, then the Rolling Period radio button is selected; otherwise, the period is a fixed period. To determine the length of the loan, you must declare a period value – Days (default) or Hours, then give the number of units.
[Currently not operational] If Fixed period is selected, then an entry must be made, as a date – yyyymmdd – to determine the due date for the loan. This feature is used often in academic libraries, to determine staff loans to a fixed point in the academic year. - Overdue notice Drop Down . The Overdue Notice ID combo displays the overdue notice regime – this is separately defined in the Loan_Notices parameters. The combo allows for variation in the regime applied.
- Charge Drop Down. If a charge is to be applied to a loan, e.g., as a hire fee, then the charge type is identified here. The charge detail itself is defined in the Loan_Charges table.
- Fine Drop Down If fines are charged, then the charge type is identified here. The charge detail itself is defined in the Loan_Charges table.
- Minimum loan period. If Recalls are set, a minimum loan period may be set before which the recall cannot be generated.
- Maximum renewals. If allowed, the library can determine the maximum number of renewals, both for all renewals and separately for unseen (i.e., telephone or postal) renewals.
- Max unseen renewals. Current not in use – there currently no operational difference between seen and unseen renewals in the system.
- 1st Overdue delay. This control sets the number of days to be allowed before the first overdue notice is produced if Not reserved
- 1st overdue delay if reserved. This control sets the number of days to be allowed before the first overdue notice is produced if the item is reserved.
- Loan Parameter ID
Panel 3
This panel contains a set of checkboxes acting as controls for overall loan behaviour:
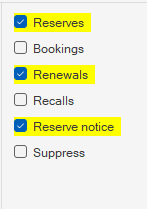
- Reserves. For this parameter combination, the library determines whether reservations are permitted. [Remember that in LoanCategory parameters, the column LC_Reservable may be set to No, to deny reservations for the Loan Category generally, for instance to remove all reservation capability from Reference material] If reservations are allowed, the Reserves checkbox is ticked.
- Bookings. This feature is enabled to indicate whether the combination will allow Bookings.
- Renewals. Renewals may be allowed or denied for this parameter combination through ticking this checkbox, or not.
- Recalls. Recalls are defined as notices sent to a user requesting return of an item, when that item has been reserved by another user. Recalls may take several forms, including allowing the system to reduce the loan period of the original loan, to favour the requester. Fundamentally the library must determine whether recalls are allowed for this parameter combination, and if yes, this is done by ticking this checkbox.
- Reserve Notice. If Reserves are allowed for the combination, you must then indicate whether Reservation notices are to be sent by ticking this box.
- Suppress. This checkbox allows suspension of a specific parameter without complete deletion – this allows the tick to be subsequently removed, and so to reenable the parameter.
Copy Loan Parameters from Another Location #
When a new location has been added to the system it is possible to copy the loan parameter from another location for this new location to help ensure the new location has the same conditions as another location in the library system.
When a location with no Loan Parameters is selects the Pop Question will appear.
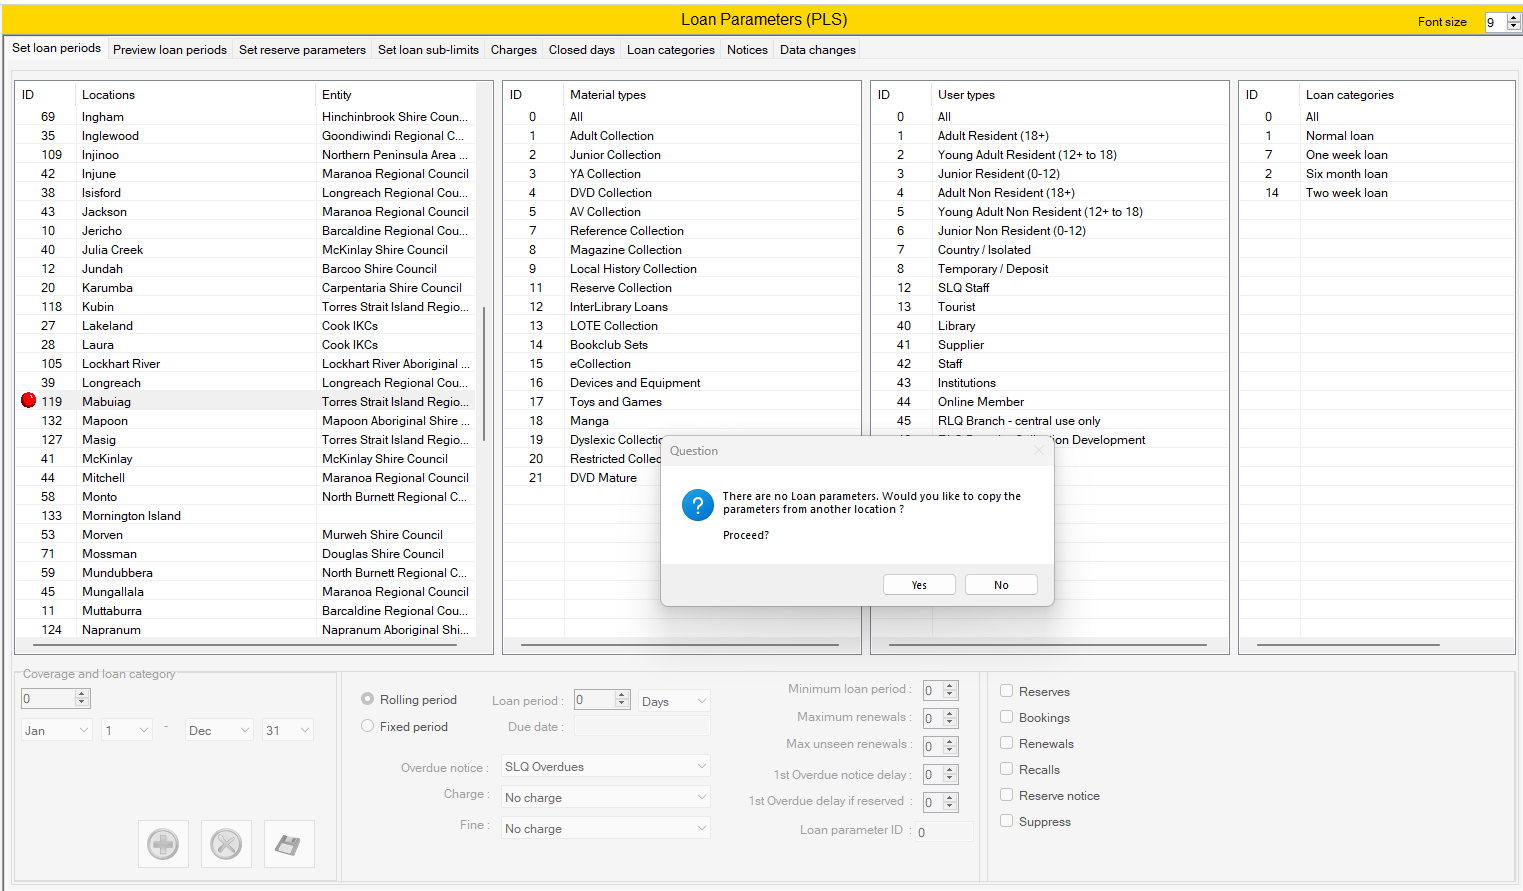
There are no loan parameters. Would You like to copy the parameters from another location?
If yes is selected a second popup appears asking for the ID number of the other location

When the number is inputted and ok is selected a confirmation popup appears asking to confirm the name of the location the parameters will be copied from.

if yes is selected the screen will reload and the new loan parameters are now applied to the Location that had no loan parameters and a final count popup appears counting the number of Loan Parameters that were created.
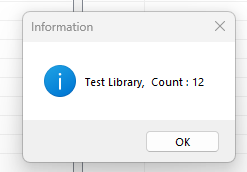
Note it is always a good practice to close the loan parameters screen clear your XML and reopen to view the latest parameters.
Good example – Green – Active Loan Parameter #
If a combination selected is good, then each of the selections in the main panels will show a green spot, and associated details are then displayed in the dependent panels:

Bad example – Red – No Loan Parameter #
If the combination is invalid – or simply not set – then the main panels will show red dots:

Preview loan periods #
The loan parameters screens allow for management and testing of loan parameter settings.
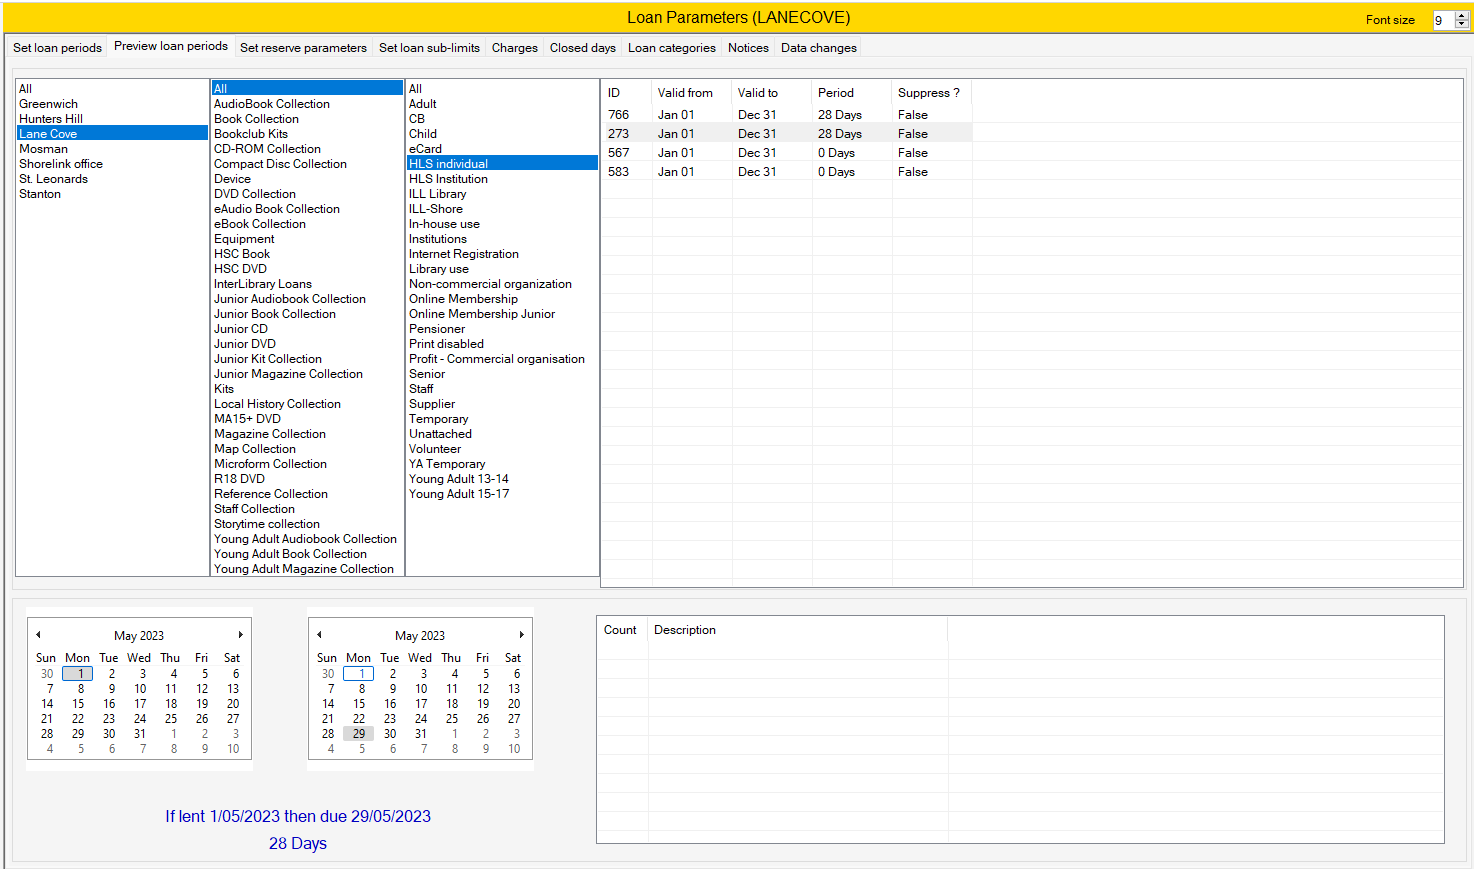
A combination of Location/Material Type/User type can be selected from the main panels. If a valid combination, then the parameter id for the combination is shown on the right. Note that there may be more than one, if the main combination is varied by loan category selection.
The lower panel will then show the loan period and the due date for a loan date selected in the left-hand calendar. A parameter may be tested by varying this date, e.g. to check Closed Days operation over Christmas.
If the combination is invalid or not defined, no ID will be shown on the right, and the lower panel will show ‘Not Defined’:
Reserve parameters #
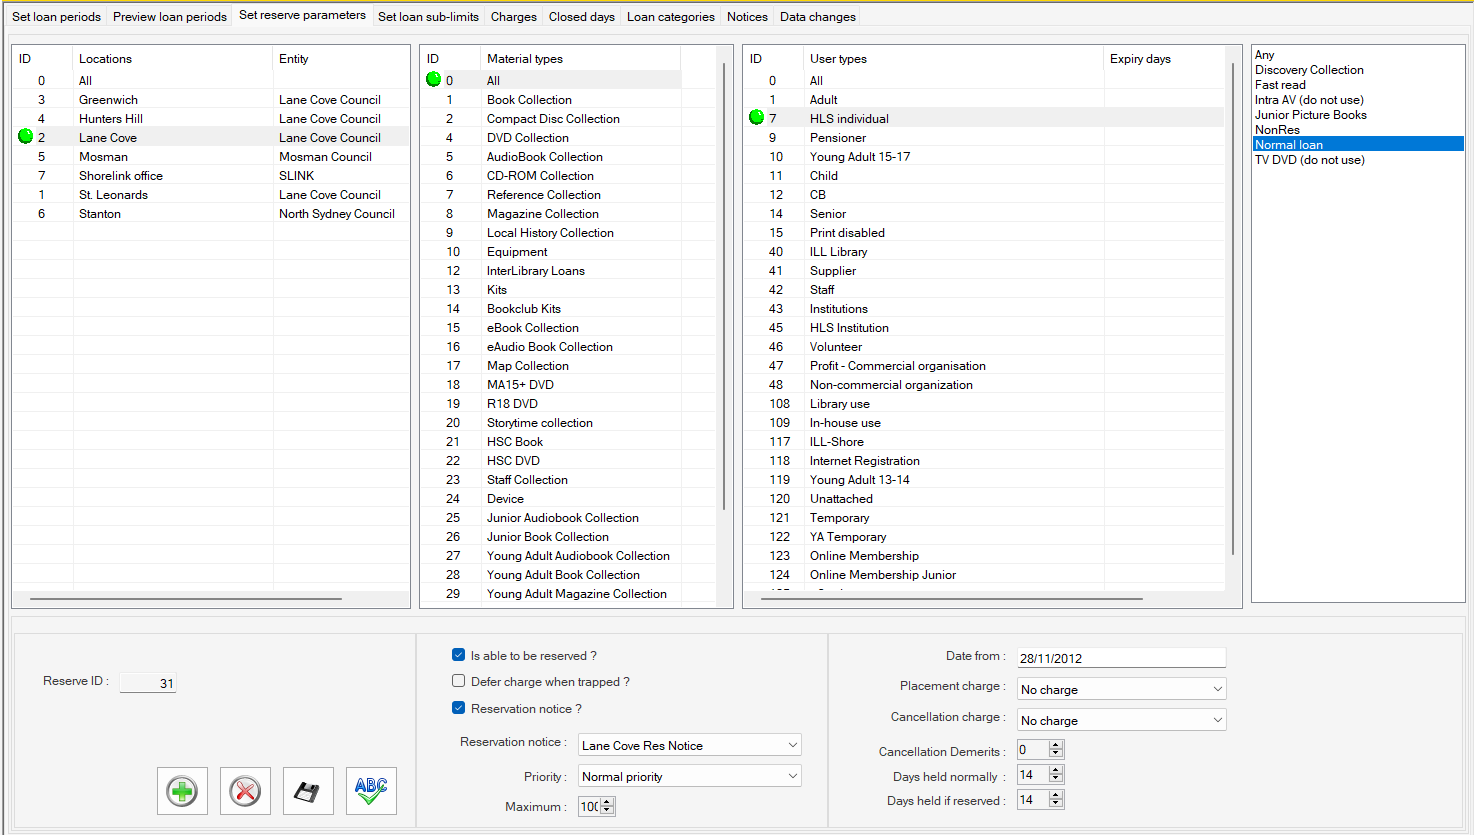
The Reservations parameter maintenance facility allows setting of all factors to handle and control reservations in a system. The screen opens to display three separate main panels and three subsidiary panels, which are each discussed in this page.
Main panels #
Parameter maintenance screens for Set Reserve parameters consist of three initial panels, which can be individually addressed to produce a suitable combination for the parameters. These three elements represent:
- Locations
- Material Types
- User Types
The panels below these three selections will change according to the current combination.
Please note the comments on Wildcard operations below.
Locations #
Reservation parameters are constructed on the basis of logical rather than physical locations, and this panel displays the defined logical locations for the library. Locations must be formally defined in the Locations structure for both logical and physical locations.
When viewing the locations in a Consortium system, the Council will be shown in the Entity column. For all other installations, this column will remain empty.
Material types #
The second panel displays the range of material types in use in the library. Note that these can be collections of separate item formats, or parallel (one to one) to the defined item formats.
User types #
The third panel displays all user types that have been defined – whether these are circulation user types or not (e.g. suppliers). The user type must be defined in the User Types parameters.
Loan Category #
A Fourth panel selection is provided to allow selection of the loan category to which the parameter line corresponds. If there is no distinction on this basis, then ‘Any’ should be selected.
Wildcards – All #
Note that each of the three main panels supports a setting of zero = All. The zero acts as a wildcard allowing all settings to support a defined combination. This means for instance that a ‘catch-all’ combination of 0-0-0 for ALL locations + ALL material types + ALL user types can be defined to ensure that a default parameter may be applied in all circumstances. this is valuable in systems which have complex parameters. If all reservations are always handled in a consistent manner, it is possible for the system to exploit the single default parameter – and individual specific parameters may be added if necessary to act as exceptions, e.g. to inhibit reservations on specific material types.
Dependent panels #
Once the combination of Location, Material Type and User Type, Loan Category is selected, then the coincidence is reflected in the dependent panels, which allow for the display and update of details:
Panel 1: Reserve ID + Command panel
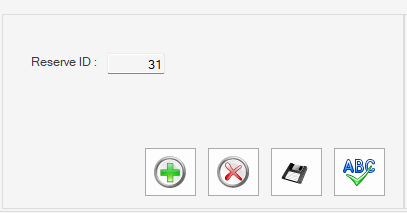
At the bottom of Panel 1, a small command panel with command buttons:
 Add – allows addition of a new parameter
 Delete – deletes an existing parameter. A check should be made first to ensure that no loans are currently using the parameter in question.
 Save – saves the new or updated parameter settings
- – Test Reserve parameters Button
Panel 2

Three checkboxes are provided:
- Is able to be reserved? This determines whether the combination forms a alid reservation option. This is normally positive, but may be explicitly set as False (unticked) where reservations are simply not permitted, e.g. for reference materials, or for records which do not have a physical holding
- Defer charge when trapped? If this box is unticked, then any defined reservation charge is applied to the user’s account as soon as the reservation is placed. If it is selected, then the charge application is deferred until the item is trapped for the reserver at the collection location, and the notification is processed
- Reservation notice? The library may determine if a reservation notice is to be produced when the item is trapped for the reserver. This will not be the case in Libraries for the Blind, when the item will simply be delivered, and no collection is required.
- Reservation notice Drop Down. In addition, if a notice is required, the defined noticed may be selected from a combo option:
Note that libraries may generally only have one reservation notice template defined, but each combination may have its own notice, e.g. where varying the collection period, the charge, or any other element that is conveyed in the notice and may vary according to the user, location, or material type. - Priority Drop Down. For each combination, a default priority level may be set:
- Maximum. There is also a control to set the maximum number of reservations permitted for the combination.
Panel 3

- ‘Date from’ for application of the parameter. Note that a parameter may be set to come into effect at a specified date, allowing parameters to be set ahead of the required date of change.
- Charges drop down. Two combo selections allow the charge for placing a reservation – and if required also for cancelling a reservation – to be defined. The charges are defined in the Charges parameters
- Cancellation demerits. This is an alternative to a cancellation charge, allowing for Demerit points to be applied for cancellation. [NOTE: demerits are not yet in operation]
- Days held normally. This control determines the number of days the reserved item is to be held for collection. Please note that the number of days is calculated from the date of production of the reservation notice.
- Days held if reserved. If required, a separate number of days may be set if the item is reserved for another user, to allow a queue to be processed more efficiently.
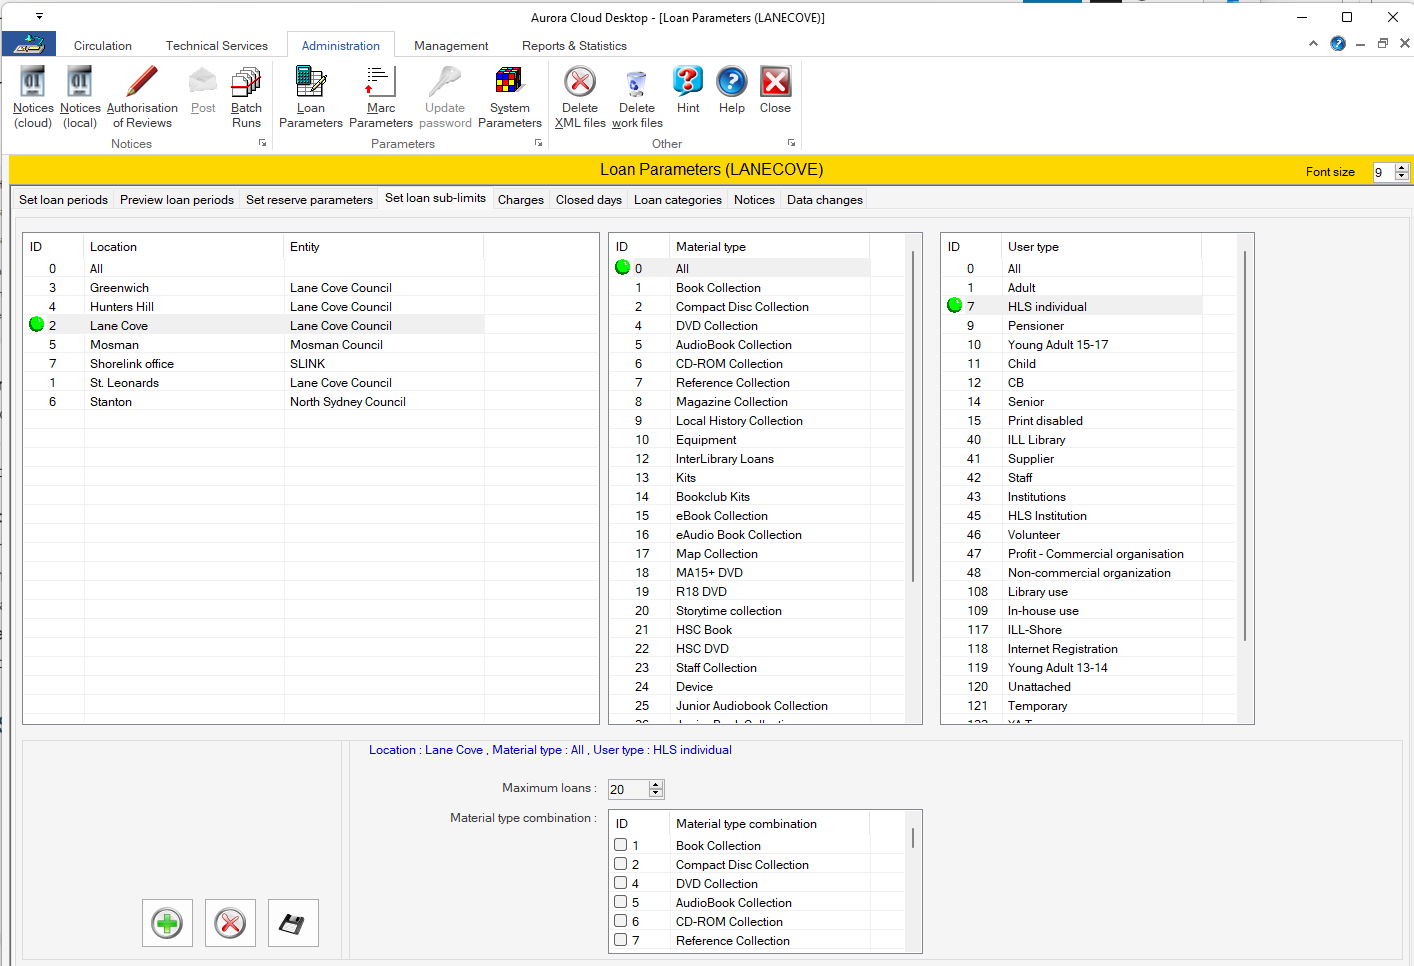
Set Loan sub-limits
This tab allows, specific sub limts based on specific – location – material type and user types.
Charges #
The Charges tab allows definition of charges that are to be levied by the library in relation to overdue loans and to reservations. Each specific charge is given a unique identification (Charge ID), and this will be called from other parameters when required. This allows a library to specify either individual Charge regimes according to factors such as User Type, or to allow a single charge to be maintained across all users.
For instance, a Reservation Charge is maintained centrally, with other parameters referring directly to it; if the charge is to be modified, then the change is simply made here.
The screen opens with a display of all charge types defined for your library:
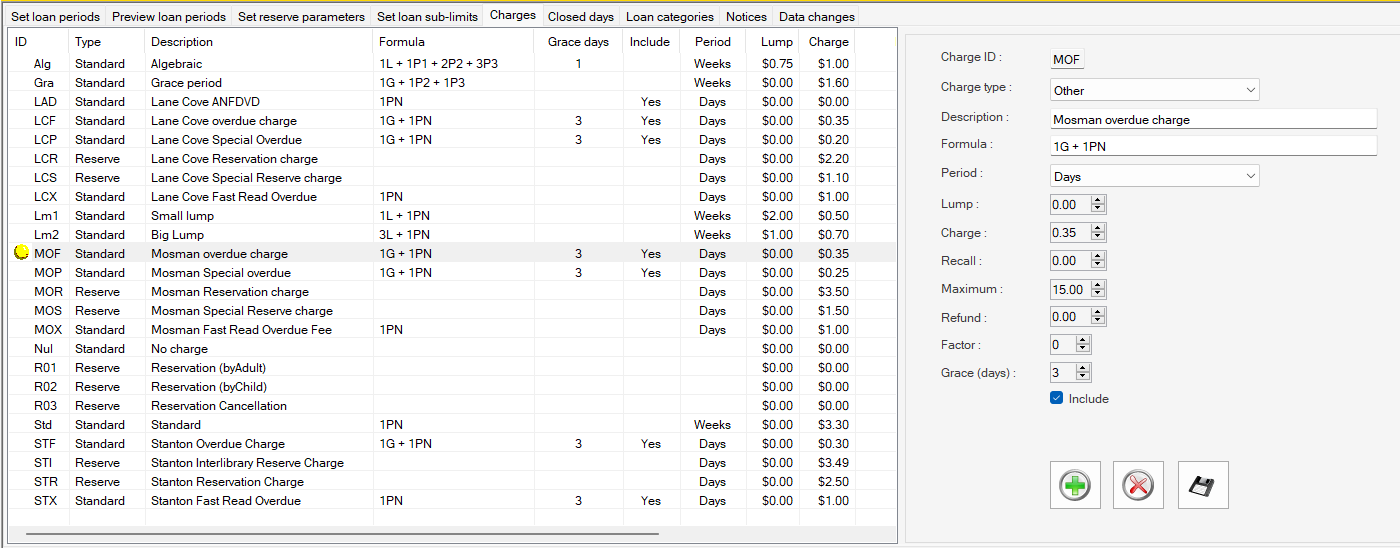
Note that this will include some default entries which are not actually applied
List of Charge types
Selecting one of these will display the detailed parameters in the right-hand Charge Detail panel:
Charge Detail #
The detail is provided for the following parameter options:
| Parameter label | Notes |
|---|---|
| Charge ID | Enter a suitable three-character id here, and it will be used to identify the charge in other tables, such as Loan Parameters – where the Description given below is displayed for selection. |
| Charge type | A combo selection is provided to identify the charge type. These are generally ‘Other’ (for overdue charges) or ‘Reserves’. Note that Other will display as ‘Standard’ in the Charge listing. |
| Description | The description is freely entered as required and is the way that the charge is referred to in all interfaces displays in Circulation. |
| Formula | The formula is the means for calculating the fine to be due and represents a simple structure using a number of different components:
so
There is great flexibility in the options that can be applied. AIT will advise on the construction of the required formula. |
| Period | For overdues this sets the period for calculation of charges (in days or hours) from due date/time plus Grace. For Reservations, which are not time bounded, the selection is ‘None’ |
| Lump | The amount used for a lump sum is input here. |
| Charge | Here the charge per period is set. |
| Recall | If the item is recalled and overdue according to the recall date, an additional amount may be charged, and this is identified here. (Not currently in use) |
| Maximum | The maximum fine level (per individual item) is set here. |
| Refund | This allows an amount of the charge to be refunded when required as a deposit, e.g. when an item is hired. (Not currently in use) |
|
Factor |
(Not currently in use) |
| Grace Period (days) |
This allows the library to set a Grace period to be allowed, following the due date, before charging commences. This provides facilities, e.g. to allow a 14-day loan, but not to start charging until say day 17. |
Check Box
Include. This check box allows for
Hint: If applying these changes independently, it will be worth applying just one parameter initially, ideally with a control user barcode, and returning an overdue item to ensure that the fine is charged correctly. When that works, the remaining parameters can be updated â noting that if a user type is not to be fined, then it can be bypassed for now.
Loan Charges Parameters #
The Loan_Charges table details all charges, including fines, that are to be levied by the library. Each specific charge is given a unique identification, and this id will be called from other parameters, e.g. Loan Parameters, when required. This allows a library to specify either individual Charge regimes according to factors such as User Type, or to allow a single charge to be maintained across all users.
Charges parameters can be maintained in Desktop Loan Parameters – using the Charges tab.
For instance, a Reservation Charge may be maintained centrally, with other parameters referring directly to it – if the charge is to be modified, then the change is simply made here.
The table is also applicable to fines and cumulative charges, and allows the following features:
- the construction of a charge formula (CH_Formula), to identify a complex charging regime.
- a Grace period (CH_Grace) to be allowed before charging commences.
- a Lump sum (CH_Lump) may be applied to charges.
- where loans are made from Reserve Book Room collections or Short Loan stock, and the loans are divided into periods, rather than for a fixed number of hours, then CH_Charge allows identification of a period value for charging.
- charges, such as overdue charges, may be subject to additional penalties if the item is in demand and has been recalled: CH_Recall allows the library to determine the additional penalty.
- all charges may be subject to a maximum ceiling (CH_Max)
Closed days #
The Closed days tab allows a library to define the days of the year when the library is closed. This allows interaction with loan parameters so that when a due date is calculated, the closed days table is consulted and if the initially calculated due date falls on a date when the library is not offering service (and is not permitted to be a due date) then the next available date (whether the next day or multiple days in the future) is selected.
The screen opens to display the current year’s dates for ‘this’ location:
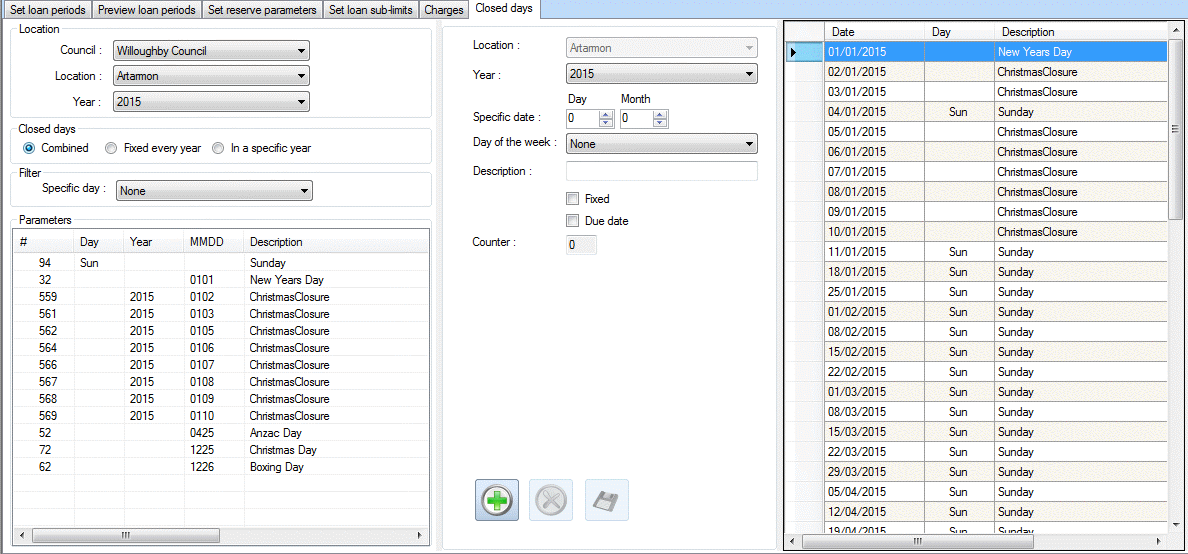
and this is divided into panels, detailed below. Note that the horizontal dividers either side of the Detail panel are movable and allow resizing of the panels if required.
Location #
The Location panel allows selection of:
| Detail | Notes |
|---|---|
| Council/Entity | This is used in Consortium systems to differentiate. |
| Location | This will display the available branches (logical locations) dependent on the selection of the Council. |
| Year | Allows selection of the year for the closed days to be set. This will display the previous year (for display information rather than setting), the current year, and the next year. |
By default, the current Council (if applicable) and branch location are set according to the workstation settings, and the current year will be selected. Note that if any of these is changed, then the Parameters and Date Display panels will change in line.
Closed days #
This set of radio buttons allows selection of date types for display:
- Combined – the default and a combination of the following two options.
- Fixed every year – this option allows display only of those dates which occur every year, e.g. New Years Day (always on Jan 1st) but not Australia Day (variable date); and includes any specific days of the week that the branch may be closed.
- In a specific year – this option only shows those dates that are specific to the selected year, e.g. Australia Day (variable date) but not New Years Day (always on Jan 1st)
Filter #
This drop-down allows selection of a specific day of the week, for display.
Parameters #
This panel lists the parameters for the days selected as closed by the combination of Location, Closed days and Filter panel options. Any of these may be highlighted to display fully in the Detail panel – the selected parameter row is indicated by a grey dot. There is no pop-up menu.
Detail #
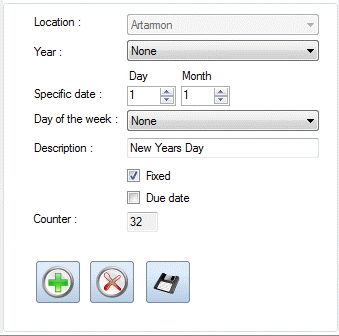
When a parameter is selected in the Parameters screen, the detail associated with the Closed day is displayed here. The panel is also used in the creation of a new parameter. Essentially, the addition is a simple form-filling exercise:
| Detail | Notes |
|---|---|
| Location | Here you can select the required branch for settings. |
| Year | Select the year for application (initial application if a fixed date) |
| Specific date | These two controls allow the selection of day and month for the required date. |
| Day of the week | If the branch is closed on a regular day of the week, this can be selected here (if closed multiple days, each must be entered separately) |
| Description | Enter here a free text description for the day – this is not publicly visible. |
| Fixed | Select this checkbox if the date is a fixed date, occurring every year. |
| Due date | It is possible to set the closed day as also a due date. If so this must be checked. |
| Counter | Automatically applied – no need to enter. |
At the bottom of the Detail Panel, a small command panel has three command buttons:
 Add – allows addition of a new parameter
 Delete – deletes an existing parameter.
 Save – saves the new or updated parameter settings
Please note when adding new Closed days parameters, that these must be added well in advance. If the parameter is not in place, then loans may become due on that date, and addition of the Closed days parameter subsequently will NOT change the originally calculated due date.
Dates display #
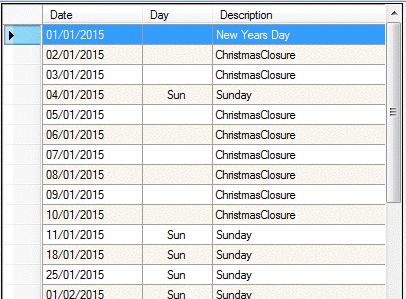
This display interprets the parameters display for the selected filters – showing each day of the week the branch is closed (if appropriate) as well as the specific closed days. This is display only and has no interactive element.
Loan Categories #
This tab allows the creation and maintenance of Loan categories.

Panel 1
Display list of existing Loan categories
Panel 2
- ID. This box is filled in automatically by the system when a category is created.
- Description.
- Default Loan Period. Allows the set of loan period based either on days or hours based on the Boleen selected
- Reservable checkbox. Allows whether item is reservable or not
At the bottom of the Detail Panel, a small command panel has three command buttons:
 Add – allows addition of a new Loan Category
 Delete – deletes an existingLoan Category
 Save – saves the new or updated Loan Category
Notices #
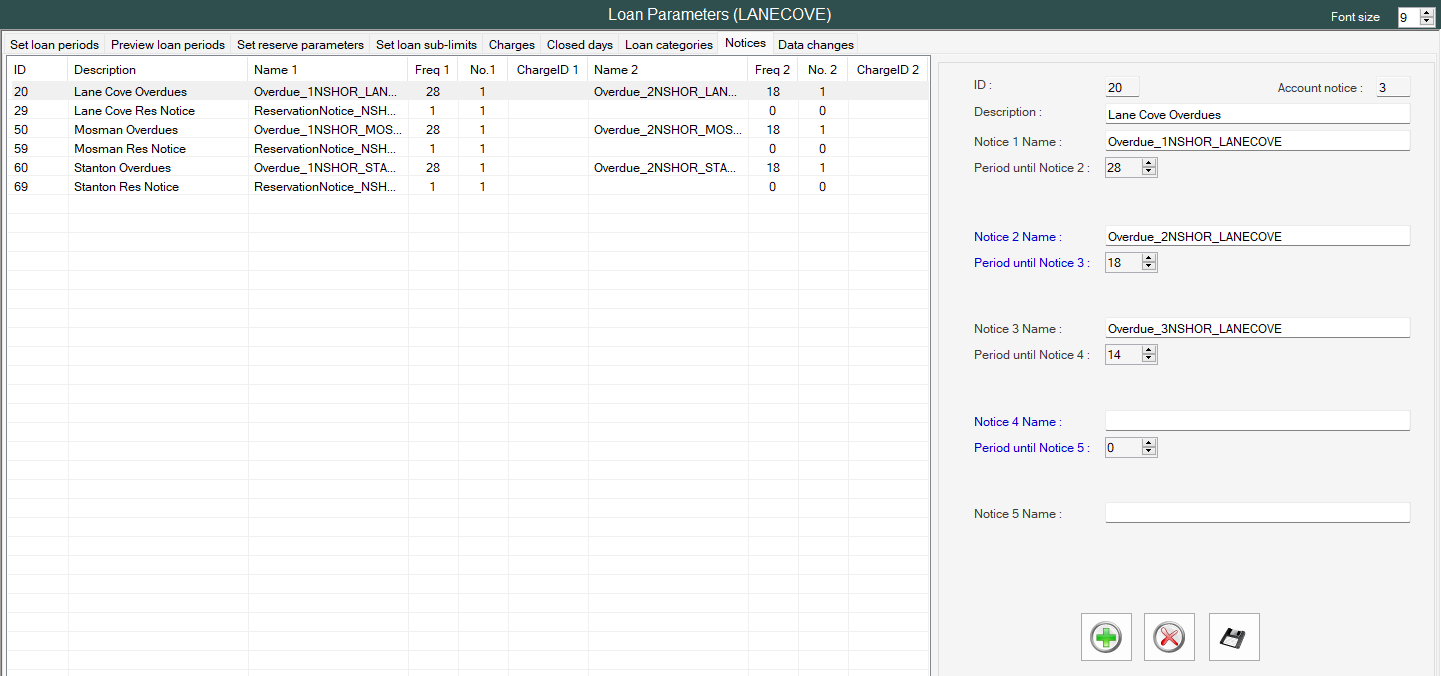
Notices List the notices applied to the system, their template name and the number of days until the next notice.
Data changes #
The data changes section of Loan Parameters separated into 3 tabs and allow changes to be made in bulk
- Trapped Reserves
- Items on Loa
- User Registration
Trapped Reserves #
This section allows a library to change the expiry date of trapped reserves.
Filter Options:
- Entity – if part of a consortia an a drop down exists to divide between councils.
- Item Home location – The drop-down box allows the operator to select specific Locations or all Libraries.
Control button
 Clicking the green button runs the search and allows for the data to be displayed int the date grid.
Date Grid
Displays all the expiry dates of trapped reserves and number of items on loan for that day based on the filter options.
Check box – select the checkbox next to each date determines what loans are to be changed
Date changes options
There are 2 options on how the dates are changed.
- Add days to selected due dates allows for a specific number of dates and will result in different due dates if multiple dates are being changed at once.
- Set new due date – sets a specific due date and will be the same for all dates selected.
Making the change
The prediction of the change will display in the grid on the NEW Due Date | Day Collum of the grid.
Clicking on the save button produces a pop-up to confirm and proceed with the change.
Item on Loan #
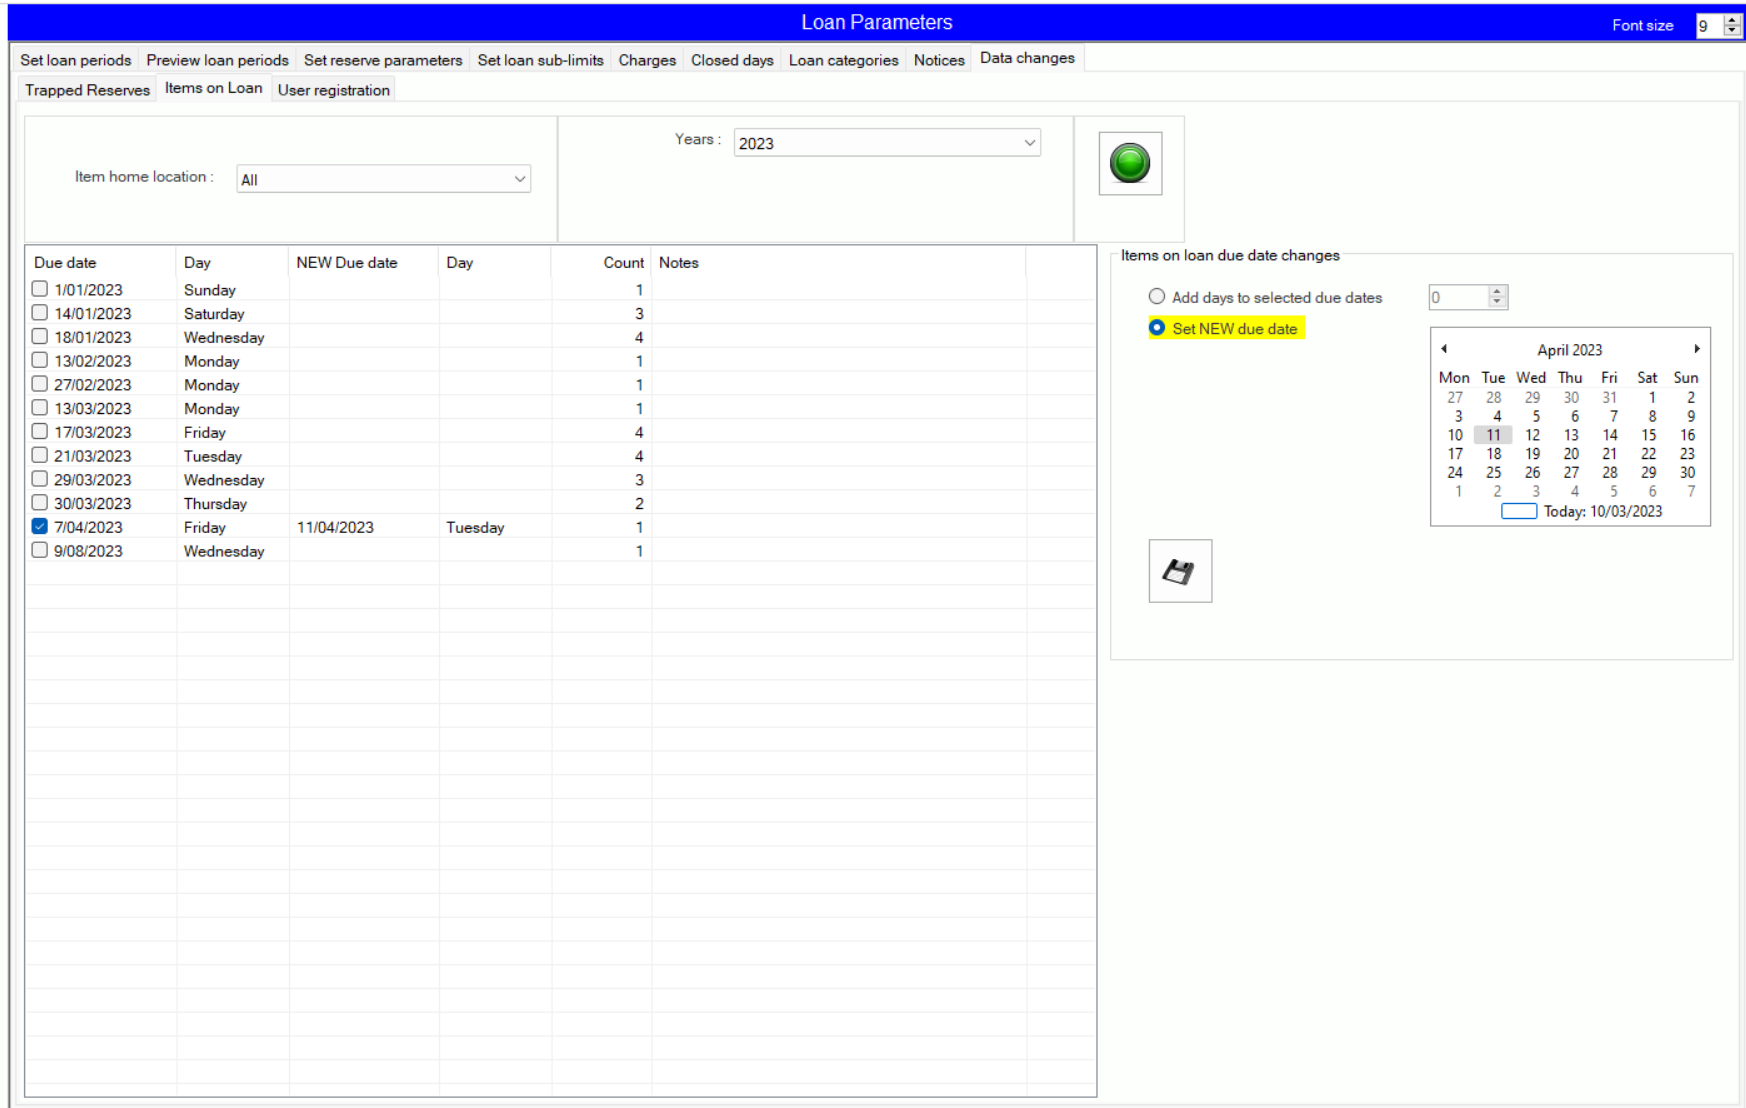
This section allows a library to change the due date of items due on a specific date to a new due date.
Note a benefit of using this function is a renewal is not used for libraries that have limited renewals for their members.
Filter Options:
- Entity – if part of a consortia an a drop down exists to divide between councils.
- Item Home location – The drop-down box allows the operator to select specific Locations or all Libraries
- Years dropdown – drop down allows for results to be filtered by year
Control Buttons
 The green command button allows the display of information based on the filter options.
Date Grid
Displays all the due dates of items on loan and number of items on loan for that day based on the filter options.
Check box – select the checkbox next to each date determines what loans are to be changed
Date changes options
There are 2 options on how the dates are changed.
- Add days to selected due dates allows for a specific number of dates and will result in different due dates if multiple dates are being changed at once.
- Set new due date – sets a specific due date and will be the same for all dates selected.
Making the change
The prediction of the change will display in the grid on the NEW Due Date | Day Collum of the grid.
Clicking on the save button produces a pop-up to confirm and proceed with the change.
User Registrations #
This section allows a library to change the expiry date of specific dates for users.
Filter Options:
- Entity – If part of a consortia this drop down allows to select council
- User Home location – The drop-down box allows the operator to select specific Locations or all Libraries
- Years dropdown – drop down allows for results to be filtered by year
Control button
 Clicking the green button runs the search and allows for the data to be displayed int the date grid.
Date Grid
Displays all the expiry dates of users and number with that day based.
Check box – select the checkbox next to each date determines what expiry date are to be changed
Date changes options
There are 2 options on how the dates are changed.
- Add days to selected due dates allows for a specific number of day and will result in different dates if multiple dates are being changed at once.
- Set new expiry date – sets a specific date and will be the same for all dates selected.
Making the change
The prediction of the change will display in the grid on the NEW Expiry Date | Day Collum of the grid.
Clicking on the save button produces a pop-up to confirm and proceed with the change.
