Audit History  #
#
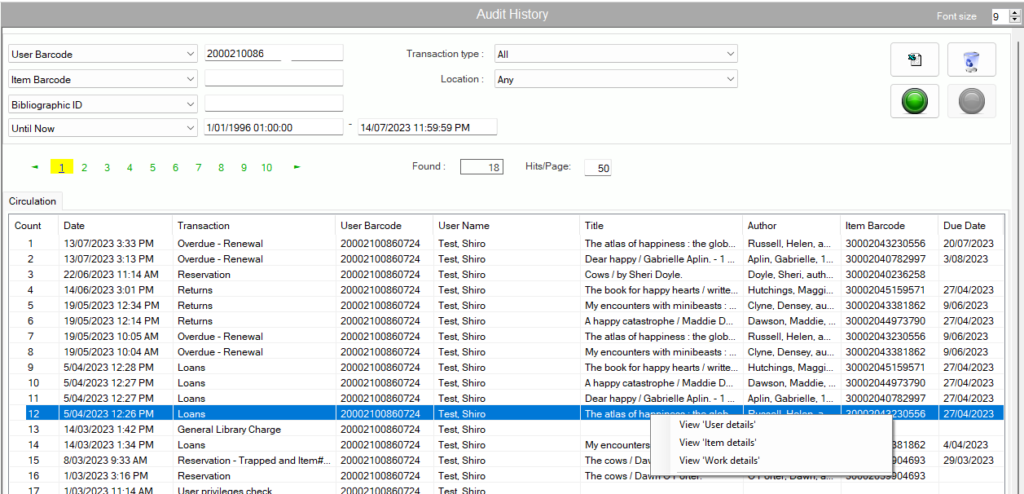
Audit History is a very powerful function, allowing operators and managers facilities to view activity of a user, a work or an item – or a combination of them – over a defined period of time. The History provides a mechanism for retrieval of information on all circulation transactions stored on the central server, providing the ability to retrieve specific data and view it on screen – e.g. the activities at a particular time on a specific workstation, or a count of transactions over a period. (The facility is not a reporting facility in the style of Aurora Reporter, although preliminary checks may be made here).
The Audit History screen is entered by selecting History from the Desktop ribbon bar.

Search filters #
User Identification #
Retrieval can be focused on a single user, e.g. to identify materials loaned by an individual. A combo drop-down menu allows selection of the access method for a user
The required identifier is then entered in the textbox identified by the User access label. Note that entry of a user id is not mandatory.
Two options are provided:
- User barcode (default)
- User id (i.e. the Aurora assigned user identifier)
Item Access #
Retrieval can be focused on a single item, e.g. to identify users who have borrowed the specific item. A combo pull-down menu allows selection of the access method for an item, The required identifier is then entered in the textbox identified by the Item access label. Note that entry of an item id is not mandatory.
Two options are provided:
- Item barcode (default)
- Aurora item id
Work access #
A combo pull-down menu allows selection of the access method for a work – this has just one option at present, which is the Bibliographic id.
The required identifier is entered in the textbox identified by the Work access label. Note that entry of a Work id is not mandatory.
Transaction selection #
This allows the selection of a single specific transaction for retrieval – a combo pull-down menu lists all available transactions.
If the transaction selection is left blank, then all transaction details fitting the remaining parameters will be returned. Therefore, specific transactions may not be combined – a query must address one specific transaction, or all transactions. The List of Transaction and their codes can be found in system parameters enterprise – Select circulation transactions or here.
Period – Timeframe #
This may be explicitly entered in the two boxes (From and To), or selected according to the standard period options:
The standard options are for:
- This month
- This week
- This day
- Until now (i.e. since the installation of Aurora)
Location #
This option allows focus on a specific branch (or defined logical location):
Command buttons #
 Export to Excel: Allows all results from the current search to be written to an Excel file in the Work directory for printing or manipulation. The filename is ‘Circulation_Audit_History_<date>_<workstation name>.xls’
 Clear: Clears all existing arguments and allows a new query to be started from scratch
 Start: Invokes the Audit history search
 Stop: Interrupts an Audit History search, or an export to Excel Note this Icon will present as
  Grey when a search is not being run.
Tallies / Found #
Below the command buttons, a tally records the number of records found by the query; by default, the number of hits per paged entry is set at 50, but this may be changed as required using the Hits/Page control, up to a maximum of 999.
Running search’s without User, Item or Bibliographic information #
A pop up will appear if the operator attempts to run a search without User, Item or Bibliographic information asking if the operator would like to proceed.
If there are not other filters it could be a massive search and slow down the system e.g. small timeframe and/or specific transaction
Results #
When the query is initiated. Aurora Desktop will identify matching transaction records and display these in the area at the foot of the screen.
Results right click #
The right click function allows the operator to navigate to another screen with specifics on the line slected
- View ‘user details’ – Open the user details screen with the information populated for the user selected.
- View ‘Item details’ – Opens item details with the item selected Note this will be greyed out if the transaction is not connected to an item
- View ‘Work details’ – Opens The Details of a Work screen in search with the work selected Note this will be greyed out if the transaction is not connected to a work

