Homebound  #
#
The Homebound facility provides full functionality for the operation of a homebound library service. Built on the basis of Aurora’s developments for Libraries for the Blind, the Homebound facility supports the identification of a user’s personal reading profile – allowing for full determination of likes and dislikes. Homebound services are optional and may not initially be set up for your library. If you want to set these up, please use the Homebound Assistant for validation and guidance.
The screen opens so with division into logical panels.
Homebound Tabs #
Four separate tabs are presented for the Homebound definitions:
- Summary
- Basic
- Allocation settings
- Look-up selection
- Look-up results
- On Demand
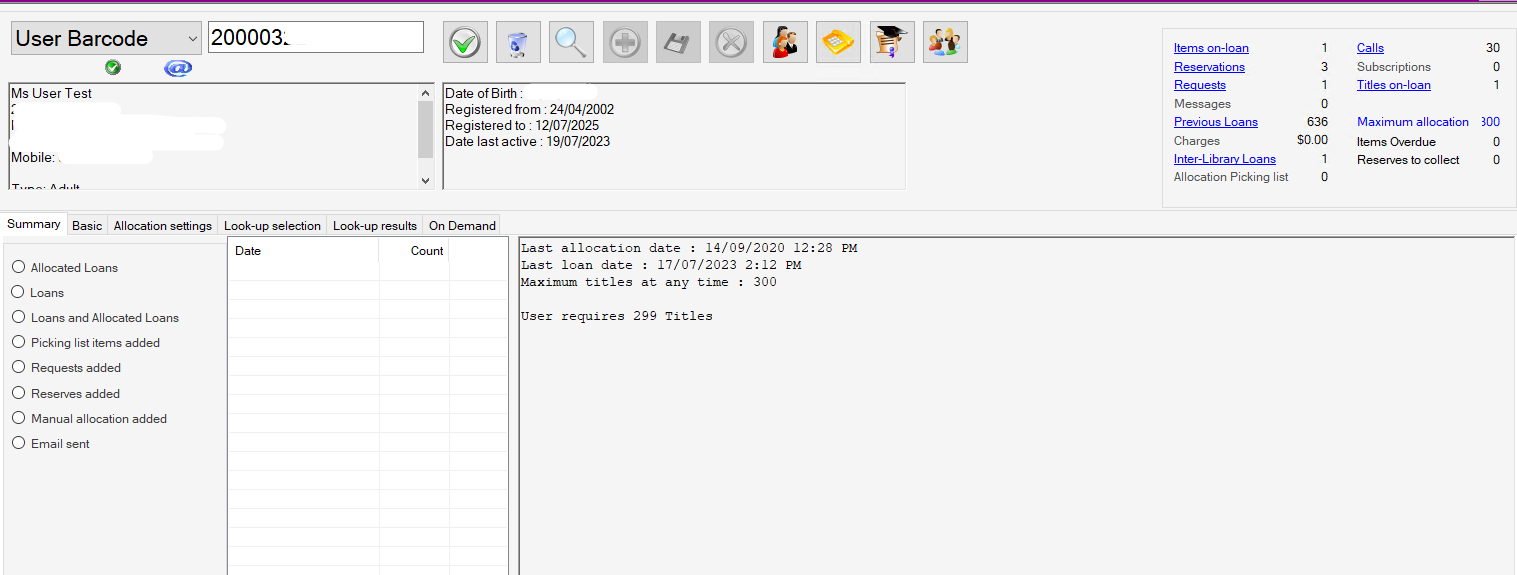
Top panel #
User identification #
A user may be identified in this screen directly by entry of their barcode or user id. However, if you have already identified the user – in User Details, User Links, Loan, or other processes, then you can simply click the Homebound icon to select the same user for display in this screen
Control buttons #
The following control buttons are provided:
 This ‘onscreen return’ allows the simulation of a return key by mouse action.
 The waste paper bin icon is used to clear the user barcode or id text box. Occasionally, this box may not be selectable by mouse, but clicking this icon will allow clearance, in readiness for entry of a new user id.
 This option opens the Quick Find panel, to allow you to search for another user
 The addition button allows a new Allocation setting to be entered
 The Save icon allows added and amended data to be saved – applies to the currently displayed tab
 The deletion button is shown here – and allows an Allocation setting to be removed
 This button lists all users with Automatic Allocation set, and displays the details in the User lists results screen
 Add call or new contact – A Pop up screen appears to be filled in the information is saved is viewable in User Links- Calls
 The Homebound assistant provide information on the status of all the setting required for homebound to function.
  Go to allocate items for Homebound Users
Flash indicators #
Above the User name and address panel, a constant set of flash indicators is displayed, showing information on the user. These are fully described here. In the majority of cases, the indicator has no active effect, and does not respond to a mouse click.
Address display #
The user’s focussed address is always shown, including (if recorded) additionally: email address; phone number; mobile phone number. Set off to the right, the panel will show the user’s date of birth and date of library registration.
Hyperlink summary #
At the far right of the user identification panel, a summary of user activity is shown. The summary lists all possible link options, with tallies applied as appropriate – hyperlinks are available for any link set which contains data.
Note that if items are overdue, or reservations are ready to collect now, then this information is shown on a red banner to alert the operator
Summary Tab #

The summary tab allows the operator to view a summary of history based on the boolen selected for the user selected.
- Allocated loans – Date Allocated loan occurred and count of number of loans on that date (Transaction = 8)
- Loans – Date Loan occurred and number of loans on that date (Transaction = 1)
- Loans and Allocated loans – combined Date Loan occurred and number of loans on that date (Transaction = 1 + 8)
- Picklist Items added
- Requests added – Date and count of requests added on specific date
- Reserves added – Date and count of Reserves added on specific date
- Manual Allocation added
- Email sent – Date and count of emails sent on a specific date.
Basic Tab #
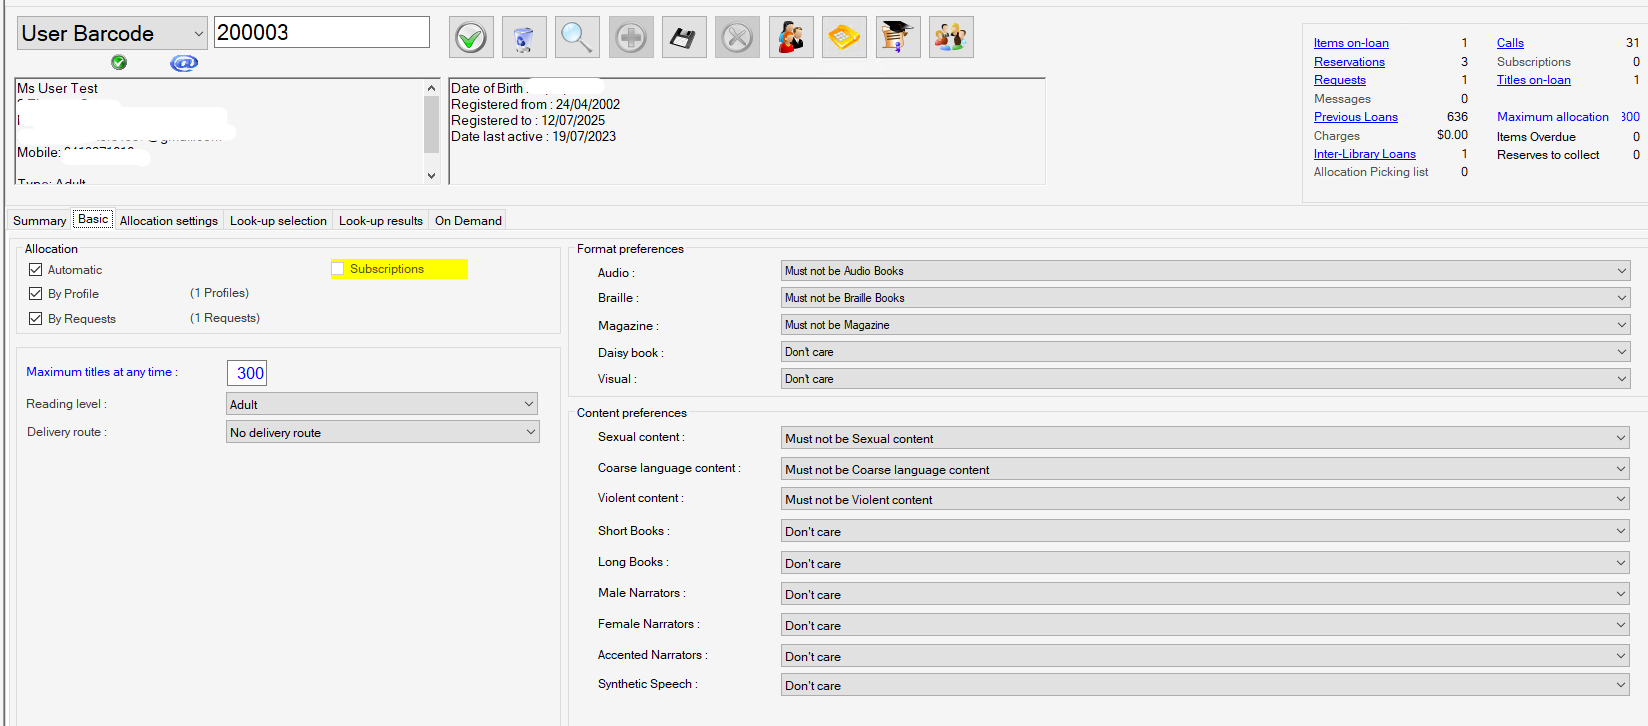
Allocation method #
This set of checkboxes determines the nature of any allocation method to be applicable to this user
Note that a user may elect to have both requests and a profile.
| Method | Notes |
|---|---|
| Automatic | If a user is serviced by automatic operation, this can apply to both of the following methods – Request and Profile – and indicate that Aurora Allocation processes will be applied to select materials to be loaned automatically according to both user need and title availability. If allocation processes are in use, then switching off automatic here will ensure that the user is not considered for allocation. |
| Request user | If a user wishes to indicate specific titles of interest, e.g. from a library reading list, or via a reader’s advisor, then this interest can be noted as a request. A Request has specific meaning in this context – it is an expression of interest, and nothing more; it is not time limited and not sufficiently positive to be a Reserve, and therefore there is no queuing, but material will be provided where the user has spare capacity, and the item is available. |
| Profile user | Where the user is happy to receive material according to subject or genre, or maybe according to a nominated range of authors, then a profile can be established. The profile also allows for exclusions, so the profile may be Adventure or Mystery or Travel; or Adventure BUT NOT Wilbur Smith |
Settings #
| Setting | Notes |
|---|---|
| Selection maximum | This sets the user’s ‘quota’ – the maximum number of titles that the user wants at any one time. |
| Maximum titles per disk | For Libraries for the Blind and Burn-on-Demand processes, this sets the user’s preference in respect of the number of titles to be burned per disk. Zero indicates that there is no specific limit. |
| Maximum disks per allocation | For Libraries for the Blind and Burn-on-Demand processes Sets the maximum number of Burn-on-Demand disks to be produced in one Allocation process. |
| Has multi-title DAISY player | For Libraries for the Blind and Burn-on-Demand processes This checkbox is set if the user has a multi-title DAISY player. If not set the Burn-on-Demand process will limit titles to one per disk |
| User label format | |
| Preferred communication format | |
| Reading level | The user’s reading level is noted here. The standard MARC21 settings are used: Adult Elementary/Junior High General Juvenile Pre-School Specialised Unknown or not specified Young adult (senior high) If automatic allocation is used, then the reading level is applied and filters out material which is of an incompatible level |
| Delivery route | Ability to select delivery routes that have been defined in system parameters / system. |
Format preferences #
This panel presents the five non-book formats primarily involved, the operator will be notified if a request is attempted on an item that does not suit the format preferences of the user.
- Audio – this reflects audio cassettes, and sound CDs
- Braille
- Magazine
- DAISY book – i.e. digital talking books
- Visual
For each of the five, the user can be set for preference:
- Don’t care [and default] – i.e. happy to receive these
- Must be this format
- Must not be this format
Content preferences #
This panel allows the user to set personal preferences for reading quality. 8 separate values can be set:
- Sexual content
- Coarse language
- Violent content
- Short book
- Long book
- Male narrator
- Female narrator
- Accented narrator
In each case there are three possible settings:
- Don’t care [and default] – i.e. happy to receive these
- Must be matching this content description
- Must not be matching this content description
Note that these preferences are taken into account in automatic allocation processes but will still be of value as indications in public libraries. If applied in automatic allocations, then the corresponding works must be catalogued to reflect the content attributes (Aurora specific tag 009 See example below)
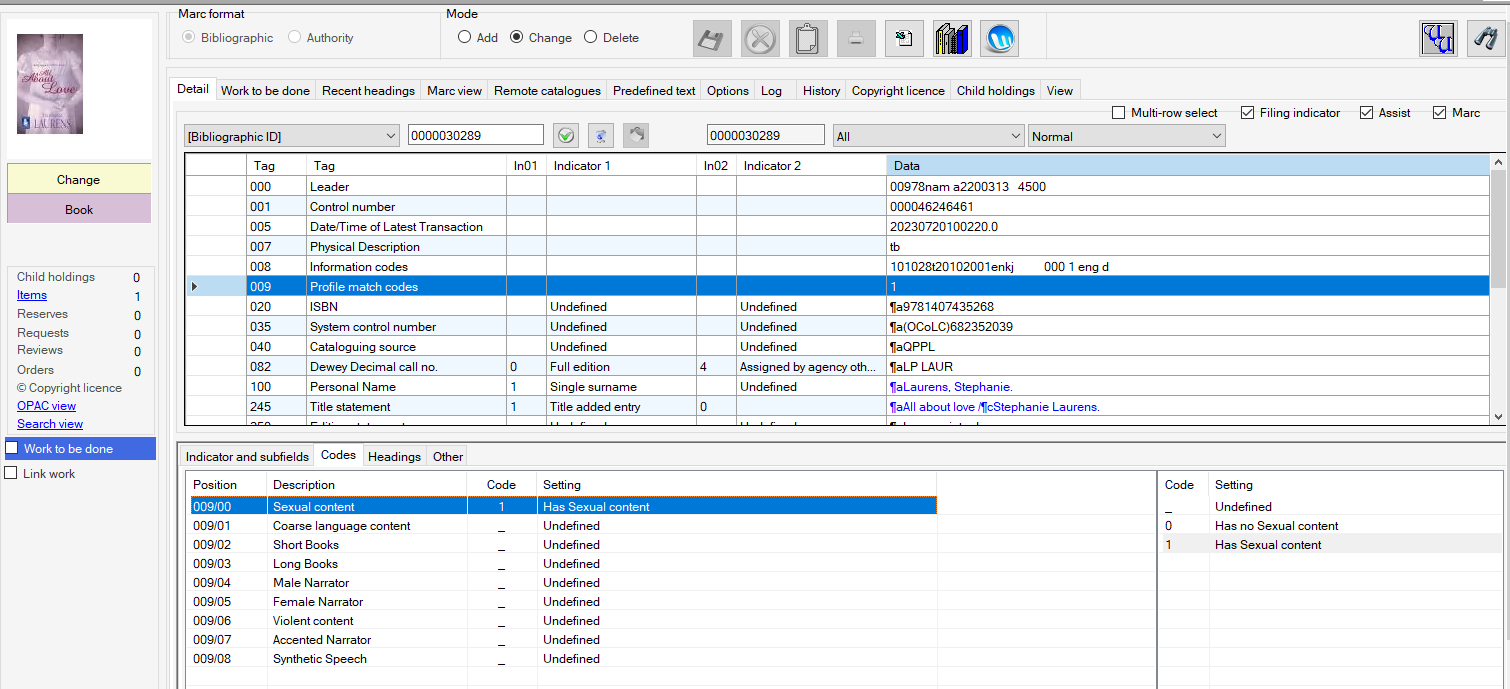
Allocation settings Tab #
The Allocation Settings tab is where the details of the Homebound user’s profile or request selections are defined.
Screen layout #
This tab is made up of three separate panels – displaying the current methods and profile in tow, with a third panel allowing the definition of new entries.
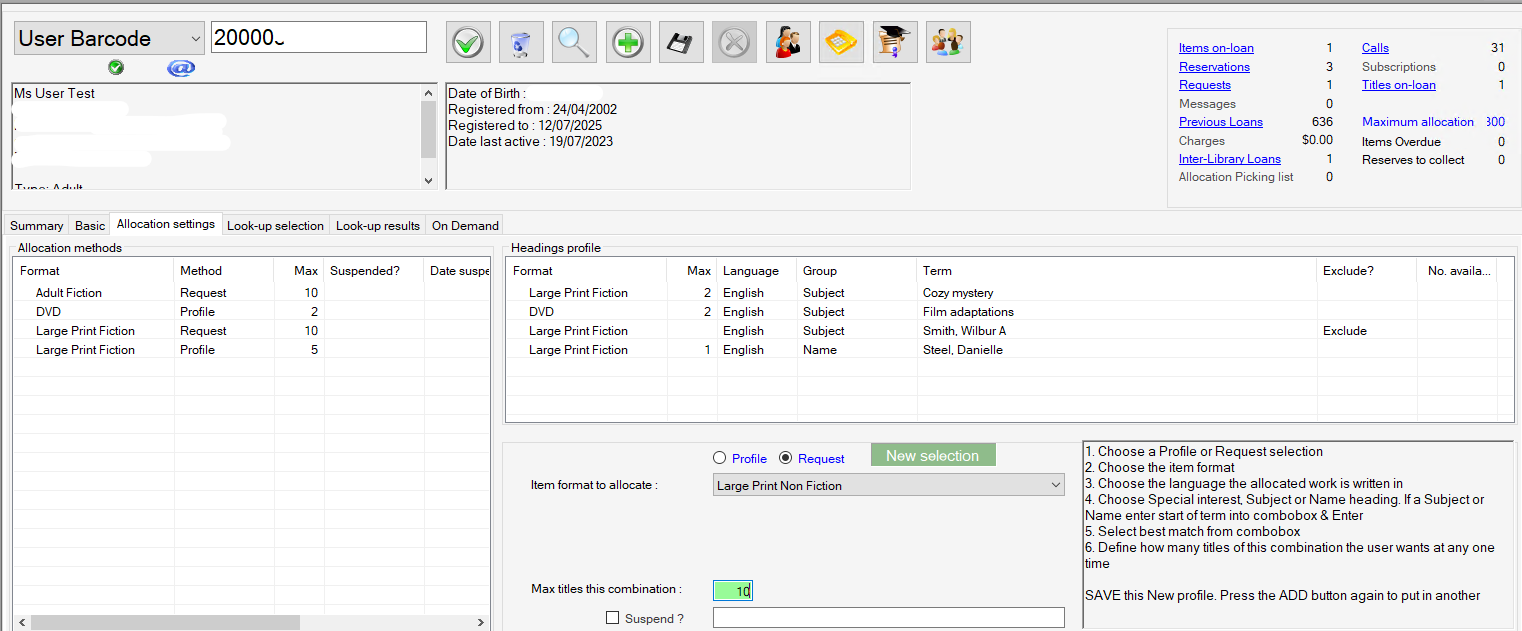
Allocation methods #
This panel displays the allocation methods defined for this user. Six columns are displayed:
| Column | Notes |
|---|---|
| Format | Each entry must have a format shown, and only those formats defined in Item Formats parameters to be used in Profile Selection can be selected. |
| Method | This column gives the allocation method, which is either Request or Profile |
| Max | This is the maximum number of items to allocate in this definition. A user may have many rows of allocation methods -the allocations processes will only apply them up to the overall Selection Maximum for the user – so there could be 6 rows each with a max of 3, but if the user’s Selection Maximum is 6, then the allocations process will stop when 6 have been allocated. [Of course, it may be that the whole set of methods is processed and still not fulfil the user’s maximum] |
| Suspended? | A method may be suspended, and this column indicates that. A suspension may be in place, e.g. if the user is away on holiday or in hospital, or if they just want to pause on a particularly method for a while (no horror stories for three months) |
| Date suspended | If suspended, then the date of suspension is shown here |
| Why suspended | If suspended, the reason is given here |
Pop-up menu #
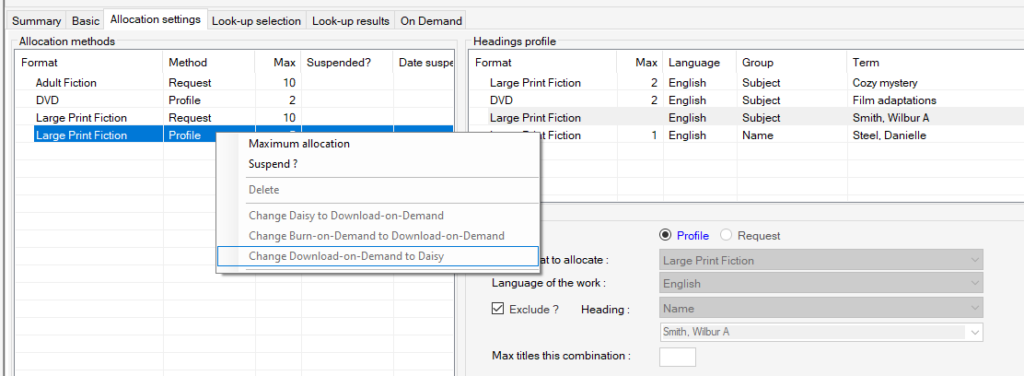
The Allocation Methods display has a small pop-up menu:
- Maximum allocation. This allows the maximum allocation for the method to be changed directly.
- Suspend. This option allows the method to be suspended, e.g. when the user is away.
Headings profile #
This panel applies to Profile selections only and lists the selections forming the overall reading profile. 6 columns are displayed:
| Column | Notes |
|---|---|
| Format | Each entry must have a format shown, and only those formats defined in Item Formats parameters to be used in Profile Selection can be selected. |
| Max | Gives the maximum for selection in this profile – that is for the subject or (SIC) in this format. The user may have a Profile allocation set with a maximum of 20 titles in a specific format; the Headings profile selections will be within that, but there may be ten definition rows (which may sum to more than 20 titles, but the allocation will stop when the profile/format selection max is achieved) |
| Language | If appropriate, a language may be set. By default, English is used |
| Group | This gives the Heading group, which is one of: Special Interest Subject Name |
| Term | This column holds the specific term for the Heading selection |
| Exclude? | This column indicates if the selection is an exclusion, which allows the heading to be bypassed for allocation, e.g. where the user wants to receive Crime fiction – but exclude all Agatha Christie. This only applies to Subject and Name headings |
Note that when selections are displayed, you can select one of these and move to the Look-up selection tab to identify available works for verification, or for a manual allocation.
Heading Profile Right click popup #
When selecting a Row int he heading profile list the right click gives you the following options
- Look Up Results – runs a search in Look up selection using the parameters of the heading profile selected giving results in Look up results tab
- Count available works Each heading – Counts the amount of items with the selected format, language that have the selected heading
- Delete heading profile
- Delete Multiple heading profile
Adding a New Headings profile or Request #
To add a new definition, you must select the user, and then click the ![]() green cross add button. This will enable the addition process, for both Profile and Request methods.
green cross add button. This will enable the addition process, for both Profile and Request methods.
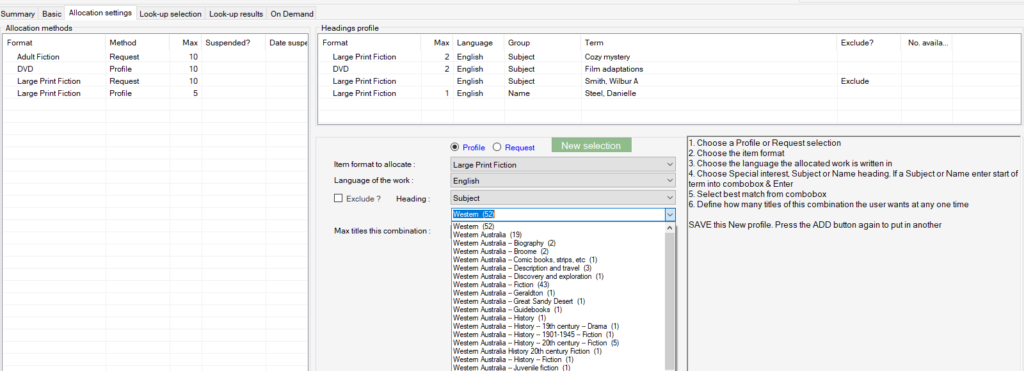
This panel is below the headings profile and has the following elements
| Element | Notes |
|---|---|
| Method radio button | The first choice is between Request and Profile definition. |
| Item Format | The drop-down combo menu presented here will only show the formats which have been set for use in Profile Selection |
| Language | If appropriate, a language may be set. The default is English. |
| Heading | This gives the Heading group, which is one of: Special Interest Subject Name |
| (Term) | If Special Interest is selected as the Heading, then the codes will populate this drop-dwon combo menu; if Subject or Name, then the Term combo is cleared, and you can enter a string, e.g. History, and then Enter – and a browse list will be provided on the combo from that key-point |
| Max | Gives the maximum for selection in this profile – that is for the subject or Special Interest Code (SIC) in this format. |
| Exclude? | This checkbox indicates if the selection is an exclusion, which allows the heading to be bypassed for allocation, e.g. where the user wants to receive Crime fiction – but exclude all Agatha Christie. This only applies to Subject and Name headings. |
Adding a Profile #
- click the
 green cross add button
 - Select the item format from the drop down combo
- Select language of the works
- Select Heading tyep e.g., Name, Subject or Special interest code
- Search for a heading by typing it into the combo box and hitting enter on your keyboard (the best match will appear clicking on the box drop down arrow will give you a browse list of headings from you search in which you can select a different heading)
- Define how many items you want in this profile in Max titles this combination e.g 2 books Note that if you do not enter a figure for the maximum, then the default set in Enterprise parameters as defSelection will be used. When done, click the
- Save button, and the Headings profile display will be refreshed.
Adding a Request #
For a Request addition, fewer details are needed, and language and heading combos are removed.
- click the
 green cross add button
 - Select the item format from the drop down combo
- Define how many items you want in this profile in Max titles this combination e.g 2 books Note that if you do not enter a figure for the maximum, then the default set in Enterprise parameters as defSelection will be used. When done, click the
- Save button, and the Allocation Method Table (to the left) display will be refreshed.

Deleting a definition #
A definition may be deleted by selection from the display and by clicking the ![]() Delete button.
Delete button.
Please note that a deletion is not necessary to stop allocation service – this can be achieved by suspension, which allows easy reversal when the service is required to become active again.
Look-up selection #
This tab allows a user’s profile selections to be used in a practical way, by taking headings or Special Interest codes and reviewing works filtered against availability, user preference (e.g. sexual Contant etc., if applicable), item format, and additional options detailed below. The results can then be filtered further to remove any that the user has already borrowed, before displaying on the Look-up results tab. This display can then be used to action request or reserve processes.
Catalogue profile (left side) #
This display presents the Content preferences as defined on the Basic tab for reference, together with the user’s reading level.
Note that if any of these causes a mismatch with titles in the possible results set, then the mismatching titles will not be shown in results, and of course will not be considered in the automatic Allocations processes.
Action panel – search #

This panel sets the parameters to determine the results of a specific query simulating the selection as it will be used in Allocations processing.
| Setting | Notes |
|---|---|
| Special Interest Code | This combo allows the selection of a defined (SIC) for the selection. The SIC code itself is not presented, but rather the description. The default selection is ‘None’. |
| OR | You can select a SIC OR a specific heading, such as a Name (e.g. Wilbur Smith) or Subject or a Series for the selection. |
| Heading | The Heading may be selected from an existing Headings profile, or entered manually – by entering a short string as key first, e.g. ‘rowli’ (omit the quotes!) and hit Enter – you can then open the combo to see a browsable list of the headings starting with the entered key – and you can select the specific heading required. |
| Radio buttons | A set of radio buttons is provided to determine which Heading index to use: All Subject Name Series |
| AND | |
| Item format | This combo presents the selection of item formats which are defined for use in Profile Selection. If the required format is not present, then the parameter will need to be adjusted. |
| Language of the work | If required, the language can be set, e.g. to provide Chinese materials to a Chinese user. The default is English |
| Reading level | The reading level may optionally be set – this may allow filtering of subject materials for the user, e.g. to specifically identify adult or secondary material |
| Language | Optionally, you can also set the user’s own language for filtering |
| Previous loans | Finally, this option allows the results to be filtered and any materials already loaned by the user will be removed, preventing an incorrect re-allocation |
Look-up results #
This tab is used to present the results of the Look-up selection.
NOTE Homebound has look-up search is entity specific.

Selected titles results #
The titles matching the Look-up selection are presented in alphabetical order of title (a control above the display allow you to change the order to Author order). Each row allows inspection of associated items – highlight the title and the items panel changes to reflect the items for that title.
Selected titles Results pop-up menu #
The Selected titles list has a pop-up menu – but please note that this is only enabled when one of the title checkboxes is selected:
| Option | Details |
|---|---|
| View notes | This option allows any notes attached to the title – including the summary – to be displayed, which can be useful as a guide to a manual allocation: If the record has no notes, this option is not offered |
| Reserve this work(s) for the user | This option enables a standard reservation for the selected user. |
| Request this work(s) for the user | This option enables a standard request for the selected user. If the user is not defined as a Request user, then this option will not be offered. |
| Go to search – Details of work | opens search screen for the selected work on details of work. |
| Export list to excel | |
| Do not allocate this work to this specific user |
Items panel #
The Items panel reflects the items for the title currently highlighted in the results on the left. Each associated item can be reviewed, for location, availability and current item status.
Items panel #
The Items panel reflects the items for the title currently highlighted in the results on the left. Each associated item can be reviewed, for location, availability and current item status.
