Item Transfer  #
#
The Item Transfer facility allows a library to record both temporary and permanent transfers of stock within its framework of branches. The facility can be used to provide for regularly changing stock – e.g. to supply a mobile library with a changing selection; or to allow materials to be permanently moved from one location to another; or, to change an item’s recorded format details. Where material is supplied from a central distribution store, Aurora’s Item Transfer facility allows the library to mark material for return to that store, and as part of the process delete the items from its local holdings, including full provision for audit, history and statistics.
Items can be entered individually – by scanning or keyboard entry – or by use of a prepared batch file.
The program is invoked from both Desktop and Backroom ribbon bars and using Function key F12 in Desktop.
#
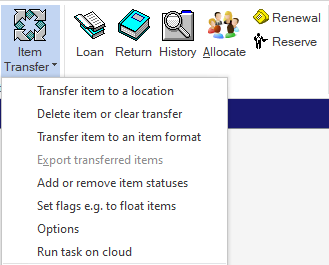
The Desktop button bar has a small pop-up menu allowing direct access to each of the main Transfer functions:
- Transfer to a Location
- Delete or Clear Transfer details
- Transfer to Item Format
- Export Transfered items
- Item statuses
- Set Flags
- Options
- Batch on cloud
Selection of one of these will lead to the specific tab in the screen display as required. Access to the other functions can then be achieved by clicking other tabs:
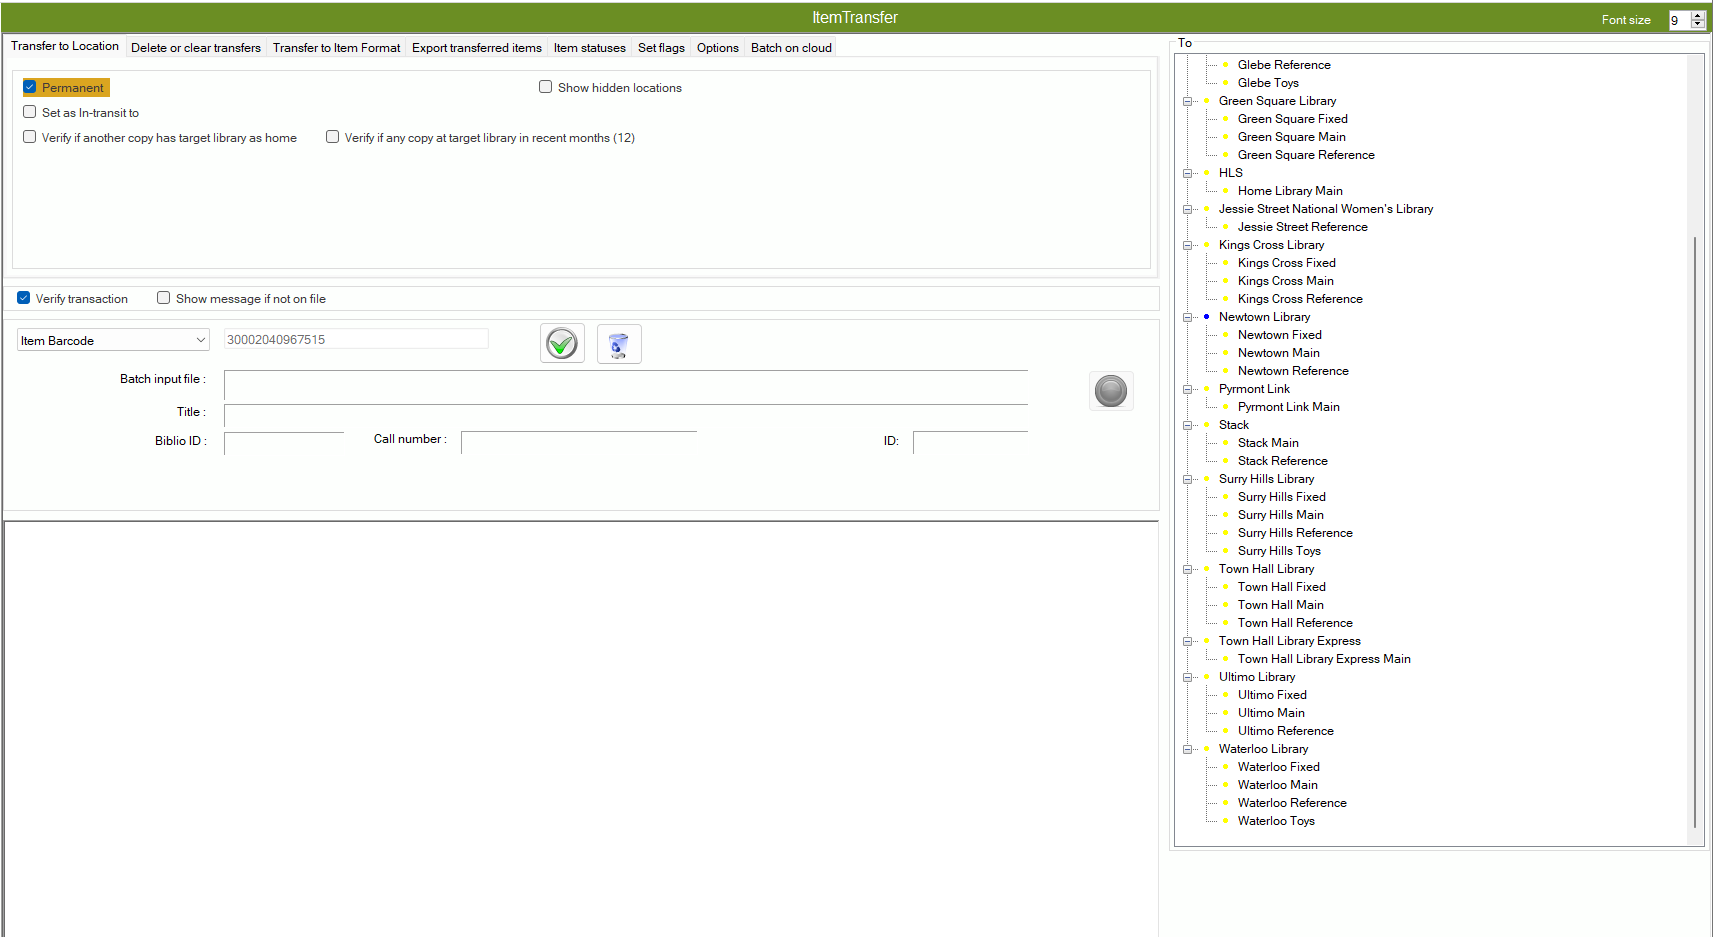
The tabs provided, divided according to primary function. Note that the Command panel will change according to Tab selection, but all other screen elements remain constant.
Functions across all screens #
Item Details Panel #

The Item Details panel is used for the input of either an appropriate item number – this can be from a barcode or from the Aurora item number – or a prepared file of item numbers; on input of valid details, the panel will display attributes of the item, including, optionally, bibliographic details – see further details.
Verify transaction checkbox – When ticked, this checkbox allows the operator to double-check the details of the item to be transferred before committing with the use of a question popup [particularly if using transfer deletion]
Show message if not on file checkbox – Displays a message if the item is not on file
 Yes / Run button for individual item inpu
 Clear button – Clears the current item number entry
Individual Input box – Default is Item Barcode, however Aurora ID and Item SICI
Batch File Input – It is also possible to transfer a batch of items from a file which has been prepared earlier. A facility to browse for the .txt file is provided by a ![]() command button, but this and the
command button, but this and the ![]() Green circle button to start the batch run are only displayed once the target location is selected.
Green circle button to start the batch run are only displayed once the target location is selected.
When is invoked, Aurora will process the items in the same way as if entered individually. NOTE Batch files must be a .TXT file and each item identifier (barcode) must be on an individual line e.g. type barcode hit enter then type a new barcode.
Bibliographic details – Displays the information of the last item actioned.
To Panel – Right hand side: #
The To panel at the right of the screen changes according to the selection of command panel tab: when Transfer to Location is selected, this panel shows a Location display; when Transfer to Item format is selected, it shows a Format display etc
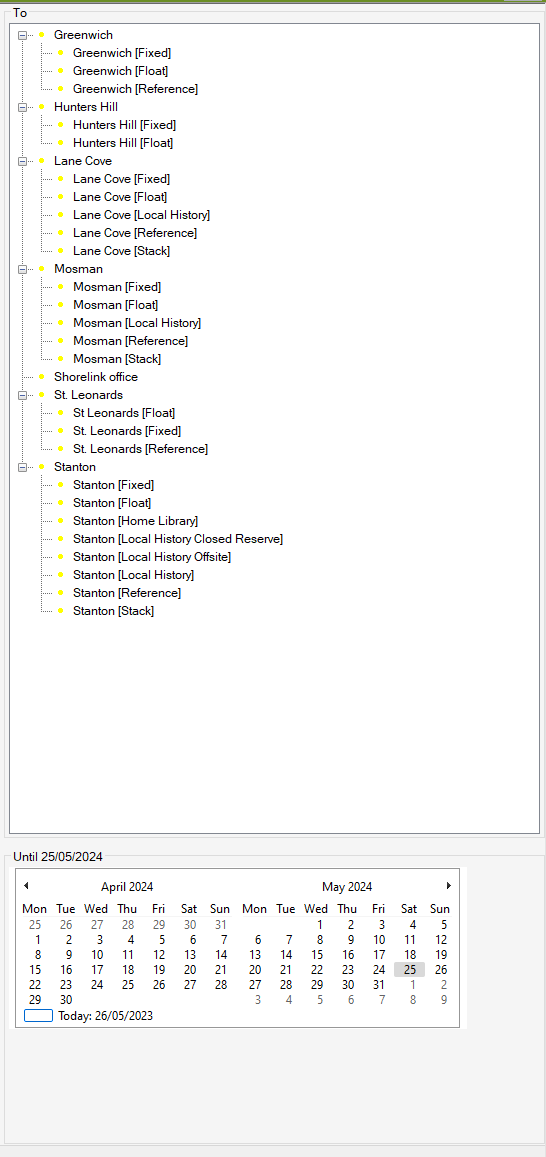
To Location – display presents a view of the library’s logical and physical locations in a tree structure. The tree is used to select the location which is to be the destination of a transfer. Note that only a physical location may be selected; and that a location must be selected before the item may be processed.
Calendar – The Calendar panel – which is only displayed for temporary transfers On the Transfer to location Tab when permanent or set as in transit are unticked – allows the selection of a date for the end of the temporary transfer period. The default transfer period is one calendar year.
Note that only a future date may be selected – and a message will warn if the date selected is passed:
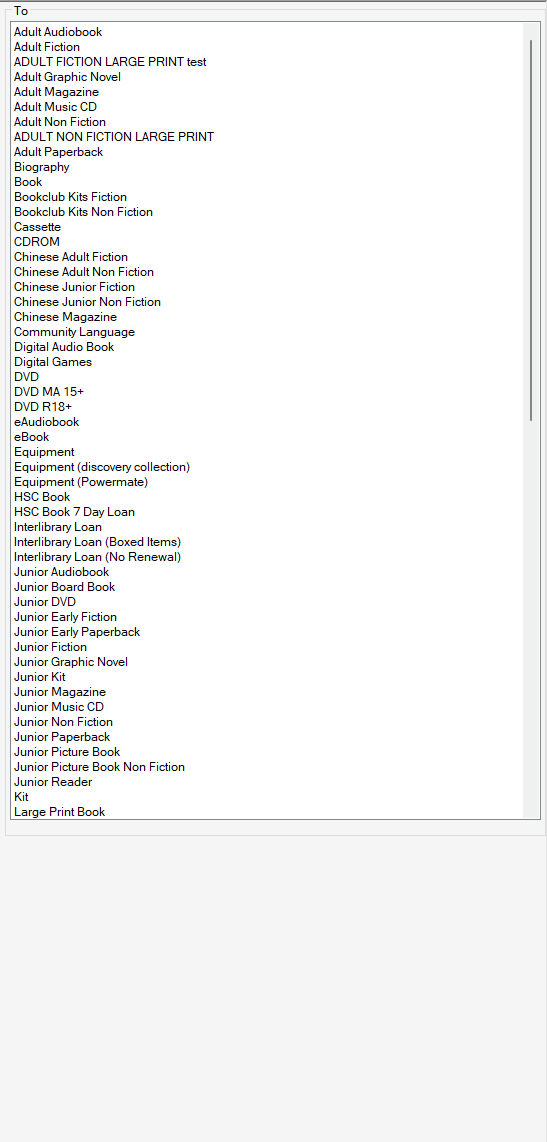
To item format – display shows the available defined item formats, for selection as a destination format. The formats are arranged according to their code value.
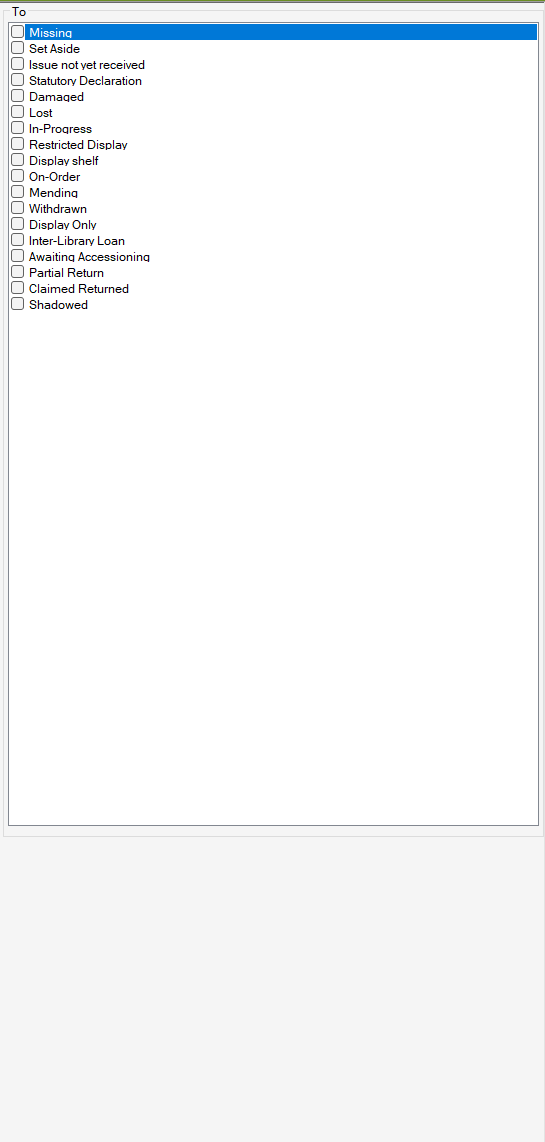
To Item statues – display shows the available item statuses. that can be added, or removed from an item.
Audit Panel #
The Audit panel displays the result of the previous transaction. Note that transaction details are record in the Aurora Circulation History, where they are available for reporting and analysis.
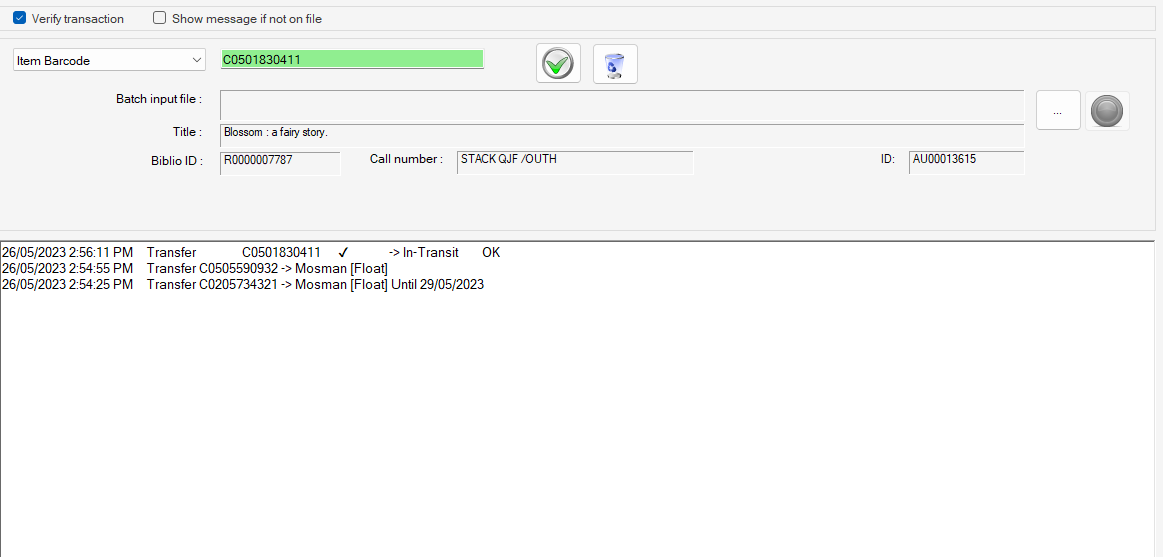
Statistics #
At the foot of the screen there is a panel recording statistics of the current session. See the Audit Processes page for full details.

Transfer to Location #
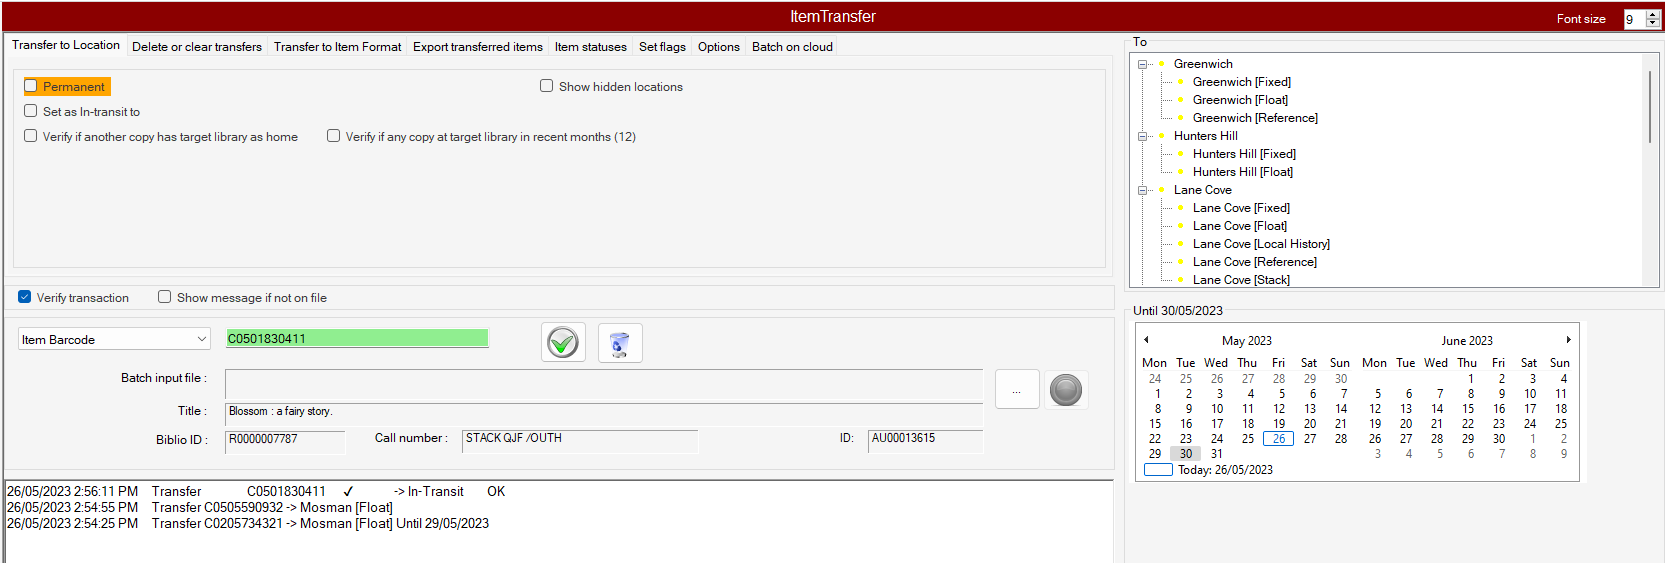
Checkboxes
- Permanent Transfer Checkbox
- When Checked – Permanent – to allow the operator to transfer items permanently to another location within the institution
- When unchecked – Temporary Transfer – transfer items temporarily to another location within the institution
- Verify if another copy is at the target library – only valid where a target location has been selected
When checkbox ticked , and another item is found at the location, Aurora will ask for confirmation that the current transaction is to continue, The operator may therefore proceed or cancel the transaction. - Verify if any copy at target library in recent month (12)
- Show hidden locations – Shows hidden locations from system parameters/locations
Permanent transfer #
For a permanent transfer, the Permanent check box must be checked, for permanent transfer, Aurora simply requires two pieces of information:
- where the transfer is to – Note that a physical location must be selected: logical locations may be displayed in the tree but are not valid for the transfer. It is not possible to identify the item for transfer until the target destination has been selected
- what item (or batch of items) is to be transferred
Temporary transfer #
To perform a temporary transfer, the operator must ensure that the Check box for Permanent transfer is not checked [by default it is not] and Set as in-transit to is unticked. Aurora then needs to know three things:
- where the transfer is to – Note that a physical location must be selected: logical locations may be displayed in the tree but are not valid for the transfer. It is not possible to identify the item for transfer until the target destination has been selected
- how long the temporary transfer is for
- what item (or batch of items) is to be transferred
Set as In-Transit #
To Change an item to InTransit, the operator must ensure that the Check box for Set as in-transit to is ticked (doing this will hide the permentant transfer checkbox. Aurora then needs to know two things:
- where the transfer is to – Note that a Logical location must be selected: Physical locations may be displayed in the tree but are not valid for this transfer. It is not possible to identify the item for transfer until the target destination has been selected
- what item (or batch of items) is to be transferred
Consortium operation #
Controls are in place to disallow transfers between Councils unless the operator has Task Level security 8 or higher. If the operator does not have this privilege, then a warning message will be given, In addition, a warning banner is shown at the foot of the locations tree:

NOTE – The Enterprise parameters of ItemTransferEntityBlock causes the physical and logical locations from the workstation entity to be displayed in the right hand panel tree.
Note on transfer of Child items #
Aurora uses the MARC Format for Holdings, and all items have their permanent location recorded in the MARC record, using tag 852. This allows for just the one location for a copy set to be recorded.
Where a transfer is temporary, the location change is not written to the MARC Holdings record but is simply held in the Item details record.
Permanent transfers of Child items therefore need to be controlled carefully: the transfer may be of one element of a child holding, such as an individual issue of a periodical; or of the complete parts of a set, as is likely to happen in a Library for the Blind.
There is therefore an additional checkbox to note in Transfer to Location – this is labelled ‘All items in Child Holding -> same location’. By default, this checkbox is ticked for a Library for the Blind but unticked otherwise. When ticked, then moving one individual part to a new permanent location will cause the MARC record to be updated, and the change then propagated to all associated items. When unticked, then only the current issue is recorded as transferred to the new location.
Checkbox details #
Seven separate checkboxes are provided:
| Checkbox | Notes |
|---|---|
| Delete item | If unticked – Clears location for a temporary transfer. If ticked – Deletes the Item. |
| Warn if last item in work to be deleted | This option is valuable, particularly if the ‘Delete work on last item deletion’ checkbox is not selected and alerts the user to the fact that the item being considered is the last item attached to a specific title. If this is indeed the case, the operator is given a message to proceed. |
| Delete Child Holding if last item Holding deleted | Where the library uses separated child holdings rather than embedded holdings, then this option may be employed to allow for the automatic removal of the holdings record when the last item is removed. [**Note that the holdings record will be removed, but even if this represents the last item in a bibliographic record, the parent bibliographic record is not removed by this action.] |
| Delete work if last item deleted | If checked, this allows the deletion of the last item attached to a work to trigger the deletion of the parent bibliographic work. |
| Bypass ‘Item Status’ prompt | if selected this allows any item status information such as indications of Missing or Lost to be disregarded, and the transfer to proceed regardless. Note that ‘Withdrawn’ status is handled as below, and this checkbox does not then reflect that status. |
| Bypass ‘Item Reserved’ prompt | if this is selected, any information on the item’s reservation is disregarded; otherwise, a prompt will be provided indicating reservation activity. |
| Bypass ‘Work Reserved’ prompt | if this is selected, any information on the works reservation is disregarded; otherwise, a prompt will be provided indicating reservation activity. |
| Use sub-location in output filename | this checkbox is specifically applied for use in Queensland Public Library Service exchanges – and in particular where councils have merged. PLS records refer to the original council name, which is preserved in the sub-location name. Selecting this checkbox therefore allows the subsequent file to be created using the old council name, e.g. TransferDeletion_Injune.ait, rather than the new identity, which would be TransferDeletion_QMRC.ait – but it would not then distinguish Inune material from that of Roma, Mitchell, etc. |
Withdrawn items button #
The command icon ![]() following the checkboxes allows creation of a file of withdrawn items:
following the checkboxes allows creation of a file of withdrawn items:
Using the batch file for bulk withdrawal - see the separate section below: Identification and deletion of items marked for Withdrawal
Transfer clearance with retention #
Note that it is important that the Delete box is not checked. The transfer clearance then simply requires one piece of information:
- what item is to be transferred
Transfer clearance with deletion #
If the transfer cancellation also implies that the item is not to be retained, but is to be returned – e.g. to a central location – then the additional box for ‘Delete Item’ is checked.
To be valid for a deletion, the item details are checked, and the deletion will not be allowed to proceed if the item:
- is on loan
- is a trapped reservation
- is an item level reservation
- is on the Picking List
If any of these situations are encountered, then an appropriate warning message is given to the operator; the deletion may not proceed until the condition has been cleared.
Selecting the additional check box ‘Bypass Item Status prompt’ etc allows any item status information such as indications of Missing or Lost to be disregarded, and the deletion to proceed regardless – this can be very useful if proceeding to delete multiple items with Missing or Lost status.
Charges #
Where an item is to be deleted and has a charge associated, the transfer and deletion process will automatically break the links in the User Account details, writing appropriate title information to the Account table, so that a record may be maintained of the details associated with the charge.
The transfer clearance then simply requires one piece of information:
- what item is to be transferred
plus in this case:
- confirmation that the item is to be deleted
Transfer to Item Format #
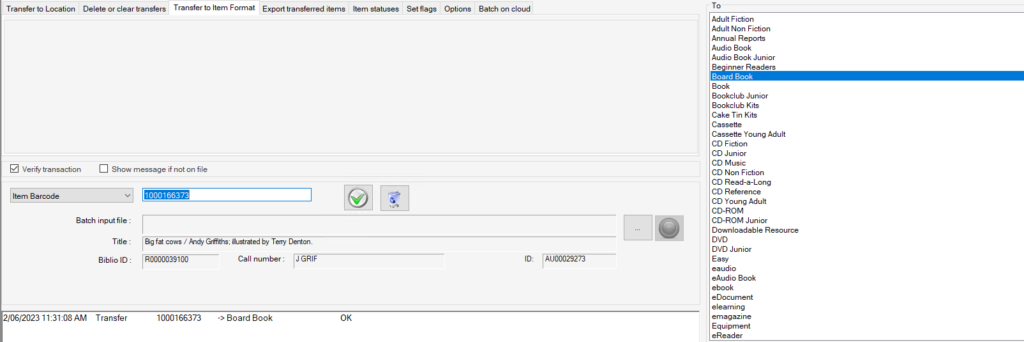
The Transfer to Item Format tab allows for the individual or batch change of specific item format. The tab has no specific controls.
The operator must first select the destination item format from the list displayed in the to Focus panel on the right
Once this choice is made. the item id can be entered as standard, with all details recorded in the audit trail.
This function can be very useful if a new item format is required where previously the items were included in a broader category, e.g. to differentiate DVDs from Videos, when all were classed previously as ‘Video’.
Export Transferred items #
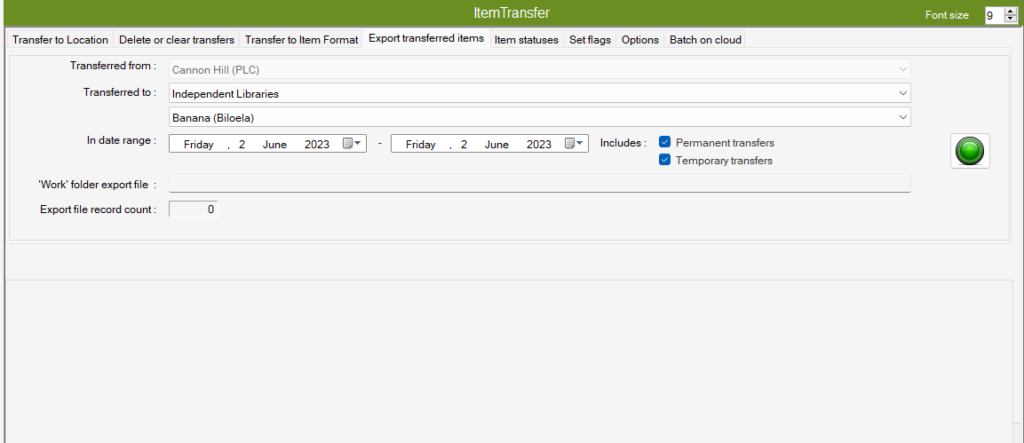
Used to create an export of works including the item 852 tag
The operator is able to select a range of works based on if they have been transferred to a defined location in a defined period.
The Target export institution must be defined for this tab to be able to use.
Item Statuses Transfer #
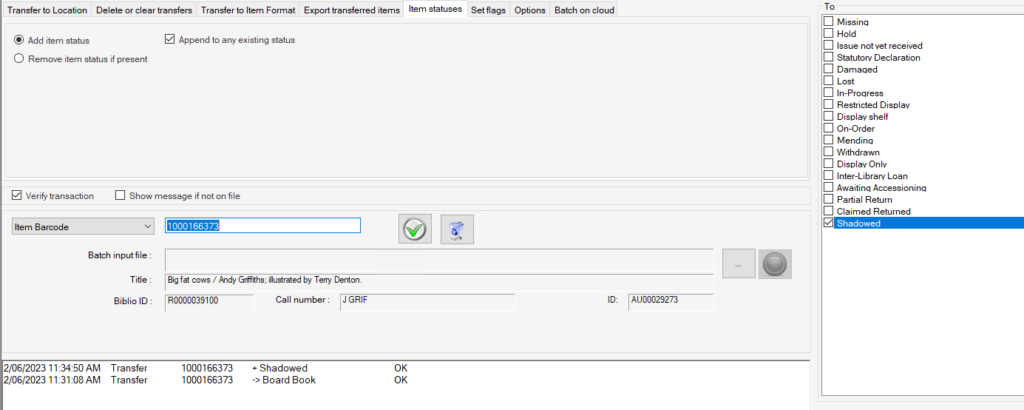
Radio Buttons
The operator is able to select between
- Add a status to an item – with this a checkbox to append to any existing status is available by default.
- Remove item status if present.
To Focus Panel
Tick boxes allow the selection of the available statuses Note the option to select multiple status is avalaible.
Results panel – Bottom
The result of the transfer will be displayed at the bottom detail what has occurred in the example above (+Shadowed ok) indicates the status of shadowed was added to the item. Other examples include (-> Clamed returned Nothing to do) or (-Shadowed ok)
Set flags Transfer #
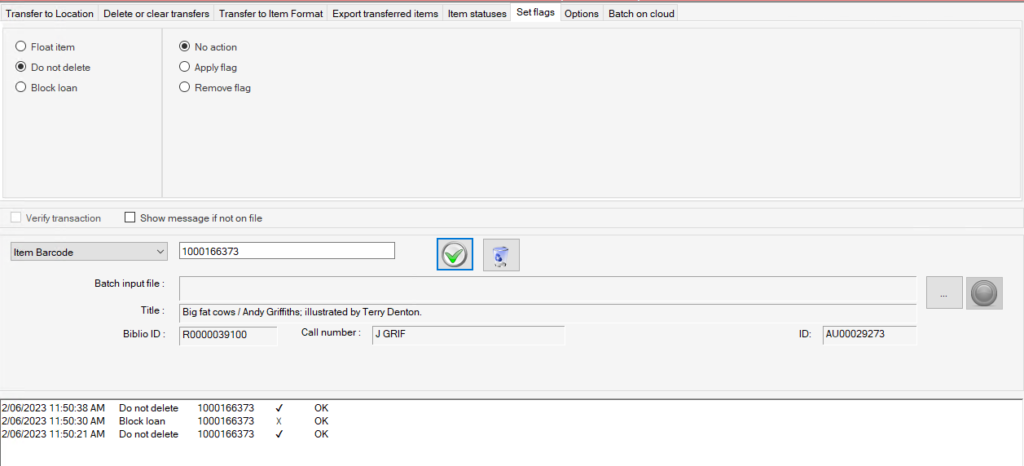
Set flags allowed the addition or removal of some specific flags in Item details
Radio Buttons
1st panel is to select the available flags that can be changed
- Float item
- Do not delete
- Block loan
The 2nd panel radio button allows the operator to choose between adding or removing flags
- No Action
- Apply flag
- Remove flag
Results panel
The results panel will display the name of the flag, the item barcode, a Tick for apply flag or a X for removed for a flag and OK if the Transfer was successful.
Options Transfer #

This tab allows the creation of a list of numbers as a text documne.
In the top panel allows the operator to detail a number range in which the list of numbers should be created in the example above there is 8 in-between
Selecting the green button creates a .txt file that has the list of numbers within it and it is saved to the work folder to be used for other actions.
Batch to cloud – Transfer #
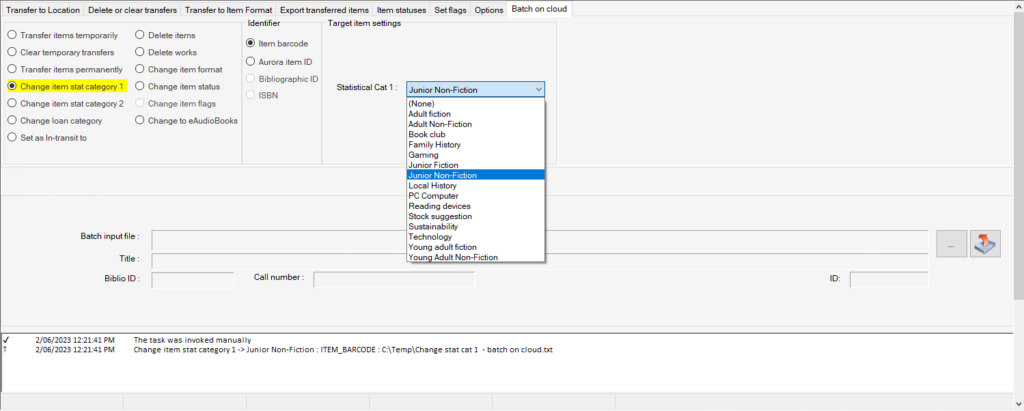
Batch on cloud allows many of the transfers that are available in other tabs plus more however they are only able to be done via batch input file as such the results panel will only display the task that has been invoked and if it was received and processed by the task watcher.
Verification messages.
Batch on cloud does not have the same ability to give verification messages on individual items that the other tabs have.
1st Panel – Batch on cloud Task Radio options
- Transfer items temporarily
- Clear Temporary transfers
- Transfer Items Permanently
- Change items stat Category 1
- Change item Stat Category 2
- Change loan category
- Set as in-transit to
- Delete items
- Delete works
- Change item format
- Change item status
- Change item flag
- Change to eAudiobooks
2nd Panel – Identifier
In order to process the batch item the operator must identify the type of identifier used in the .txt document that is selected for the batch input file NOTE depending on the task radio button selected will change the identifier options e.g. Delete works can only be identifed by Bibliogrphic ID or ISBN
- Item Barcode
- Aurora Item ID
- Bibliographic ID
- ISBN
3rd Panel – changes/ details
This panel changes depending on the 1st Panel – Batch on cloud Task Radio options selected
| Task | Changes |
| Transfer items temporarily | Location of the transfer Dropdown Expiry date Box |
| Clear Temporary transfers | No Input |
| Transfer Items Permanently | Location of the transfer Dropdown |
| Change items stat Category 1 | Stat cat 1 dropdown – list if stat category 1’s are within system parameters and are individual to each library |
| Change item Stat Category 2 | Stat cat 2 dropdown – list if stat category 2’s are within system parameters and are individual to each library |
| Change loan category | Loan Category drop down – List of loan categories are from Loan parameters – Loan categories and are individual to each library |
| Set as in-transit to | This option shows the to focus panel tree the same as transfer to location tab |
| Task | Changes |
| Delete items | Provides check box to: Delete work if last item deleted Delete child holding if last item holding deleted |
| Delete works | Provides radio buttons to select the work formats that are able to be deleted. Any ebook eaudiobook ebook or eAudiobook |
| Change item format | A dropdown list of all the formats available in the system. |
| Change item status | Provides 2 panels to choose to add or remove item statuses and a series of checkboxes select the statuses to which will be added or removed. |
| Change item flag | Currently not available |
| Change to eAudiobooks | |

