Inter-Library Loans  #
#
The Inter-Library Loan function supports various strategies to transmit requests to potential suppliers and manage their loan and eventual return. The process links through to circulation functions, so the actual end-user loan mechanisms operate as if for local stock. A quick reference guide is available. See also details of creating a box of ILL items
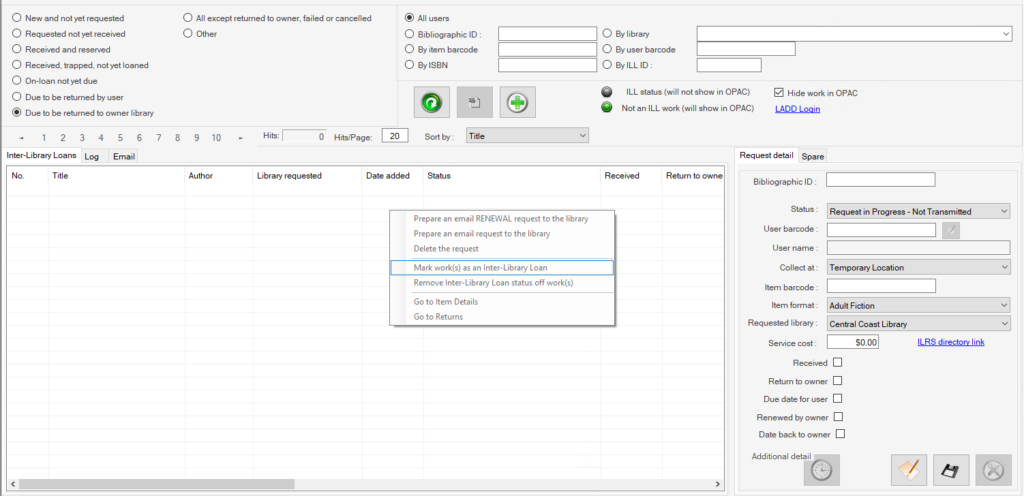
and is made up of five separate panels:
- ILL state – Radio Button – Left hand panel Top
- Retrieval options – Left hand panel top
- Command panel – Left hand Panel middle
- ILL summary Results display – Left hand panel bottom
- ILL request detail – Right hand panel – Bottom
ILL state – Radio Button – Left hand panel Top #
The first panel presents a number of separate radio buttons allowing retrieval of ILL details into a summary display, according to the state of the request:
The radio button options presented are for requests:
- New and not yet requested
- Requested and not yet received
- Received and reserved
- Received, trapped, not yet loaned
- On-loan, not yet due
- Due to be returned by user
- Due to be returned to owner library
- All except returned to owner, failed or cancelled
- Other
In each case, the selection may be subject to a filter set in Retrieval options; and the summary display is invoked by clicking the Refresh button on the Command panel.
Note: For an interlibrary loan to be able to be reserved. A loan parameter must be set up to allow this.
Retrieval options – Left hand panel top #
For each ILL state selection, the Retrieval options panel to its right allows more focus to be applied, by entry of an identification key for the request:
The options are selected by radio button from:
- All users – the default and applies no extra filter
- Bibliographic ID – will usually be one result only, for the requested title
- By item barcode – will usually be one result only, for the requested title
- By ISBN – will usually be one result only, for the requested title
- By library – to allow all requests for a given library to be checked, e.g. if that library announces a closure. This option allows a browse of the library name from the drop-down combo.
- By user barcode – to allow all requests for an individual to be checked
- By ILL ID – this is the specific ILL request id – shown in the summary list view as the rightmost column, and will be one result row only, for the requested title
Command panel – Left hand Panel middle #
A simple command panel is placed under the Retrieval options.
This has two button commands:
 Refresh – this button will display the summary detail for ILL requests matching the initial ILL state, and limited by Retrieval options if applied
 Export – this button allows export of the current summary display to Excel
 Quick ILL – allows simple entry of a request from a staff operator
and a key to the work’s ILL status, determining whether the work details will show in OPAC or be suppressed. The ILL status can be applied through any listview display using the pop-up menu – but there is also a checkbox ‘Hide work in OPAC’, which allows all requests processed to be automatically given the required default status (‘Hide’ is selected by default)
There is also a Sort option, which can be set to sort before the search is performed, using a combo allowing sorting
- By title (default)
- By date, latest first
- By date, earliest first
- By library name
ILL summary display #
The summary display shows the hits for the state (and limited by retrieval options if appropriate):
Note that the number of hits per page can be set as preferred. The default value is 20 and may be set up to 99 – once set, this value will be persistent for the workstation.
The results can be pre-sorted according to the command panel sort setting; once displayed, the results may be sorted on any column, by clicking on the column header, with the first click allowing sort ‘ascending’; and the next ‘descending’.
Pop-up menu #
The Summary display provides a pop-up menu:
This has seven options:
[The first three are only enabled when one ILL row is selected]
- Prepare an email RENEWAL request to the library
- Prepare an email to the library
- Delete the Request
[The middle two, between the lines, support actions applied to one or more selections. The application of the Inter-Library Loan status allows the title to be suppressed from OPAC display]
- Mark work(s) as an Inter-Library Loan
- Remove Inter-Library Loan status off work(s)
[The lower set allows you to switch to linked screens, using the current ILL item’s barcode]
- Go to Item details
- Go to Returns
Right click Prepare – Email Request #
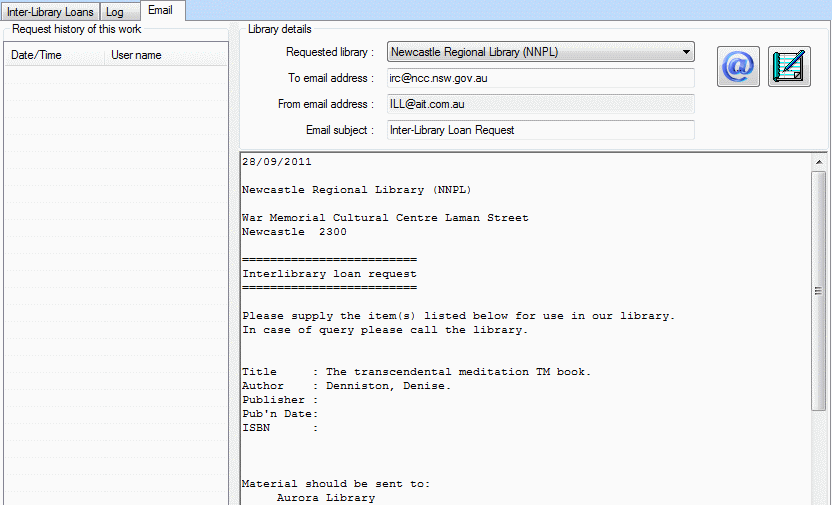
Following the email request option allows a despatch or the request to the target library, or optionally, printing of the request letter, e.g. where no email address is known.
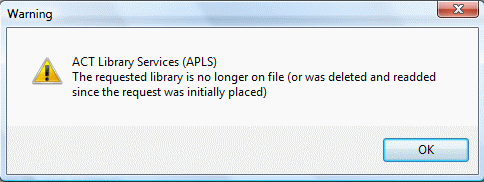
This action is taken following selection of the target library in Request Detail, so the library is already known – however, if the library record has been deleted since allocation, this will be notified to the operator:
Otherwise, the tab will open as illustrated above, showing the content of the email to be sent, and additional panels as described below:
Library details #
This panel shows the following detail:
- Requested library. This shows a combo of all recorded ILL target libraries and allows the target to be changed if appropriate.
- To email address – from the library’s user record
- From email address – from the configuration files
- Email subject – from the configuration files by default (may be amended)
Two command buttons are available on the right of the panel:
 This generates the email
 If email is not possible, then this option invokes Notepad and allows the message to be printed
Email text #
The email text to be sent is compiled and shown in the panel below, in the exact form in which it will be sent:
The template for this is held in ../Aurora/Aurora_client/Client/Programs/Templates/ as illrequest.txt – this may be edited as required to change wording, but Aurora keywords should not be removed.
Request history of this work #
As requests are sent to the libraries, a panel to the left of the screen will populate, showing the libraries to which requests have already been sent – as soon as the email is despatched, this will be updated to reflect that:
ILL request detail – Right hand panel – Bottom #
#
When a specific request is selected from a selection display, the fine detail is shown in a panel on the right – This panel displays the following elements

- Bibliographic id
- Link to Suggestion – this hyperlink will display the original suggestion from the user
- Link to Catalogue – if this link is followed, the record will be displayed in Details of a work
- Status – this provides a combo for selection of the status of the request: – Note that while it is possible to apply a manual selection, e.g. to mark a request as Cancelled, a number of actions will automatically update the status, logically.
- User barcode
 Email the requester – a small button is placed right of the user barcode, allowing an email communication to the user (only enabled if the user is in turn email enabled). This function is the same as the right click from the Summary panel
If this is clicked, then a draft message will be displayed in the same way as for the library email request and using the same controls. – The template may be modified as required, but please note that the draft can be edited before sending, e.g. to extend the explanation.- User name
- Collect at – allows selection of the branch from which the ILL will be collected when delivered.
- Item barcode – Aurora permits the use of the original barcode carried by the item, as long as it does not duplicate an existing library barcode – so the supplying library barcode can be used.
- Item Format – note that Item format parameters determine the specific formats that can be used in the ILL context. AIT recommends that the library set up a specific format ‘InterLibrary Loan’ for this purpose. Note that changes to the request may not be saved, until an item format is applied.
- Requested Library – this combo lists all the libraries defined in the system for use in ILL. A new target library may therefore simply be selected from the list presented.
- Service Cost – if a charge is to be associated with the ILL request, it can be noted here.
Date Checkboxes
- Received – This is the date that the item is received by your library.
- Return to owner – This is the date that the item is due to be returned to the owning library.
- Due date for user – This is the date the item is due back to your library (if not filled in the default due date will apply)
- Renewed by owner – This is the last date that the owning library will allow a renewal.
- Date back to owner – This is the date that the item was returned to the owning library:
Command buttons #
 Prepare the request email to the target library
 Save changes to the Request detail
 Delete the Request (and also any associated ILL item)
User links for ILL #
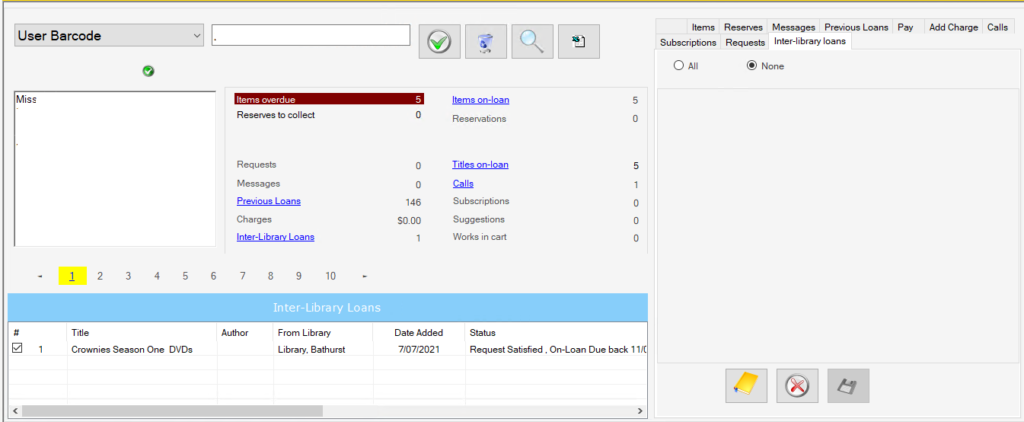
The Inter-Library Loans linked tab presents information on the user’s recorded inter-library loan requests. The display shows author and title details; the library used to supply the loan, and the status of the inter-library loan request:
Control Panel #
a radio button allows for selection of ALL or No ILL requests; when requests are selected,
these may be deleted using the command button:
![]() – Delete ILL
– Delete ILL
![]() – Go to Item Details
– Go to Item Details
Quick ILL #
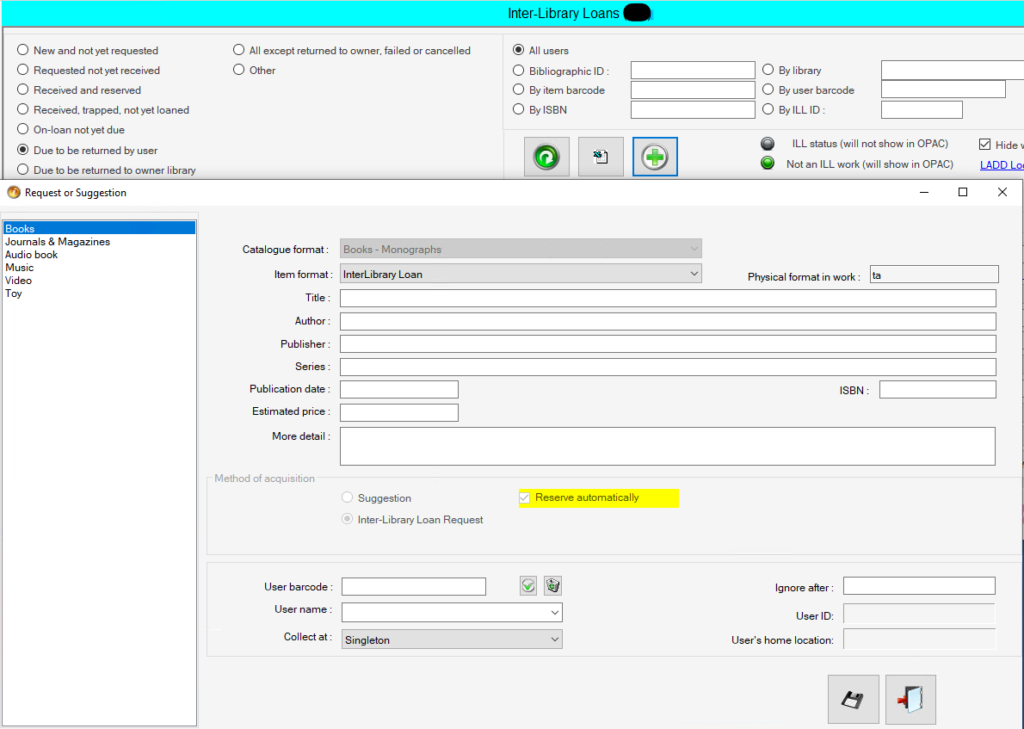
The Quick ILL form ![]() in the Inter Library Loans Screen provides a simple alternative to creation of an Interlibrary Loan request in Suggestion Management. The form is shown as an overlay:
in the Inter Library Loans Screen provides a simple alternative to creation of an Interlibrary Loan request in Suggestion Management. The form is shown as an overlay:
with prompts for addition of the required bibliographic details. Note that in the ‘Method of acquisition’ panel, the radio button ‘Inter-Library Loan Request’ is automatically selected – this cannot be varied. Similarly, there is a checkbox ‘Reserve automatically’ – ticked, and so the lower panel is enlivened for entry of user details for the purposes of recording a reservation when the item is received.
Quick ILL Help #
- 1. User places request – via OPAC (Suggestion) or Aurora Desktop (Suggestion or ILL)
- Contact the borrower via email to inform of ILL, Cost, etc. (If required by 1.)
- Mark suggestion as ILL request (if required by 1. And 2.)
- Create catalogue record or attach record to suggestion (if required by 1.)
- a. If a ‘good quality’ MARC record is required for communication use Z39.50 to acquire.
- b. Edit the Suggestion as necessary, e.g. fix spelling, add GMD or prefix the title.
- c. On completion of either of these tasks, load the record into the catalogue.
- Mark as an approved ILL (optional)
- Search for a library that holds the item (Internet, LADD, Trove, etc.)
- Create an ILL request (from suggestion)
- a. Select the requested library.
- b. Select item format ‘InterLibrary Loan’.
- c. Add service cost (if known at this stage)
- d. Save
- Request via email
- When the item arrives:
- a. Input item barcode
- b. Enter ‘Received’ date
- c. Enter ‘Return to owner’ date
- d. Enter ‘Date due for user’ (optional) – default loan period is used if no date entered here.
- e. Add the service cost (if not done in 7c.)
- f. Save
- Return the item (do not remove the abnormal status) – this will:
- a. Trap the reserve
- b. Bill the user for the ILL service cost and the reserve cost (This can be set to zero)
- c. Notify user by email, post or other supported methods.
- Item is loaned (in-progress status is automatically removed)
- 12. Renewal requested by borrower
- a. Request renewal via email (Only available if originally requested by email through Aurora)
- b. Update ‘Return to owner date’
- c. Save
- d. Renew the item for the user to the new date in circulation
- Item is returned – Operator is alerted to ILL
- Mail item back to owner and: a. Enter ‘Date back to owner’ b. Save c. Item is automatically given withdrawn status
- Delete the request – this can be done:
- a. Manually
- b. Scheduled task purges: i. Inter-Library Loans returned to owner Library ii. Bibliographic Inter-Library loan works with no items (exclude if URL or added recently) iii. Inter-Library loans linked to deleted works
