Aurora Post Introduction #
Aurora Post provides a message interface application, integrating with Aurora Web Services (AWS) and Aurora Desktop to allow the bulk sending of HTML Emails or SMS Messages to pre-selected users.
PLEASE NOTE: This application is not covered by the standard support and maintenance agreements and is separately chargeable. Please contact AIT for further information
Installation #
Aurora Post is installed by simply downloading and unzipping the latest AuroraPost archive file from AIT, running setup.exe and following the prompts. If you have any problems during this stage, please contact AIT as per normal for assistance.
Generating XML User Files #
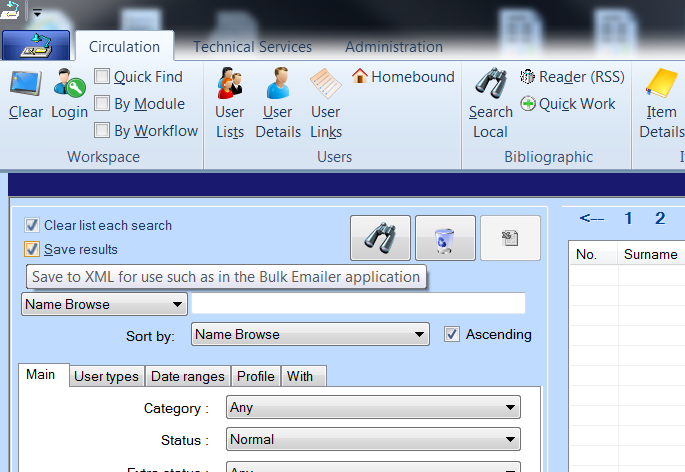
In order to bulk select users to Post messages to, you need to have first exported an XML file from within Aurora Desktop. This is done through “User Lists”. Carry out a normal filter of criteria as you normally would, and once you are happy with the list of users to send to, check the box “Save Results” before re-invoking your User Search. This will save your XML file onto your computer ready for use. If you don’t know where this file is located, check the Trouble shooting for more details on this issue.
Logging in #
A shortcut to Aurora Post will exist on your Desktop. Opening Aurora Post will present you with a Login window as below.
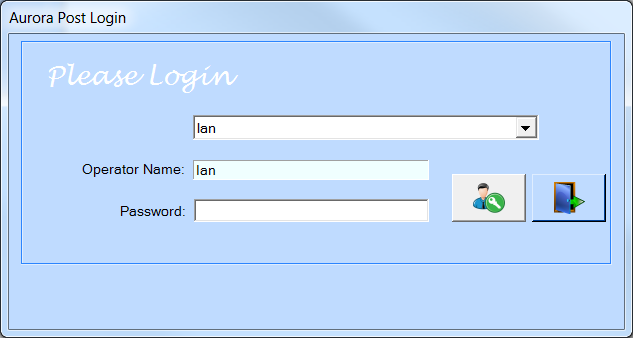
Choosing your username from the list provided, entering your correct password and pressing the Login button ![]() will login you into Aurora Post. Your username will also be remembered to avoid you having to choose your username from the list each time you log in.
will login you into Aurora Post. Your username will also be remembered to avoid you having to choose your username from the list each time you log in.
Settings #
It is critical that close attention is paid to this document and your use of Aurora Post to avoid sending incorrect information to your users. The Settings screen is reached by clicking “Menu” at the top of Aurora Post and choosing “Settings” which will then present you with a window which looks like this:-
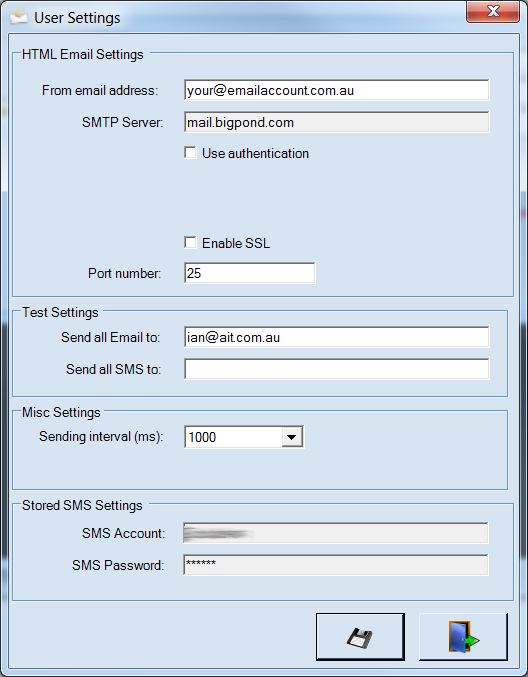
Once these settings have been changed to suit, simply press the Save button and these settings will be recorded for future use. This setup file can also be backed up for future reference and is stored in your C:\Program Files (x86)\Aurora Information Technology\AuroraPostSetup folder, named AuroraPost.exe.config
HTML Email Settings #
From Email Address #
You need to enter the email address here which will be used to send the emails from. A generic non personal one is preferred for obvious reasons.
SMTP Server #
This field cannot be changed here. It is defined in the system Enterprise parameters and it is critical that it is kept up to date and correct within Aurora. A valid entry will then be automatically populated here in Aurora Post. If you have nothing in this field, you will need to enter your mail server details in Aurora Desktop first.
Use Authentication #
99% of email users will NOT need to tick this as SMTP outgoing email is usually allowed to do so without authentication. Please leave this unchecked unless you are directed to check it.
Enable SSL #
This is only required if your mail connection has to be done under SSL encryption. Please leave this unchecked unless you are directed to check it.
Port Number #
This is usually port 25 and can be left as is unless directed to change it
Test Settings #
Send all Email to #
If you are doing some testing and want ALL emails to go to your test account overriding the users actual email addresses, then enter a valid test email account into this text box. Note: Doing so will put various messages and warning throughout Aurora Post so you are comfortable that you are in test mode and emails will go to your test email address instead of to your users. Simply blank it out again and Save when you have finished testing and are ready to proceed with an actual post to your users.
Send all SMS to #
If you are doing some testing and want ALL SMS messages to go to your test Mobile number overriding the users actual mobile numbers, then enter a valid test mobile phone number into this text box. Note: Doing so will put various messages and warning throughout Aurora Post so you are comfortable that you are in test mode and SMS messages will go to your test mobile number instead of to your users. Simply blank it out again and Save when you have finished testing and are ready to proceed with an actual post to your users.
Misc Settings #
Sending Interval (ms) #
This setting allows you to choose the delay time between each message as they are sent. Please note that some ISP’s do not look kindly on huge numbers of messages going out with very little time between them and may well think you are spamming people. At the same time, too large a delay will take more time to deliver the messages. You may have to try various delays to find the perfect delay for your site, but at present it defaults to 1000ms which is obviously one second.
Stored SMS Settings #
SMS Account #
This field cannot be changed here. It is stored within your Aurora Database and it is critical that it is kept up to date and correct within Aurora. A valid entry will then be automatically populated here in Aurora Post. If you have nothing in this field, you will need to enter your SMS account details in Aurora Desktop first.
SMS Password #
This field cannot be changed here. It is stored within your Aurora Database and it is critical that it is kept up to date and correct within Aurora. A valid entry will then be automatically populated here in Aurora Post. If you have nothing in this field, you will need to enter your SMS account details in Aurora Desktop first.
HTML Email Templates #
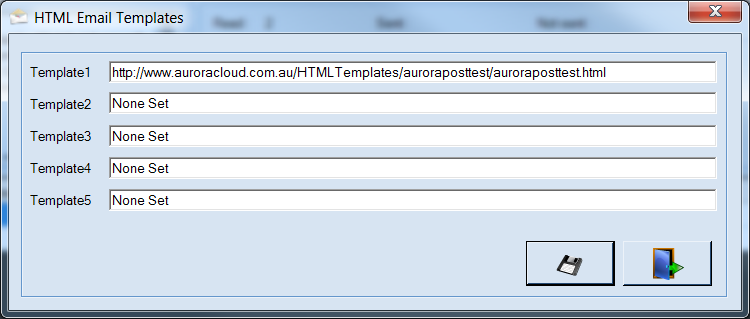
In order to point Aurora Post at your HTML Templates, they must be entered into Aurora Post through the “Menu” and select “HTML Email Templates” There are currently five possible templates to be used. You simply need to paste the FULL path to your HTML template file, for example:
http://www.auroracloud.com.au/HTMLTemplates/auroraposttest/auroraposttest.html
The following keywords can be used in formulating a template to take data directly from the Aurora database:
| Keyword | Meaning |
|---|---|
| TransactionAmount | The referenced fee from a transaction such as the invoicing run |
| U_ID | The user’s Aurora id |
| U_Barcode | The user’s barcode number |
| U_Type | The user type |
| U_Name_a | The user’s last name |
| U_Name_b | The user’s forename |
| U_Name_c | Any additional name element |
| U_Name_e | The user’s ‘title’, e.g. Mr, Ms, or Admiral |
| U_Name_f | The informal name for the user |
| U_Mobile | The user’s mobile phone number |
| U_HomeAddress_1 | A specific location element in the address, e.g. the flat number |
| U_HomeAddress_2 | A secondary specific location in the address, e.g. the building, and usually the number in a street |
| U_HomeAddress_a | The street address |
| U_HomeAddress_b | City or suburb |
| U_HomeAddress_c | State or Province |
| U_HomeAddress_d | Country |
| U_HomeAddress_e | Post code |
| U_HomeAddress_k | telephone number (landline) |
| U_HomeAddress_m | email address |
| U_RegS | Start of registration |
| U_RegE | End of registration |
| U_Status | User status |
| U_HomeAddress | The full home address (individual elements listed above concatenated into a single data element) |
| U_DebarReason | Reason for debarral (if applicable) |
| U_DebarS | Debarral start date |
| U_DebarE | Debarral end date |
| U_DOB | Date of birth |
| U_LastD | The date of last activity for the user |
It is critical that each and every file reference within this HTML File is entered as a complete URL path, whether it be:
- a JavaScript file
- a CSS File
- an Image file
- a Link to a file, such as a PDF
For example, if, within the HTML file, you reference an image like this:
<img src="/images/test.png">
then Aurora Post will not be able to see this file. It must look like this:
<img src="http://www.test.com/images/test.png">
Subject Headings #
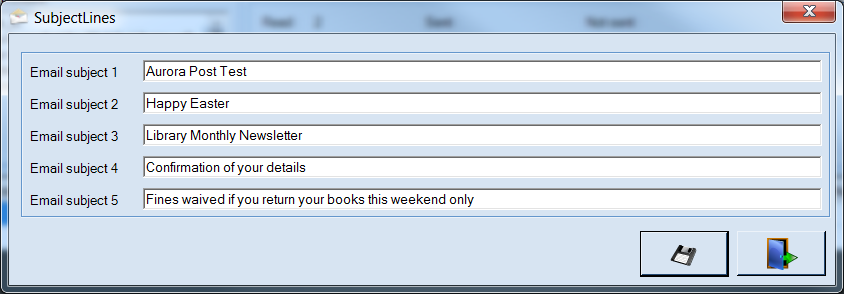
In order to pre-populate point Aurora Post with your Email Subjects , they must be entered into Aurora Post through the “Menu” and select “Subject Headings”. There are currently five possible Subjects to be used. These are currently entered by default to give you an idea but can be easily modified to suit your needs.
Aurora Post Main Screen #
You are now ready to Post to your users using one of the two methods described in detail below.
To Post out a HTML Email template #
It is simply a matter of :-
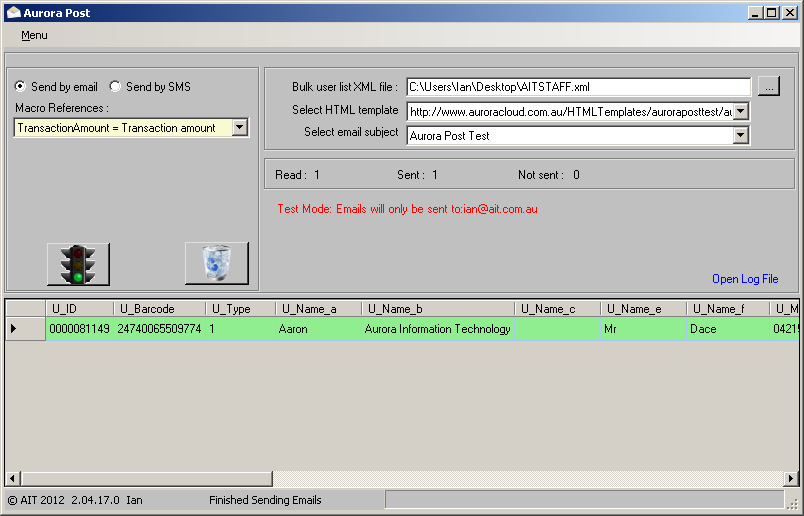
- Ensure “Send by email” radio button is selected.
- Select the XML file you exported from User Lists in Aurora Desktop for “Bulk user list XML file”. You will see the grid populate as below if successful.
- Select a HTML template from the dropdown. You can modify this list as documented.
- Select an email subject from the dropdown. You can modify this list as documented in subject headings.
- Click the Send Button to begin the process.
Important points to note here:
- If testing, you should see a RED Label on this page informing you of the current Test Mode and the email address being used.
- Rows in the grid are highlighted green when sent successfully, and red if unsuccessful.
- Success or failures are logged to a file and can be checked by clicking the link “Open Log File”. This will open for you in Notepad.
- You can Stop the process at any time by clicking the Stop button.
- Rows in the grid that are green can then be deleted manually and you can click the Send button again if you needed to continue without sending it out to the same people.
- The Clear button will empty the grid for you, ready to pick a different XML file.
- The Macro Reference dropdown is here to describe the fieldnames found in the grid.
To Post out an SMS #
It is simply a matter of :-
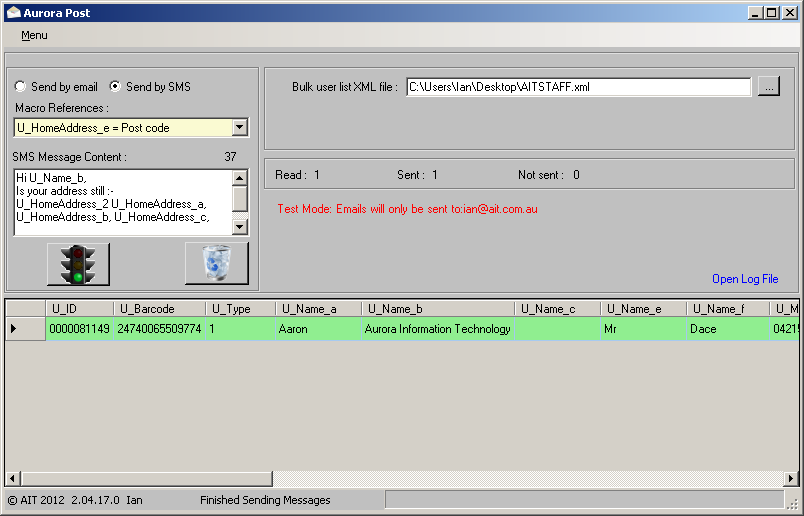
- Ensure “Send by SMS” radio button is selected.
- Select the XML file you exported from User Lists in Aurora Desktop for “Bulk user list XML file”. You will see the grid populate as below if successful.
- Enter your SMS Message Content using the Macro References to auto populate for you in your message box. An example of this can be seen in the below screenshot.
- Click the Send Button to begin the process.
Important points to note here:
- If testing, you should see a RED Label on this page informing you of the current Test Mode and the mobile number being used.
- Rows in the grid are highlighted green when sent successfully, and red if unsuccessful.
- Success or failures are logged to a file and can be checked by clicking the link “Open Log File”. This will open for you in Notepad.
- You can Stop the process at any time by clicking the Stop button.
- Rows in the grid that are green can then be deleted manually and you can click the Send button again if you needed to continue without sending it out to the same people.
- The Clear button will empty the grid for you, ready to pick a different XML file.
Troubleshooting #
Default folder for Desktop to save XML files to, and Aurora Post to read from, automatically.
Within your auWksAurora.ini file, LINK NOT SET UP in the [Settings] area, you are able to add an entry as below which will set this folder for you from now on, making it easier to save these XML files from Desktop, and read this folder by default from Aurora Post
The syntax looks like this:-
Environment_SpecialFolder=38
The Code choices you have are as follows :-
- 43 = CommonProgramFiles
- 38 = ProgramFiles
- 35 = CommonApplicationData
- 28 = LocalApplicationData
- 26 = ApplicationData
- 16 = DesktopDirectory
- 5 = MyDocuments
- 5 = Personal
- 0 = Desktop
