Cataloguing  #
#
Aurora supports an underlying MARC data structure, but you do not need to catalogue in MARC if the structures are not familiar. Note that your operator id must be enabled to perform cataloguing functions – if the Cataloguing icon on the toolbar is greyed, then you are not enabled (please contact your Systems Manager if changes are to be made)
See also – Cataloguing process / Bibliographic records management
Record locking #
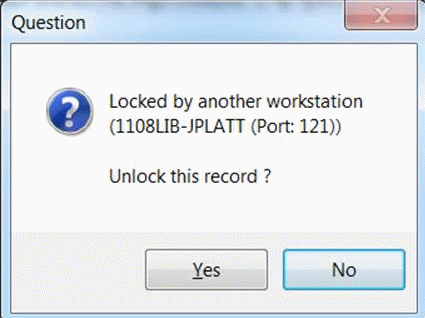
When you enter a record number to edit a catalogue record, the record will be locked immediately – you do not need to have made a change, you just need to be first one in. When you clear the entry number field the record is unlocked. If somehow you managed to lock it, then the office had a power failure and the workstation powered off, and subsequently you went back into the record, it will not give you a message to say it’s locked – as it knows that it’s locked for your workstation.
If you attempt to open a record which has been locked by another user, then you will be given a message, and can see the identity of the other operator:
If you opt to unlock the record from another workstation, then obviously it’s a fairly obvious decision. On doing this the record will be unlocked – then relocked to your workstation port.
For this to apply, the Enterprise parameter ‘CatalogueLock’ must be set. Bibliographic and Authority records work the same way
Screen elements #

This initial page introduces the screen elements you will encounter in Cataloguing. When you click the Cataloguing icon, a screen like this will be shown:
This is divided into several panels:
MARC format – Aurora Cataloguing supports both Bibliographic and Authority record maintenance. Please note that the choice here is not dynamic – you cannot select one or other format, but here Bibliographic maintenance is the default, and Authority maintenance is invoked by separate action.
Mode – The Mode panel allows selection of the Cataloguing Mode:
- Add
- Change
- Delete
and also provides a set of control buttons:
| Active state | Notes | |
|---|---|---|
| Save | Save is enabled as soon as any edit is performed on the record. – The button will be grey if inactive and not able to be used | |
| Delete | The Delete button is enabled by selection of Delete mode. – The button will be grey if inactive and not able to be used | |
| Clipboard | The Clipboard is enlivened when a record is copied into it – either from the record copy function, or selection from a Z39.50 search – allowing that record to be pasted in for exiting. – The button will be grey if inactive and not able to be used | |
| A record may be printed at any point. | ||
| Export to Excel | The current record can be exported as required to Excel. All exports are written to the central work file as Detail_<date>_<workstationname>.xls. Following the successful export, a question will be asked if the output file should be opened in Excel. – The button will be grey if inactive and not able to be used | |
| Quick Holdings | When a record is being edited, the Quick Holdings function may be invoked for ease of item addition, particularly if handling multiple items. – The button will be grey if inactive and not able to be used | |
| Spell-check | This feature remains currently under development. – The button will be grey if inactive and not able to be used |
Further to the right, there is a separate set of buttons:
Allowing quick links to:
 Provides information of colour hints.
- Windows character map
- Search
Sidebar #
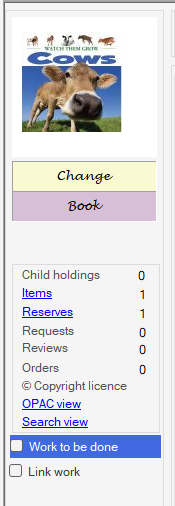
On the left-hand side of the screen, you will find a sidebar:
Cover image, delivered from Syndetics, if you have an account, or using the Aurora Image Server to acquire public domain images.
Current action indicator. This indicator is provided to give a consistent and clear indicator of where you are with any record, by showing the action (add, change or delete) and the Work Format of the work currently being dealt with.
Example Work formats: Maps, Vook, Music, ebook, eaudiobook, serial
Full details of work formats for Montage
|
Change
|
Delete
|
Add
|
|---|
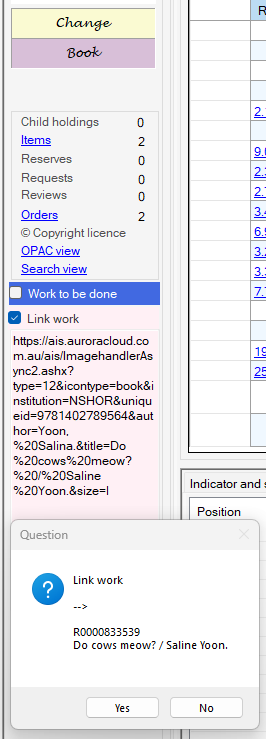
Sidebar Related links #
This panel displays any current links to other records, in the form of hyperlinks:
- Child holdings
- Items
- Reserves
- Requests
- Reviews
- Orders
- Copyright licence
- OPAC View
- Search View – Opens Search screen with on bib ref search on current work
Sidebar Checkboxes #
- Work to be done – Ticking this open the Work to be done buttons at the bottom of the sidebar – selecting one runs each list that is displayed in the work to be done tab
- Link Work – Allows works to be linked and displayed in montage as a separate tab when looking at a title in montage.
To add a Link – Find the title that is to be linked in montage click and hold onto the cover image and drag into the Link work box.
A popup question will appear asking to confirm the link – Click yes
A 774 tag will appear on the table with the Bib Ref of the work and the title. Save the work.
two ring links will appear next to the works on the search screen and the linked tab will appear in Montage.
Work to be done – sidebar #

Initially, this checkbox is not selected.
When the ‘Work to be done’ checkbox on the Cataloguing screen sidebar is selected, then Aurora accumulates tallies of records which need some attention:
Clicking on each tally button/symbol open the work to be done tab listing the relevant works.
| Tally symbol | Meaning | Notes |
|---|---|---|
| Works marked for ‘review’ | If your library has a trainee, or even a new member of staff, then it may be useful for that person’s work to be set to be marked for review. This applies only to catalogue records and allows the trainee to add records in exactly the same way as any other operator; the difference is that on Save, when the record is saved with Review status, this means that it is not fully indexed, and is not available in OPAC. Note that the library may also set any work added via Quick Work to be given review status Enterprise parameter BibsMarkForReviewIfQuick.It is necessary therefore for a supervisor to view the works marked for Review and confirm that the cataloguing is good. When the supervisor saves the record, the status must be reset to Normal. | |
| Works with an item marked as having a skeleton catalogue record | ||
| Works marked as ‘archived’ | ||
| Works marked for ‘deletion’ | ||
| Works marked as having ‘no items’ | ||
| Works marked as ‘shadowed’ | ||
| Works (other than serials) with items to be accessioned | ||
| Most recent works added by anyone | This lists the latest 200 works added to the database, with most recent first. The display may be sorted by clicking on the column header. | |
| Most recent works added by operator |
Tabs #
Cataloguing is supported by a number of separate tabs, each providing different views and capabilities:
- Detail
- Work to be done
- Recent headings
- MARC view
- Remote catalogues
- Predefined text
- Options
- Log
- History
- Copyright licence
- Child holdings
The main portion of the screen is taken up by the display of the record being created or edited, and the optional editing details for the current field:
See Editing below for the mechanics of the editing process.
Detail tab
This tab has a number of fundamental controls to help you through the cataloguing process:
Control number selector – Find a work #

This combo drop-down menu allows you to choose the control number type for retrieval of a record from the database for maintenance. Options include ISBN and the Aurora bibliographic id but can include other control numbers such as Library of Congress number, or locally defined identifiers.
NOTE – Works can also be displayed by use of right click context menus that link to catalogue maintenance.
A set of three buttons is provided to act on the control number input:
| Button | Image | Notes |
|---|---|---|
| On Screen Return | Button to emulate the carriage return key | |
| Clear | Clears the current record. | |
| Paste | Pastes the ISBN stored on the clipboard. |
Database subset #

If your library has special collections defined as ‘database subsets’, you will need to specify the subset when you are cataloguing material for that collection – a combo presents all of the options currently defined. [Most libraries will simply say ‘All’, with no specific subset defined.
Database subsets are created in System parameters – System – DU Database subset and add the subset NOTE the code must be different for each subset and ‘N’ is reserved for newspapers
NOTE To add a database subset on an existing record you will be required to also make a change on the table to activate the save button. (this can be a simple as adding a space then removing it from the 100 tag
Record status #

If the record being edited has a status other than normal, e.g. Marked for Deletion, then this is shown in this box – equally, the cataloguer may apply the status here.
| Status | Notes |
|---|---|
| Normal | None of the following are applied. |
| Bibliographic deletion | When an item is deleted, it is no longer available for circulation usage, or for OPAC discovery; it may however be retained in the database to allow transactions to be associated with the title. For instance, when an ILL is returned to the lending library, the record is deleted, but the reference for the title is retained, so it will show in reports and in the users previous loan history. |
| Shadow work | This status allows a work to be suppressed from OPAC display. Note that functions are available in Interlibrary Loans control to suppress an ILL work from display, and this is not required in addition to that. If your library has a specific collection which is to be suppressed from view, it is likely to be better to create a Database Subset to hold the records and hide the whole collection – please discuss this with AIT. |
| Bibliographic archival | Not currently in use |
| Mark for Export | This option allows one or more records to be marked and the Export process would then pick these up as an adhoc collection for creation of an export file (ISO 2709 format). – No Longer in use. |
| Freeze | Not currently in use. |
| Inter-Library Loan | If the record is marked as ILL (and this can be set in the ILL function, including a default setting to ensure this), then the record can be suppressed from OPAC display (when the necessary bExcludeILL is set as True. |
| Mark for FTP transfer | As with Mark for Export, but here reflecting the FTP transfer function. – No longer in use. |
| Mark for Review | A record may be marked for review by a trainee cataloguer, or simply as part of regular procedures. When marked this way, the record is not fully indexed, and is not available for OPAC searching. Records with this status may be listed in Work to be done. Note that the library may optionally set all works added by Quick Work to be given Review status using the Enterprise parameter: BibsMarkForReviewIfQuick |
Checkboxes #
Three checkboxes are provided and these have significant implications:
- Multi-row select
- Filing indicator
- Assist
- Marc
Multi-row select checkbox
This tick box allow the operator to select multiple rows and remove multiple tags at once using the right click context menu . To select the rows:
- hold down left click on mound the drag across the rows your wish to select or
- hold shift and click the top and bottom row ranges
- Hold Ctrl and select multiple individual rows that can be in any order.

Filing indicator checkbox
By convention, MARC uses indicator values to denote the number of characters in a string, such as a title, to be skipped before the filing title is identified. The logic to identify the strings which are to be handled this way is held in Aurora in a table, where the majority of European languages are covered. When the Filing Indicator checkbox is on, then the logic is applied automatically, and the correct filing value is applied to the appropriate indicator. If the checkbox is turned off, then no filing logic is applied, and the indicator value will be set at zero, meaning that the string will be filed directly on its contents.
The Filing Indicator may be turned off when the leading character is logically assumed to be applicable, but in reality is not, e.g.
Le Carre and the spy novel [where ‘Le’ is not a leading article, but part of the subject’s name)
Die another day [where ‘Die’ in this case is not the German leading article]
A is for Apple
The articles controlled by this Filing Indicator control are defined in the parameter table MARC_Stoplist. Articles may be removed if preferred – note that some foreign articles such as DIE, IN, TEN have English word homonyms, and these may require the article to be manually set in cataloguing for titles such as ‘Die another day’, ‘In the valley of Elah’, or ‘Ten little Indians’.
In the specific field details in the lower panel, the indicator will always show ‘N’ when automatically calculated – there is no need (and no possibility) to overwrite this.
Example.

In the above example, Filing Indicator is on, and the title field starts with ‘THE ‘ and the value of 4 is given to the indicator.

But, if as in this last case, the Filing Indicator is turned off, then the indicator value will remain at zero, regardless.
Assist checkbox
This checkbox simply turns on (or off) the lower panel giving details of each field as it is catalogued. It may be switched off to review the full record.
MARC checkbox
The MARC checkbox allows the MARC field and subfield encoding to be hidden, and the record shown in a simple labelled format:
MARC Ticked

Marc unticked – Labelled
Note that in the labelled view, any heading is shown in blue, and an indication is given of the number of works that are attached to that particular heading:

Editing – Detail Tab #
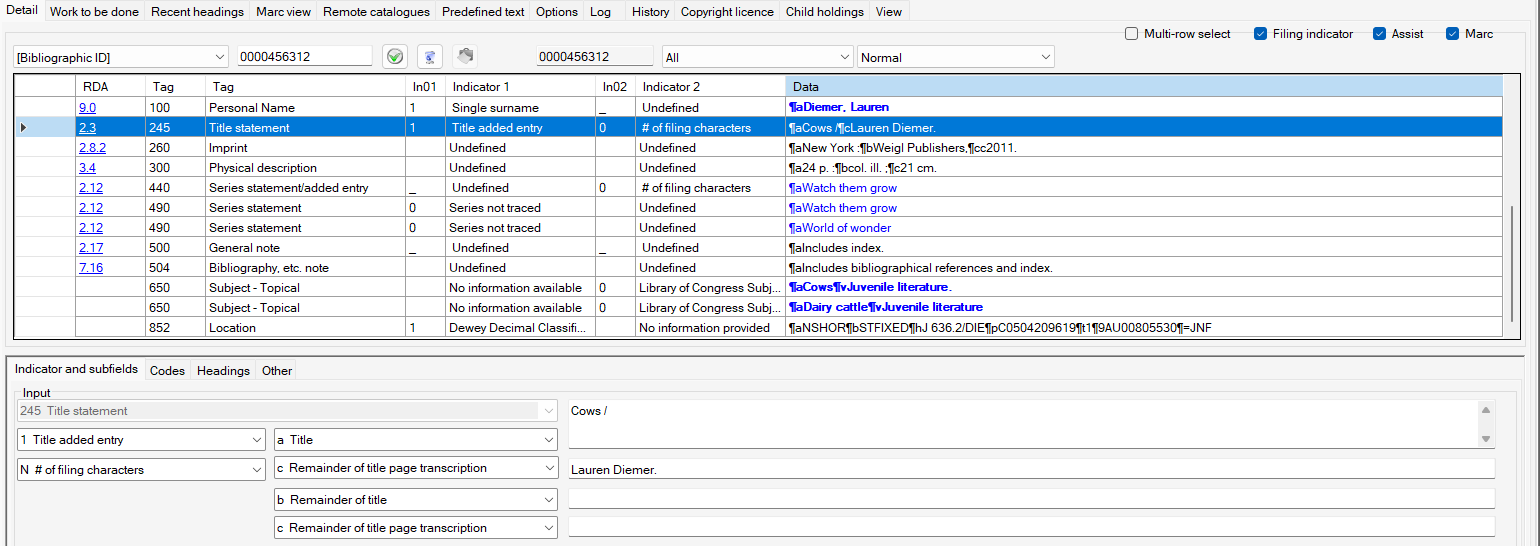
The Cataloguing screen allows a record to be edited directly with two panels addressing the data.
In the top panel, the record is show dissected into fields, and in MARC or labelled display according to preference.
As a field (tag) is selected, the contents of the tag are displayed and further dissected into subfield level in the lower panel. (this panel is only visible if Assistant is ticked)
Note that editing generally occurs in the lower panel, with the exception of using the edit data option from the right click menu.
MARC Tag Table – Right click menu #

Edit data #
The Edit data function can be very useful in editing the contents of a tag directly. While normal editing selects the tag and dissects the content according to subfield in the lower panel, with Edit data, you can simply edit the tag contents in the upper display as a wysiwyg (what you see is what you get) operation.
When the function is selected, the affected tag is then highlighted in light green:

You can then type over the contents in part or in total, as required. There are some specific areas where the function is particularly useful:
- where the tag has more than 10 subfields, then the subfield dissection will not display all of them – using Edit data allows all subfields (unlimited) to be addressed.
- where subfields displayed need to be reordered, or a subfield inserted into a specific position before existing subfields. (This cannot be achieved in the dissected view, without retyping subfield data).
- where data (non-authority data) is to be copied from one record to another. Hint: find the source record in Search, and then go to Details of a Work and the MARC display. You can then copy the contents of a field, and then go back to Cataloguing with the record being edited still open.
The edit is completed as soon as the cursor is moved to another field and clicked, or another function is selected.
A new subfield can be entered using function F12 to insert the ¶ character. Note that fixed fields, like 007 and 008, cannot be edited in this way, and the menu option is not available for these fields.
Insert tag #
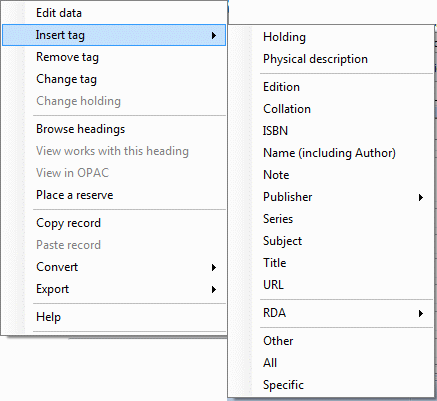
The Insert tag option presents a further submenu of tag ‘types’ for specific selection of the tag to be inserted:
Please see Insert tag in catalogue process for full details, on all the sub menu options
Remove Tag #
An individual tag may be removed completely using this menu option. When the option is selected, the cursor must be highlighting the tag to be removed. For this reason, Aurora will provide a confirmation message, detailing the tag, and its content, to be removed:

If you agree to the removal, the tag is not immediately removed, but is now shown on a yellow highlight background, and the text is struck-through:

The tag will not be removed completely until the record is saved – at that point it may not be recovered.
Reinstate tag #
If the incorrect tag is selected for removal, or the decision is to be reversed for any reason, then the menu will change – for a tag marked for removal only – to offer instead of ‘Remove tag’, a new option in its place of ‘Reinstate tag’, which will return the tag and its content to a full status:
Change tag #
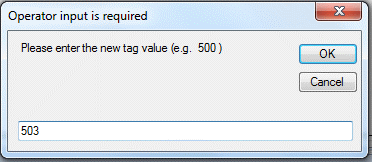
Any tag, other than a holdings field, a fixed field, such as 007 or 008, or a mandatory field, such as 245, can be reset with a new tag number. Following the menu option, Aurora will present a request to enter the new tag:
The input box will always show the value of the originally selected tag.
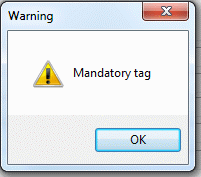
Note that if a mandatory tag, e.g. 245 is selected, then Aurora will not allow it to be changed, and will give this message:
Please remember that field validation for the newly defined tag may not match the original tag, and therefore validation errors may be encountered on save.
Change holding #
This option is only enabled when a Holdings tag, e.g. 852, is selected. When selected, Aurora will pop-up an overlay form detailing all aspects possible for the specific Holding. Note that only the specific individual holding focused on can be dealt with in one action.
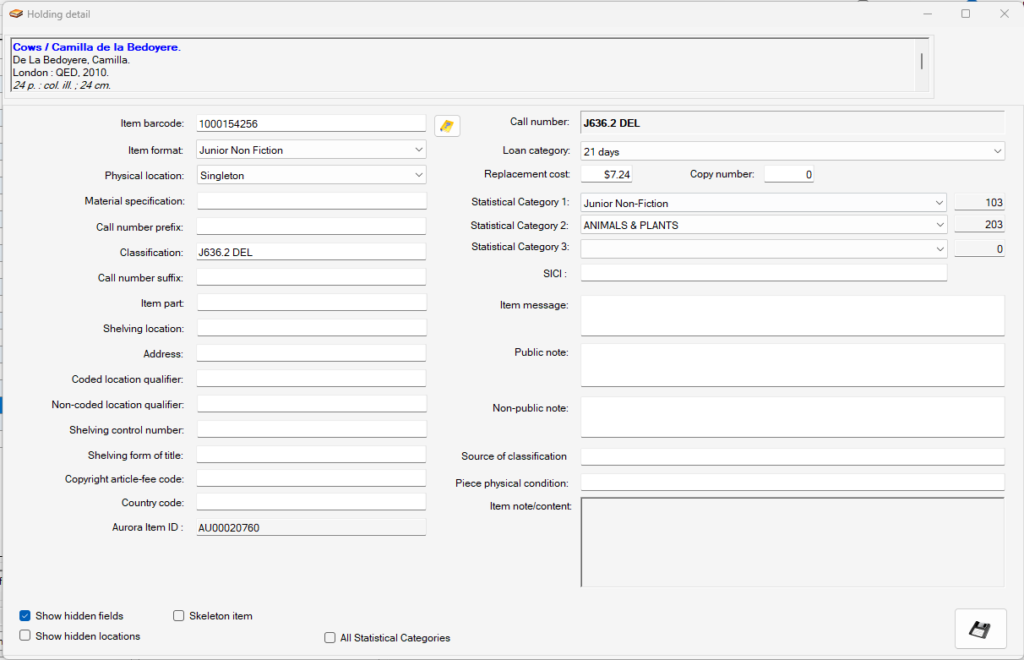
Bibliographic description
A brief bibliographic description is always displayed at the top of the screen to allow the operator to check that they are dealing with the correct material.
Holdings data elements
Notes in italic in the table below are from Library of Congress MARC21 details.
| Label | Aurora/MARC | Notes |
|---|---|---|
| Item barcode | Aurora 852$p | The barcode can be wanded or read in directly here, if your workstation is equipped with a suitable reading device, or the barcode number can be transcribed. Note the little icon to the right, which allows an immediate check to see if the entered barcode already exists in the database |
| Item format | Aurora 852$= | A local Aurora subfield which links to the Item Format parameters defined for each library. |
| Physical location | Aurora 852$b | Specific department, library, etc., within the holding organization in which the item is located or from which it is available. Name is given in full or in a locally standardized abbreviated or coded form. Subfield $b may be repeated to indicate the organizational hierarchy of the sublocation. Separate 852 fields are used for each sublocation when multiple copies of an item having the same call number are housed in various sublocations or when parts of a copy are split among several locations. In Aurora, this is the holding physical location, and set according to the Physical location parameters defined for each library. In a Consortium system, only locations belonging to the council where the workstation is registered are shown. |
| Materials specified | 852$3 | Part of the bibliographic item to which the field applies. Usually applicable to multipart items. |
| Call number prefix | 852$k | Term that precedes a call number. Subfield $k is input before subfield $h (Classification part) or $i (Item part). |
| Classification part | 852$h | Classification portion of the call number used as the shelving scheme for an item. A Cutter, date, or term that is added to the classification to distinguish one item from any other item assigned the same classification is contained in subfield $i (Item part). A call number prefix is contained in subfield $k (Call number prefix). |
| Call number suffix | 852$m | Term that follows a call number. Subfield $m is input after subfield $h (Classification part) or $i (Item part). |
| Item part | 852$i | Cutter, date, or term that is added to the classification contained in subfield $h (Classification part) to distinguish one item from any other item assigned the same classification. A call number suffix is contained in subfield $m (Call number suffix). |
| Shelving location | 852$c | Shelving location of the item within the collection of the holding organization. It may be used to indicate the physical location within a sublocation; for example, reference alcove, oversize shelving. The description of the shelving location is given in full or in a standardized abbreviated or coded form. |
| Address | 852$e | Street address, city, state, zip code, and country information for the current physical location of the item. May be repeated to separate the parts of an address. |
| Coded location qualifier | 852$f | Three-character code that identifies the specific issues of the item that are located apart from the main holdings of the same item. Code is composed of Qualifier type, Number of units, and Unit type codes. If the location qualifier cannot be expressed in coded form, it may be described in subfield $g (Non-coded location qualifier): l, p – Qualifier type One-character alphabetic code indicates if it is the latest or previous time or part unit that is housed in a different location. l – Latest Latest, including the current, time or part unit is housed in a different location. p – Previous Previous, not including the current, time or part unit is housed in a different location. 1-9 – Number of units One-character number (1-9) specifies the number of time or part units that are housed in a different location. When a number is not required to identify the specific units, this character position contains a blank (#). If the number of time or parts units exceeds 9, they may be contained in subfield $g (Non-coded location qualifier) and this character position contains a blank (#). When Qualifier type is Latest (code l), the number includes the current time or part unit. When Qualifier type is Previous (code p), the number does not include the current time or part unit. # – No information provided 1-9 – Number of units m, w, y, e, i, s – Unit type One-character alphabetic code describes either the time period or the part that is housed in a different location. m – Month(s) time w – Week(s) time y – Year(s) time e – Edition(s) part i – Issue(s) part s – Supplement(s) part |
| Non-coded location qualifier | 852$g | Textual description that is used when the codes in subfield $f (Coded location qualifier) are inadequate for describing the unit that is located apart from the main holdings of the same item. Subfield $g immediately follows the subfield $a, $b, or $c being qualified. |
| Shelving control number | 852$j | Shelving control number that is used as the shelving scheme for an item. |
| Shelving form of title | 852$l | Shelving title of an unclassified item that is shelved by title. |
| Aurora item id | Aurora 852$9 | Holds the automatically applied internal item id. Note that this is constant throughout the life of the item: the barcode may be replaced, but this id will remain consistent. |
| Call number | Aurora | Libraries may construct call numbers for items from the single $h Classification field, or dissect the structure into component elements, e.g. $k Prefix $h Classification $m Suffix. Aurora will concatenate these into this Call number field, which cannot be edited directly. |
| Loan category | Aurora | This element is not held in the catalogue record, but only in Item details |
| Replacement cost | Aurora 852$r | This local subfield allows for the transfer of holdings data including a replacement cost, e.g. in supplier shelf-ready records. The detail is then held in Item details, where the data can be updated. |
| Statistical category 1 | Aurora | Aurora allows up to three statistical category codes to be recorded for each item. These can be stratified in levels, or simply ‘different’. When in a Consortium, parameters may be set to differentiate the codes available according to each participant council. If this is the case, then only those codes defined for the Council will be shown. Note that a cataloguer in one council may not edit the codes for an item belonging to another council. These codes are recorded in transaction history, and so may be used for management information. |
| Statistical category 2 | Aurora | As for Statistical category 1 |
| Statistical category 3 | Aurora | As for Statistical category 1 |
| Item message | ||
| Public note | 852$z | Note relating to the location of the item identified in the field. The note is written in a form that is adequate for public display. A note not for public display is contained in subfield $x (Nonpublic note). |
| Non-public note | 852$x | Note relating to the location of the item identified in the field. The note is not written in a form that is adequate for public display. A note for public display is contained in subfield $z (Public note). |
| Copyright article-fee code | 852$s | Description of the copyright article-fee code is given in field 018 (Copyright Article-Fee Code). |
| Country code | 852$n | Two- or three-character MARC code for the principal location contained in subfield $a (Location). Code from: MARC Code List for Countries. |
| Source of classification | 852$2 | MARC code that identifies the source from which the classification or shelving was assigned. It is used only when the first indicator position contains value 7 (Source specified in subfield $2). Code from: Classification Scheme Source Codes. |
| Piece physical condition | 852$q | Description of any unusual characteristic of the physical condition of the piece when the holdings information does not contain an 863-865 (Enumeration and Chronology) or 876-878 (Item Information) field that contains a subfield $q (Piece physical condition). Subfield $q is not used for physical condition information resulting from a formal review for making preservation decisions. Preservation decisions are contained in field 583 (Action Note). |
| Item Note/Content | Aurora | Up to 2Gb of information can be saved in the item details |
Checkboxes
Two checkboxes are placed at the foot of the screen:
- Show hidden fields. The MARC Holdings details present a wide range of options (detailed below), many of which may not be appropriate for all libraries. A checkbox at the foot of the screen can be used to ‘hide’ lesser used elements. When unchecked less options are displayed, ticking this checkbox shows the hidden fields
- Skeleton item. If an item has been created at the desk, it will be given a skeleton item flag, and will be put aside on return from loan. In addition, if an item is created for a record where there is no subject heading, an 007 tag, or a call number, and the Enterprise parameter SkeletonItemCheck is set True. The flag, if set, may be lifted here.
- Show hidden Locations. Shows hidden locations for the physical location drop down
- All statistical categories –
Browse #
The Browse option is only enabled where the pop-up menu is invoked on a heading field, and is context sensitive, allowing up to three sub-options:
- Browse
- Headings – this group. This will use the heading, and display ONLY headings in the matching group, e.g. only names or only subjects.
- Heading – names and subjects. This option allows the display of headings from name and subject groups combined. This option is not offered for other types of heading, e.g. Title. Please note that this option is also offered as a direct menu option immediately below.
- Heading – all groups. This will browse all available headings in an Anywhere selection.
Browse heading – name and subjects #
This option allows the display of matching headings in the Headings panel below, from name and subject groups combined, when a name or subject heading tag is selected. This option is not offered for other types of heading, e.g. Title.
Place a reserve #
This option will invoke the Reservation form allowing the work, or one specific item, to be reserved.
Upgrade heading to basic authority #
This option allows a cataloguer with appropriate permissions to upgrade the selected heading to an authority where the tag selected must be a heading and is not already recorded as an authority term.
Copy record #
This function allows a record to be copied, e.g. to record a new edition, a similar separately catalogued part of a multipart work, or simply a new instance of a record in a series – all where a substantial part of the record is going to be identical to the source record.
When a record is to be copied, no updates must be waiting, i.e. the record must have been saved. The process is:
- Invoke the pop-up menu and select the menu option ‘Copy record’ (this option is not tied to any specific tag), and when clicked
- Then reinvoke the pop-up menu – and you will see that the Paste record option is now enabled. Select this.
- The mode will now change, and the new copied record is displayed in Add mode
- Note that the Holdings attached to the source record are now removed in the copied record
- Now complete the cataloguing edit operations in the same way as for a new title.
Paste record #
This option is only available when a record has been copied. Please see Copy record
Convert #
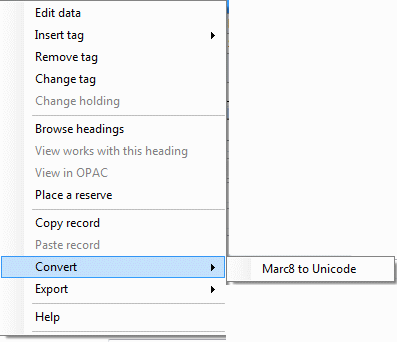 Enable the conversion of marc8 files to unicode.
Export #
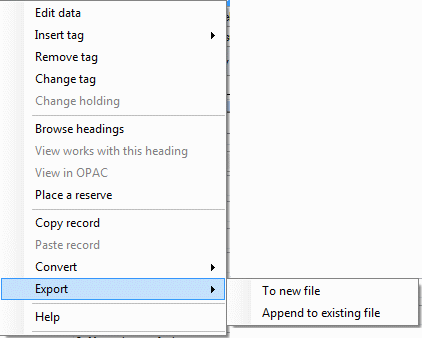 To a new File – Saves the marc record to your individual work folder
append to existing – if you go to a new record and want to save the marc to the same file use this.
Help #
While selecting a row then right click context menu and selecting help opens up the Library of Congress website on that marc tag.
E.g. if you have selected a 650 tag it will open up on MARC 21 Format for Bibliographic Data: 650: Subject Added Entry-Topical Term (Network Development and MARC Standards Office, Library of Congress) (loc.gov)
Remote Cataloguing tab #
If a short record has been created by the acquisitions officer or loaded from your supplier, search can be used to find the work that you wish to catalogue. Simply select the title in search and right click, select ‘Catalogue Maintenance’ from the contextual menu. The record opens in Bibliographic Cataloguing. Alternatively enter the ISBN directly into the search box in the Cataloguing module to find a record.
This short record may now be updated through original cataloguing or via Z39.50 download, or via Loader, where a full record has been supplied by a third party.
The tab ‘Remote catalogues’ will open to your default z39.50 search libraries selected. If you have searched by ISBN this will have been automatically entered into the search field.
Setting the Default Search libraries #
This is set in the workstation ini
Example
[Z3950]
Favourites=State Library of Western Australia (LISWA)^Libraries Australia
Searching for Marc Records #
Select the Type of search
- ISBN
- Title
- Author
- Subject
- Anywhere
- Identifyer
- ISSN
Input your search term and select the search button.
The search will run through all the selected library databases and display the possible marc records in the grid to the right.

Assessing the marc records #
The results of a search are displayed in a list in a table to the right of the screen.
Basic information on each record is displayed within the table, in order asses a marc record right click on the line and select marc display.
The marc view screen will open with the content of the marc for you to assess for to confirm if the record meets your libraries needs.
Saving the record. #
Once you have located a marc record you wish to save to the libraries database. Ensure the record is highlighted in the List or open in the marc view screen and click on the ”paste marc record from clipboard button” ![]() at the top of the screen
at the top of the screen
The marc record will open in the detail tab, This will alter the cataloguing mode from Change to Add.
Then click save
Saving pop-up examples #
Save successful – add holding?
If there is not matching existing record to merge with the system will prompt with a Save successful would you like to add a holding message.
- Note if you are using the Aqisitions module to add holdings the answer will most likely be ‘No’ if you are not and there is an item connected to this work the answer will generally be ‘Yes’

Existing Work – Operator input
- If there is not matching existing record to merge with the system will prompt with a Save successful would you like to add a holding message.
- Note if you are using the Aqisitions module to add holdings the answer will most likely be ‘No’ if you are not and there is an item connected to this work the answer will generally be ‘Yes’
- If there is an existing record an operator input will ask you to identify the record that this new record will be merged with over the short/brief record already in the catalogue. (in the example 1)
Clicking OK causes, the mode changes back from ADD to CHANGE and you can adjust the record now.

Near matches
If you get a Near match message: it means that the record closely matches another record, but there is not enough evidence to let the program proceed.
To proceeded with these records, navigate to the options tab and the ‘Near match options for new catalogue entries section.
- Choose ‘Force save as changed record’ then click save, this will save the record over the near match.
- Choose ‘Forse save as New record’ if the match is not correct and you want separate records.


Marc fields #
Marc tag colour indicators #
Tags that are indexed are colour coded as below:
Black – Only time used
Orange – Non-preferred term within an authority record
Bold Black – Authorised but only used once
Light Blue – Not an Authorised heading, but links to other records
Bold Blue – Authorised – preferred heading
Bold Pink – There is a similar heading with a minor variation (often a diacritic)
Browse Headings #
When you click a tag, you will notice a box opens on the bottom half of the screen which is called ‘assist’. This allows you to type the data into the sub-fields.
With a tag such as the 100 name or a subject tag these may be checked against your authority file. Select the field you wish to check. In ‘assist’ the authors name will then be selected, right click on it and choose browse headings.
This opens the ‘Headings search box’ so that you may select the correct authorised entry or check if you need to create a new heading.
You can tell there is no authority as there is no scroll symbol besides the name. If the author’s name were already there, such as ‘Gary Sterne’ the count would have become 2 or more. You could then right click on the name and ‘insert heading into selected data row’.


