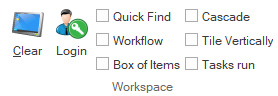
Aurora Desktop workspace #
 #
#
Login screen #
All operators must log on to Aurora Desktop. The act of logging on allows the system to receive information about you – what you like in displays, and what you are allowed to do within the system. Note that the operator’s preferred language is detected as part of the log on process, and subsequent Aurora displays will reflect this choice. Note that if a changed login is required, this may be set using this Desktop icon ‘Login’
When Aurora Desktop is started up it will always prompt for user identification. You will always be able to identify yourself from the list of registered users – and just need to point and click, but you will also need to give the system your password.
Your password will not show on the screen, but will be masked by asterisks **** to prevent others discovering it.

Control panel #
Control buttons #
 This ‘onscreen return’ allows the simulation of a return key by mouse action.
 This icon allows you to cancel the login process
Font size & Background colour #
This control allows you to set the default font size for all forms in Desktop. The system default is 8 point, and this may be increased in increments to a maximum of 12 point.
An operator may also select a background colour using the colour pallet botton ![]()
Technical support options #
Two smaller buttons are available for handling some technical issues:
- Delete XML files – used by this application. This allows parameters to be cleared and reloaded prior to login, and saves a login to perform the same action, followed by closure and login again.
- Clear AWS connection – details from server memory. This option may be useful if the implementation has multiple databases, and the operator is swapping between them: it ensures that the server memory is flushed, and therefore reduces risk of an incorrect assignment residing in memory.
On Workstation #
The current workstation id is shown here. If having any difficulties with logging on, this workstation id (it is the Windows computer name) may be asked for.
Connection #
The AWS path in use is shown here. If you have a dual database system, e.g. with a Test database, this will indicate the version of AWS that is being used. Again, this may be requested for diagnostic purposes if there are problems with a login.
Splash screen #
Hitting the Enter/Return key, or clicking the onscreen return, will then request access, and you will be shown the Desktop splash screen:

Password #
Don’t forget your password – you need this to be able to get access to Aurora Desktop. If your password is incorrect, or if the workstation you are logging on from is not registered as an Aurora workstation, then your access will be denied.
Pressing the Cancel icon will cancel your logon. We recommend not closing the form with the top right x.
Offline Download #
A daily routine allows the download of the current (at start of day) details of debarred users, and reserved titles and items to a local workstation.
This is important for a front-desk workstation, but not so critical for a backroom machine.
This is set within System parameters / workstations witht he following opetion
- no required
- Automatic
- prompt the operator
FIf prompt the operator is selected following the logon, Aurora will ask if you want to proceed to download the files:
The date of last download is given, and front-desk workstations should do this. There is a small-time delay as the details are downloaded from the central server, and if required, the files can be manually downloaded at a later time.
| Warning: Please note that if the parameter AllocationsUsed is set ON, the download of Offline files for Debarred users and Reserved Items and Works will be inhibited. |
Workstation registration #
All Workstations to be used for Aurora Desktop must be centrally registered, and operators must have a password. If you attempt to run Desktop on a workstation that has not been registered, or if you enter the password incorrectly, you will receive a warning:
This gives the information recorded, where possible, that may be interpreted, showing the expected interface language, the selected operator id, the workstation name, and the institution that the workstation belongs to. In case of query, this should initially be taken up with the local administrator, and failing resolution, then with AIT.

Clear #
![]() The Clear link allows current forms to be cleared, and the simple Desktop to be shown. The Desktop also provides links to standard Windows accessories. [Note: the installation of accessories may be controlled by local IT, and you may need to contact them if functions described below do not appear on your desktop.]
The Clear link allows current forms to be cleared, and the simple Desktop to be shown. The Desktop also provides links to standard Windows accessories. [Note: the installation of accessories may be controlled by local IT, and you may need to contact them if functions described below do not appear on your desktop.]
Clicking the Clear icon clears all existing forms – except Quick Find and Workflow – and returns to the Desktop itself showing the details of the latest Offline Download and the available Accessories:
Login Button #
The Login button allows a secondary or changed login – this may be useful when the currently logged in operator jits a circumstance, where their privilege level is insufficient to complete a task. A supervisor may then use this button to login and complete the required action.
This for example will allow a supervisor to come over, quickly login to waive a fine or delete a user; and then just press the login button again for the original operator to log back in.
If the overriding login remains, then the current operator will of course work with the supervisor’s privilege level.
The login gets the new operator login privileges and adjusts any open screen settings, e.g. Search (local user view), User Details (Delete button), Item Transfer (Delete button), Item Details (Save button).
Quick Find #
See Quick Find
Workflow – Tasks #
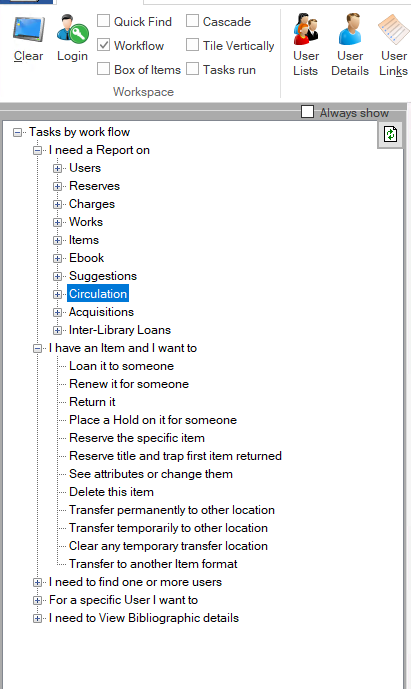
The Tasks by Workflow function allows the operator to identify the correct screen for a number of common processes, according to the initial start point – of having either an item or a user, or wanting to view details:
A checkbox ‘Always show’ is placed above the tree and means that the list of tasks remains on screen and is not overwritten by other screens
I have an Item… #
The Item node starts with having an item, and allows linkage to the following processes:
- Loan it to someone
- Renew it for someone
- Return it
- Place a Hold on it for someone
- Reserve the specific item — the reservation screen is invoked, with ‘Work or Item’ set to Item barcode
- Reserve title, and trap first item returned — the reservation screen is invoked, with ‘Work or Item’ set to Bibliographic id
- See attributes or change them
- Delete this item
- Transfer permanently to another location
- Transfer temporarily to another location
- Clear any temporary transfer location
- Transfer to another item format
I need to Find… #
The Find node provides a link for search options:
For a specific User… #
The User node starts with having a user, and allows linkage to the following processes:
- Add a new user registration
- Lend an item to them
- Renew items or family’s items on-loan
- Place a reserve for user
- View/change some user details
- See all items on loan
- See all reservations
- See all works previously borrowed
- See all charges and/or fines
- Add a new charge
- See all calls
- Add a new call
- See all Inter-Library Loans
- See all Messages
- Add a new message
- See all Requests — Pending
I need to View… #
The View node allows selection of different options to see date relating to a bibliographic work:
- By item barcode – invokes Details of a work, with item barcode selected as entry key
- By bibliographic id – invokes Details of a work, with bibliographic id selected as entry key
- By ISBN – invokes Details of a work, with ISBN selected as entry key
- By Keyword (Title, Author, etc.)
- By a specific Heading (Subject (etc.)
- By currently selected Work
Workspace Views #
There are two Workspace checkboxes – allowing the operator to view the currently open forms in Cascade, or Tile Vertically displays. Cascade is the best option if there are a lot of forms open, tiling works best if only a couple. Note that forms which are Closed with the Close button will not show here.
A new form can be invoked from the toolbar or using a shortcut; an existing form can be selected and maximized by double-clicking its top banner or using the expand button at the top right of the banner. Note that the ‘active’ form is always shown with the close option in red, and a slightly different banner colour:

The controls here from left to right allow:
- minimize the form
- maximize the form
- close and clear the form (this deletes the form and content, and does not put it into background as the Close
 toolbar button does)
Desktop gadgets and links #
Pop-up menu #
A right mouse-click on the cleared Desktop will invoke a pop-up menu:
This has options to:
- Open – i.e. open the selected gadget or file
- Add to desktop
- Delete from desktop
- View Marc records
- Load Marc records
- Store Supplier Marc records
- Create suggestions from Marc file
Adding a favourite #
You can add a URL, or a local file, as a desktop gadget, taking the ‘Add to desktop’ option. You will be asked for the location, which can be a URL, and a second question asks for the label to be applied on the desktop – which can be as required locally (just this one workstation).
Then the icon is placed on the desktop, and a right mouse click on that icon shows more options enlivened on the menu to open or delete from desktop.
If a local file, you can transcribe the path – or simply drag the file over to the desktop, and again you will be asked for the label. Please note that if the file is a file of MARC data, then additional options are available for MARC handling:
- View Marc records – connects with ‘View’ option selected
- Load Marc records – connects with ‘Load’ option selected
- Store Supplier Marc records – connects with ‘Store supplier records’ option selected
- Create suggestions from Marc file – connects with ‘Create suggestions from Marc file’ option selected
Last Download #
A daily routine allows the download of the current (at start of day) details of debarred users, and reserved titles and items to a local workstation. This is important for a front-desk workstation, but not so critical for a backroom machine. Please see Offline for details of how this data may be used in case of network failure.
An icon on the Desktop shows when the last download was performed: ![]()
Manual download the operator is asked at login if a download is required – clicking this icon will allow a manual download. The operator is then asked if a download is required now.
Accessories and assistants #
- Advanced Reminders
- AIT Website
- Aurora Geo Preview
- Aurora service desk
- Aurora Templated
- Aurora Wiki
- Calculator
- Character Map
- Characters
- Create Multimedia
- Fantastic fiction
- homebound assistant
- ILRS
- ISBN Converter
- LADD
- Magnifier
- Last Download
- Release features
- Release notes
- Work folder link
Calculator #
This link invokes the standard Microsoft Calculator, allowing simple and complex mathematical computation. All Help is supplied through a standard Windows installation, and the calculator is not described further here.
Magnifier #
This link invokes the standard Microsoft Magnifier – a utility ‘intended to provide a minimum level of functionality for users with slight visual impairments.’ It is noted that other options should be followed for regular daily use.
Character map #
The Character Map link allows for identification of non-standard and non-Latin characters. Its extent of operation will depend on the way that the local workstation is set up for Windows, but internationalisation allows multiple languages and character sets to be applied. A Help link is provided, invoking standard Microsoft Help.

Characters #
This little panel allows characters to be checked for their underlying code value. For instance, a record which has a strange character on import can have that character copied in here to see what code it has. This information can be useful to AIT in determining diagnostics, and allowing AIT to advise on the import settings that will be required.
Data can be entered either as the underlying ANSI character code or the actual character (e.g. as copied from a record), producing the equivalent ANSI and HEX values

Assistants #
Aurora includes ‘Assistants’ which are screens to validate specific functional setups and allow a checklist of the steps in getting functions going.
Desktop release notes #
![]() This icon (which will change its year as time moves on) links to the latest Desktop release notes (ASR), showing recent changes and enhancements.
This icon (which will change its year as time moves on) links to the latest Desktop release notes (ASR), showing recent changes and enhancements.
Homebound assistant #
![]() This assistant provides the details for enabling Homebound services and is described fully here. The assistant is an administrative operation – and does not show unless the operator has Task level 8 or higher.
This assistant provides the details for enabling Homebound services and is described fully here. The assistant is an administrative operation – and does not show unless the operator has Task level 8 or higher.
Advance Reminder logs #
If your library operates Advance Reminders, and you as an operator are part of Task Group 7 or higher, then on startup you will see two buttons on the Desktop reflecting logs of success and failure in the Advance Reminder processes.
Advance Reminder success
![]() Clicking the success icon will bring up a list of logs for successful operation:
Clicking the success icon will bring up a list of logs for successful operation:
If Advance Reminders log files displayed on the Desktop (to operators with Task Group level 7 and above) are less than a week old, they cannot be deleted via the menu. A warning icon linked to the file indicates this. If you do delete a file, it is now removed from the list and no message box is shown to confirm this obvious deletion.
Advance Reminder failures #
![]() This icon indicates that there are failure logs on the server, where Advance Reminder notifications have hit a problem.
This icon indicates that there are failure logs on the server, where Advance Reminder notifications have hit a problem.
The most recent file is shown first. Files can be opened to display the errors, and can be deleted from the server by the operator using this screen: then the icon won’t appear until the next failure is recorded on the server.
In both cases, the most recent file is shown first.
Pop-up menu #
A small pop-up menu is associated with the log entry:
- View file. The file can be opened to display errors, e.g.
Email not sent, check log for detailed message. It may be the email server and or email address.
if there are very many errors of this form, it may be a server problem to be checked; individual errors may require checking the user’s email details. - Delete file. If the log files are less than a week old cannot be deleted via the pop-up menu. These files are indicated with the No icon. If you delete a file, it is simply removed from the list, and no message box is shown to confirm this obvious deletion.
- Save Locally then open file
- Save locally, auto delete on server, then open file
Command buttons #
Three command buttons are placed at the bottom of the log listings:
 Help – links here
-
 Excel. This allows the log listing (that is the list of logs, not of the success or failure messages) to be output to Excel
 - Exit. Note that the form will stay on top of Desktop until explicitly closed.
Minimise the ribbon #
This option allows the main content of the ribbon bar to be minimised invoked by the Ʌ next tot eh small help button at the top right of the screen, and only invoked when the labels – i.e. Circulation and Other – are clicked. This option allows the desktop to be cleared and allow greater space for other functions and information.