System parameters  #
#
The System Parameters link will take you to functions to manage fundamental system parameter tables. This function is expected to grow and currently presents the following separate tabs:
- Enterprise | System | Locations | Item Formats | Operators | Workstations | User Types | Streets | Post Codes | Management View | Matching Routines | Databases | Workforms | User Codes | User Definition
Control panel #
At the foot of the screen, a small control panel is provided. When a specific parameter is selected, the associated details are displayed, and these will be varied according to context.
#
A common set of command buttons is available. These buttons are context sensitive. None will be enabled initially, and each will enable as and if appropriate:
 Add new. This button is allowed in library defined parameters, such as GC: General Charge, but not in system-controlled parameters, such as IS: Item Status.
 Save. This is only enabled when a change has been made to a parameter.
 Delete. Library defined parameters may be deleted; system-controlled parameters may not be.
 Clear and reload parameters into memory
Enterprise #
This presents your library’s Enterprise parameters, allowing display of current settings, and the ability to update them.
Display #
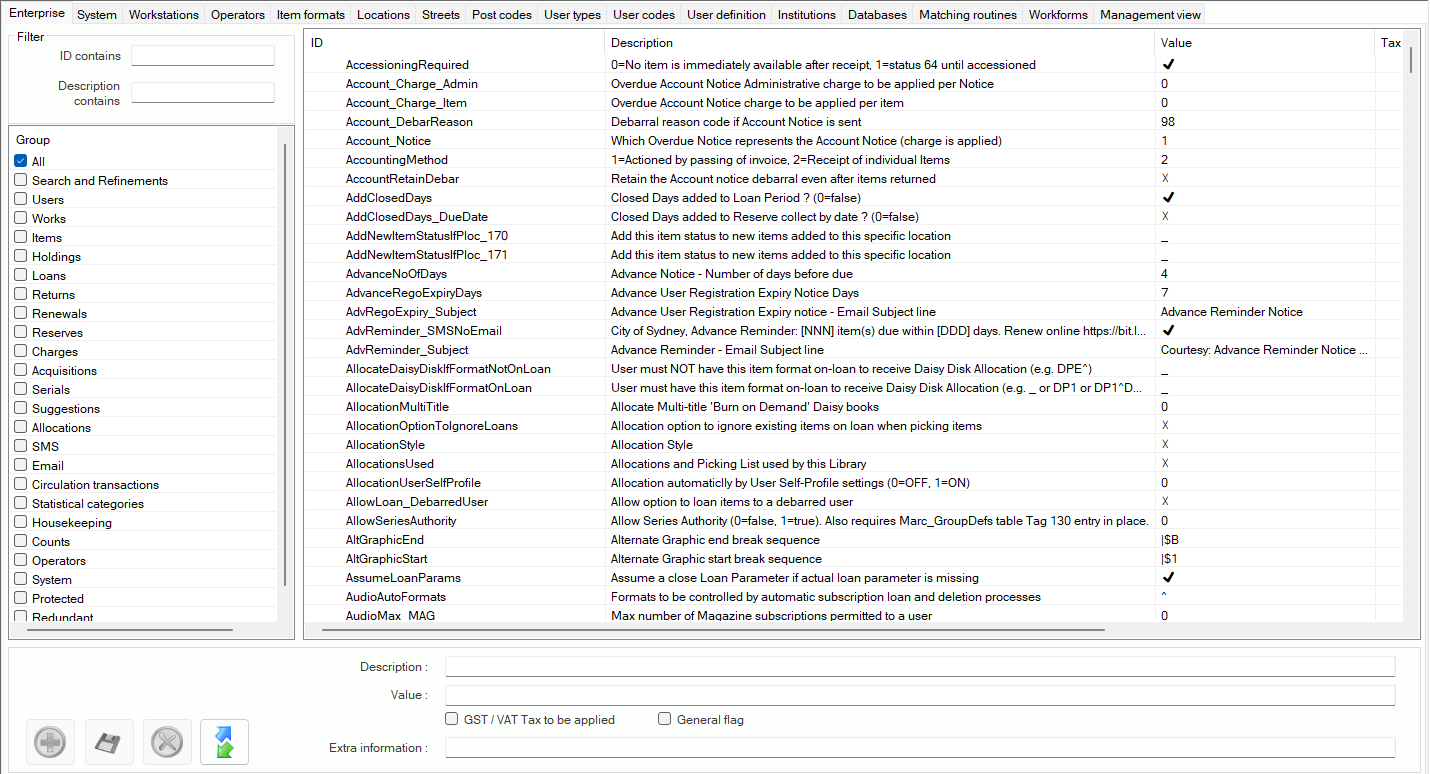
The Enterprise parameters are displayed alphabetically, according to their parameter id:
Control panel #
At the foot of the screen, the control panel is provided to display associated details when a specific parameter is selected:
- Description. This will provide a brief explanation of the parameter. Full details of the Enterprise parameters can be found here. Note that a number of parameters include values 0 or 1, and in such a case the Value control will hold a checkbox below, which simply has tick on or off – 1 = On and 0 = Off.
- Value. This control may have either:
a checkbox (as illustrated above) to define whether a parameter is applied (Ticked = ON = 1) or not (Unticked = OFF = 0)
or, a textbox allowing entry of a string (see the Enterprise parameter details for full information on appropriate values), e.g.
- GST/VAT. Some parameters define a charge which may be levied, e.g. Account_Charge_Admin. In such cases, the charge may be subject to tax, and this checkbox allows that to be defined.
The standard Command buttons are provided.
System #
This presents your library’s System parameters, allowing display of current settings, and the ability to update them.
Display #
The System parameters are organised by grouping according to an ID. As a group is highlighted, its constituents are listed in a panel on the right:
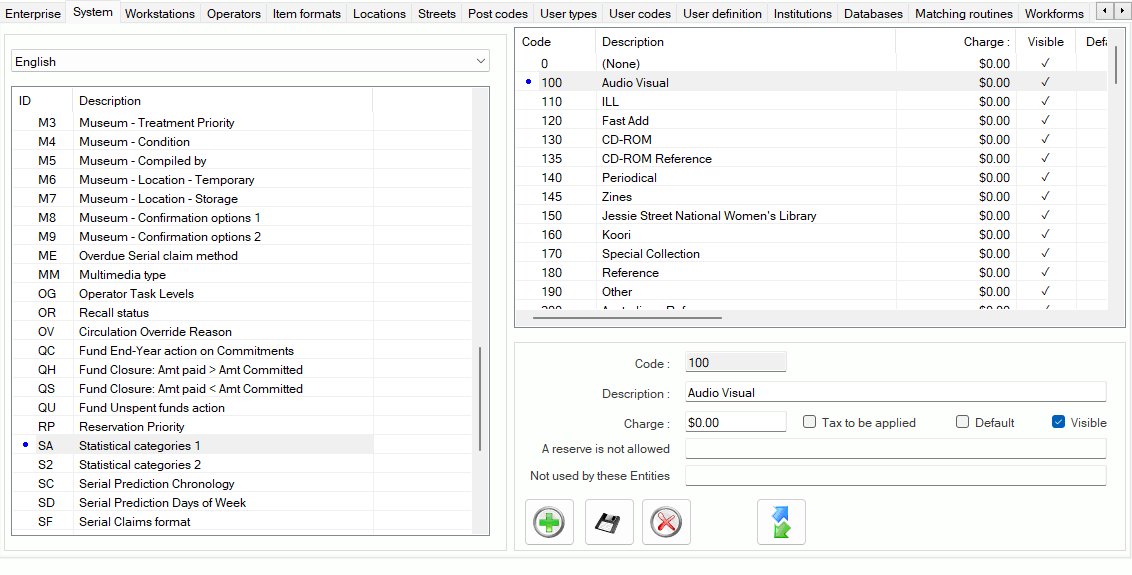
Language dropdown – A language combo is provided to allow parallel languages to be maintained. In the first instance, this will be limited to English and Korean.
ID Panel – (left hand side) The ID panel lists the System group ID and the description (according to the selected language):
Code and Description Panel – The Code panel shows the individual constituent elements within the ID group, listing their code, description (variable by language), charge, visibility, default indicator, and tax indicator:
- Charge – this element is not used in the majority of cases but is required for instance when listing GC: General Charge codes, listing the items for which the library will make a charge.
- Visibility – a parameter can be marked ‘invisible’ to allow it to be suppressed without deletion.
- Default – if a code is set as default, then it will be the default prompt in the application; if no code is set as default, the lowest value code will be shown in the prompt.
- Tax – this applies if the parameter reflects a charge and indicates if the charge includes tax or not.
Control panel – At the foot of the screen, a small control panel is provided. When a specific parameter is selected, the associated details are displayed. The standard Command buttons are provided.
Locations #
Display #
The Locations parameters control both Logical and Physical Locations.
Note The information for Logical locations will only display when a Logical location is selected and likewise when a physical location is selected.
Summary #
Language dropdown – The Summary panel has a control to determine the language of the interface:
Locations display – (Left hand panel) #
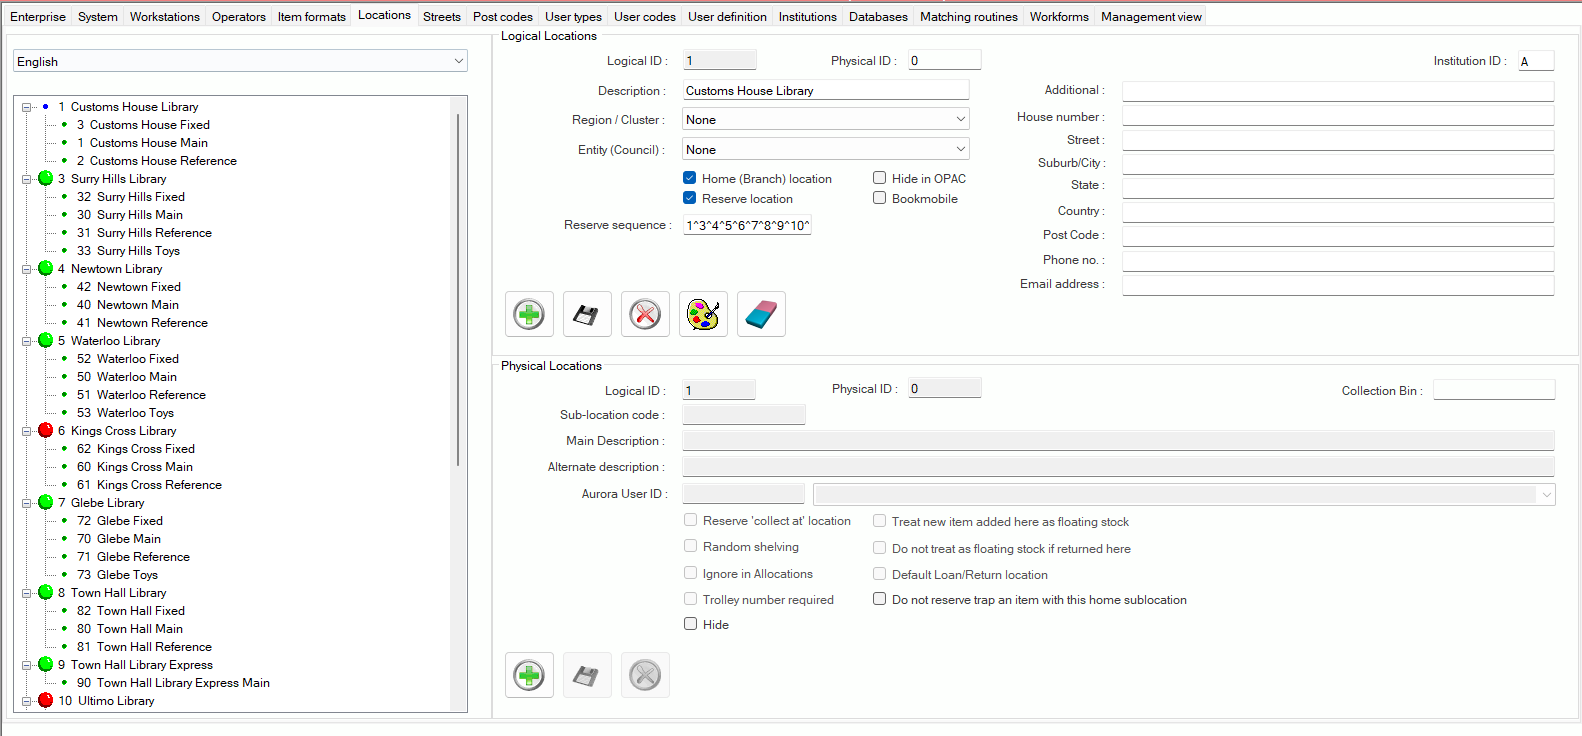
Locations are displayed according to the numeric code applied, and show the logical location (e.g. Branch) and subsidiary to this any physical locations (e.g. collections or departments) that are so defined, in alphabetical order. Note that as above, even if the logical location has only one physical location, that must be defined; a branch may have multiple physical locations as below:
Clicking a logical location description will select the logical location attributes to the right (above); and clicking a physical location description similarly will select the physical location attributes to the right (below).
Logical Locations #
The Logical Locations panel determines the settings to define the logical location, such as a branch:

The following elements are available.
| Element | Notes |
|---|---|
| Logical ID | Each logical location has an id which is provided initially by manual selection. This element may not be changed. |
| Physical ID | When a Logical Location is selected, this will always show 0 – when a Physical Location is selected and is addressed in the lower panel, then this will show the physical location’s id (for information only) |
| Institution ID | This is the Aurora ID applied, and will normally be A |
| Description | This is usually the name of the branch library, but may also reflect a combination of locations on a purely logical basis, e.g. where a logical location reflects a number of similar locations at different branches, such as a logical children’s collection formed from the combination of individual children’s library locations in a number of different branches. |
| Region | This option is currently only applicable to Rural Libraries Queensland, and allows the definition of the region in the State to which the location belongs. |
| Entity | This option applies in a Consortium system, enabling the location to be linked to its parent Council |
| Home (branch) location | This checkbox is ticked if the location is a Home Location – i.e. to be used in Circulation parameters. |
| Reserve location | This checkbox is ticked if the location can be used for reservation satisfaction. |
| Hide in OPAC | This checkbox is ticked to suppress the location from OPAC Reservation ‘Collect at’ prompts. |
| Reserve sequence | This allows a sequence of logical locations – i.e. branches – to be used in reservation satisfaction: the locations are searched in the order specified, which requires input of the location’s ID, each separated and concluded by the ^ character, e.g. 1^2^3^ |
The standard Command buttons are provided.
Physical Locations #

The Physical Location table is used to identify the library’s physical locations: these may be the actual collections or parts of collections in a building, e.g. Children’s Library, Local History section, Stack. Physical locations may be combined to form logical locations; multiple physical locations may be combined in this way, and this table relates each defined physical location to the Home location that is defined for the logical location. (see also Loans Control Parameters, where the Logical Locations are combined with other data elements to form a loans control matrix)
Each Physical location to be used is defined, and is given a code, which is held in the associated Holdings data (equates to MARC21 852$b). In addition, the library may define a contact for the location, and indicate whether the location will be used as the reservations collection point for the home library: for instance, a library could be split into seven floors, each floor constituting a separate physical location, but all combining to form a logical location which is a Home location; when a user makes a reservation at the seventh floor, the system knows that the standard collection point is actually on the ground floor, and so provides this as a prompt.
This Locations panel presents the physical location attributes for display and maintenance. Each item recorded must belong to a physical location.
The panel presents the following elements.
| Element | Notes |
|---|---|
| Logical ID | When a physical location is selected, its parent logical location id is always shown here. It may not be modified |
| Physical ID | Each physical location has a unique, manually applied id. The id cannot be changed once saved. |
| Description | This holds the free-text description of the specific collection. |
| Sub-Location code | This element allows a specific collection code to be recorded in the MARC Holdings data as 852 $b – sublocation. The code can be an internally defined indicator, or it may be a national symbol for a significant collection in a larger library. It must not be changed without discussion with AIT |
| Collection bin | Where the library uses an automatic Sorter, this element can be defined to correspond to the matching bin understood by the sorter |
| Aurora User id | This holds a user id (the Aurora user id, not the barcode) for a user to be associated by default with the collection, which may be the collection manager, or a specific user record for the collection. The code allows associated address information to be recorded for bill-to and ship-to information on orders associated with the collection. When an id is associated, the user name is shown in the box to the right. |
| Reserve ‘collect at’ location | This checkbox is clicked to denote the location as being able to be a ‘collect at’ location, for reservations. |
| Random shelving | [Applies only to Libraries for the Blind]. This feature should not be applied without prior consultation with AIT. |
| Ignore in Allocations | By default, a location may be considered for inclusion in Allocations processes (for Libraries for the Blind and Homebound applications), where appropriate material is available. A library may set up a separate location to hold material – either as reserve stock, or as work in progress, for example – and denote the location to be ignored for allocation purposes, by checking this checkbox. |
| Trolley number required | This option applies to Vision Australia only and indicates those locations where a return may need to be associated with a trolley id, prior to loading into the Vertical Carousel storage system. |
| Hide | This checkbox is clicked to allow a location to be hidden from view and therefore not selectable in loans, returns and item transfer processes. |
| Treat new item added here as floating stock | If this checkbox is selected, then any new items added to the location, e.g. by catalogue addition or by bibliographic load, are automatically flagged as floating. |
| Do not treat as floating stock if returned here | If this checkbox is selected, then the location does not apply a float change of location; i.e. if the location is so set, then a floating item returned at the location will not reset its home but will retain the previous location detail as home. |
| Default Loan/Return location |
The standard Command buttons are provided.
Physical Location table #
The Physical Location table is used to identify the library’s physical locations: these may be the actual collections or parts of collections in a building, e.g. Children’s Library, Local History section, Stack. Physical locations may be combined to form logical locations; multiple physical locations may be combined in this way, and this table relates each defined physical location to the Home location that is defined for the logical location. (see also Loans Control Parameters, where the Logical Locations are combined with other data elements to form a loans control matrix)
Each Physical location to be used is defined, and is given a code, which is held in the associated Holdings data (equates to MARC21 852$b). In addition, the library may define a contact for the location, and indicate whether the location will be used as the reservations collection point for the home library: for instance, a library could be split into seven floors, each floor constituting a separate physical location, but all combining to form a logical location which is a Home location; when a user makes a reservation at the seventh floor, the system knows that the standard collection point is actually on the ground floor, and so provides this as a prompt.
Loan Parameters #
Logical location details are used in loans control processes: see Loan Control Parameters, where Location details are combined with other parameters to form a loans control matrix.
Item Formats #
The Item Format table links information held in an item’s parent bibliographic record to a format description, to be used for display of the appropriate item format icon. The defined Item Format may then be combined with other similar formats to form a Material Type, which may be used in controlling loan parameters: for instance, video recordings may come in a number of formats, each of which may be specifically identified by the library; to allow all videos to be controlled in a consistent way, they may be collated under a Material Type to allow loan parameter control to be exercised once only for all item formats. Alternatively, an Item Format may be withheld from the Material Type for special treatment – e.g. if all masters are held in U-Matic, and all loan copies are held as other video formats, then the U-Matic may be identified as a unique Item Format and maintained in parameters separately from other video formats. See also Aurora Administrator – Loan Control Parameters, where the Material Types are combined with other parameters to form a loans control matrix.
For libraries for the blind, specific elements identify that settings reflect the format’s property as either Braille or Audiobook.
If a specific format is to be recorded but is not formally bibliographic – or explicitly a piece of equipment – then it is possible to mark the format as requiring no holdings record to be attached to a master bibliographic record. Formats may also be designated to be set apart from limits calculations, and not to be tallied as part of a user’s loans.
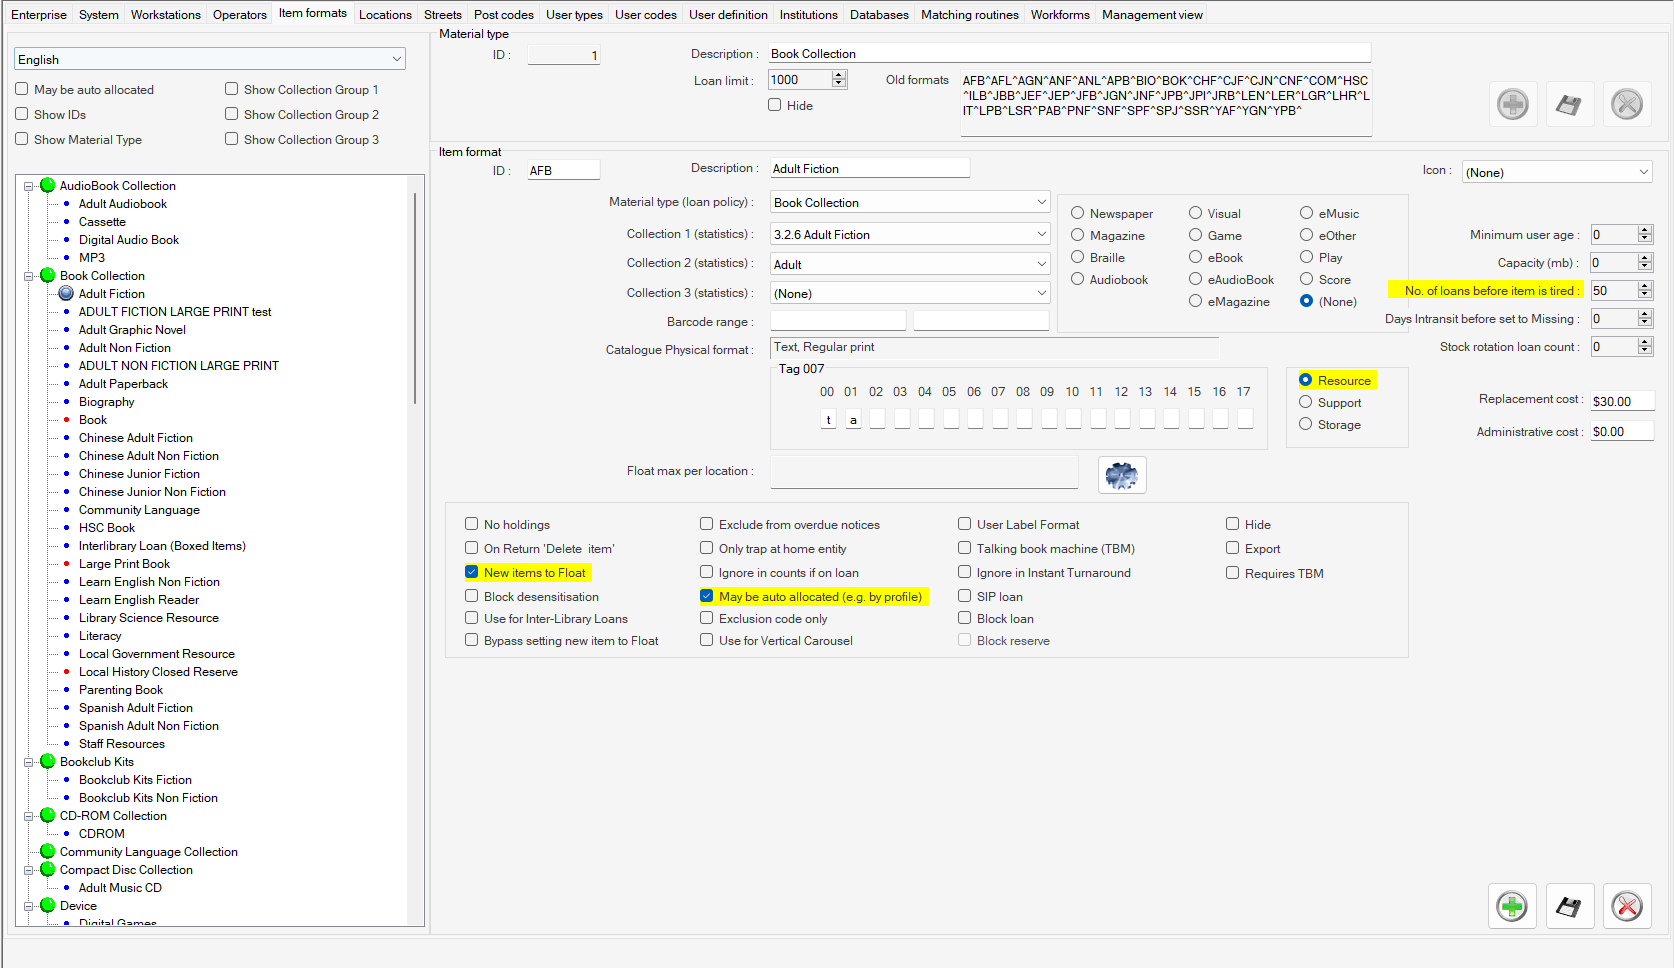
The Item format tab of system parameters opens to a form with a formats tree on the left and two panels:
Formats tree (Left hand panel) #
The tree shows each Material Type defined (highlighted with a green blob) as a tree node, with each item format included in the Material type listed below.
Top selection settings (left hand panel) #
Language – A combo selection is provided to allow selection of an alternative language in the user interface – usually this will be English in your system by default.
May be auto allocated checkbox –
Show ID’s Checkbox – shows material type id next to material type in tree – This can be very useful if you are adding a new format, as it allows you to check that the value you are going to use has not already been applied.
Show Material Types checkbox – Shows material type in () at the end of each format
Show Collection Group 1 – shows collection 1 description next to the format (can only select 1 at a time)
Show Collection Group 2 – shows collection 2 description next to the format (can only select 1 at a time)
Show Collection Group 3 – shows collection 3 description next to the format (can only select 1 at a time)
Material Types panel #
When a Material Type or an Item Format is selected in the tree, the panel will be populated with the appropriate details:

The panel displays:
- Material Type ID (MT_ID)
- Description (MT_Desc), which can vary according to the selected language of the interface. Note that ‘Material type’ is usd only for collation of loan parameters – this is never seen in public displays.
- The associated item formats, listed by their internal id and separated by ^ Note that this is for display only and cannot be edited here
- Material Type Loan Limit (MT_LoanLimit) – the increase/decrease controls may be used to change this, or you can simply overtype the current value
The standard Command buttons are provided.
Adding a new Material Type #
To add a new Material Type select the Material Type panel and click the green cross. Aurora will automatically apply a new id when the details are saved, so this does not have to be set – all that is needed is entry of a description, and an indication of the loan limits for the material type (applicable to all user types). When complete, press the Save button to save the data.
Deleting a Material Type #
If no longer required, a Material Type definition may be removed by selection of the parameter, and when displayed, clicking the Delete button (red cross).
Note that a Material Type may not be deleted if it still contains Item Format definitions.
A confirmation message will be returned.
Item Formats panel #
When the tab is initially opened, no Item Format will be selected, and this panel will be blank
When an item format is clicked in the tree, the panel details will be populated:

Item Formats panel elements descriptions #
| Element | Notes |
|---|---|
| Item format id | This id should ideally be of three characters – and must not coincide with another id of greater length – e.g. CD and CDR. Generally, item formats are displayed using their description, so this element remains purely administrative. |
| Format icon | Each item format may be associated with a format icon, for display in WebOPAC. Note this is not referenced in Montage |
| Description | The ‘public’ element display description of the format. This may be varied according to interface language. |
| Replacement cost | If a generic replacement cost is known, e.g. as defined by a State Library, then that value may be entered here. In Lost book processing, if the item does not have an actual recorded purchase cost, then this default may be applied. |
| Administrative cost | A generic administrative cost may be applied, per item format, for use in billing. |
| Minimum user age | Where the library has age-restricted materials, such as MA15 or R18 (in Australia) DVDs, then these may be set up as item formats in their own right, and this parameter set to prevent users of insufficient age from borrowing them. Note that this does of course require that the user’s date of birth is recorded. |
| Capacity (mb) | Where the library is a Library for the Blind and offering Burn on Demand services, this value needs to be set to indicate the maximum capacity that can be held on the format’s media – in megabytes – to ensure that there is not attempt to write excessive data to a production disc. |
| No. of loans before item is tired | This input box allows a library system to identify at what number of loans a item would be considered tired e.g. grubby, well used, ready for withdrawal or ready to order a new copy. The stock analysis report on high activity items references this input box. |
| Days intransit before Missing | This input box allows |
| Stock Rotation Loan count. | In conjunction with other elements, the stock rotation feature can use this input box to determine the number of loans a format should have before it could be rotated to another library within the system. |
| Material Type (loan Policy) | |
| Collection 1 (statistics) | In combination with System parameters / system / I1 Collections – 1st formatting group. allows formats to be grouped together purely for statistical reports. |
| Collection 2 (Statistics) | In combination with System parameters / system / I2 Collections – 2nd formatting group. allows formats to be grouped together purely for statistical reports |
| Collection 3 (statistics) | In combination with System parameters / system / I3 Collections – 3rd formatting group. allows formats to be grouped together purely for statistical reports |
| Format group | The small panel of boolean selections is for identifying format group is used by Libraries for the Blind in determining service provision for their clients. A single format may be selected by radio button; the exception to this is ‘Magazine’ – if this is selected, an additional checkbox ‘Also DAISY’ is presented: This is provided as Libraries for the Blind stratify according to DAISY, Magazines, and DAISY Magazines. It is also necessary to flag Serials, Journals or Magazines item formats with the Magazine selection. If this is not done, then the format is not offered as an option in ordering a serial. |
| Barcode range | This is provided specifically for Libraries for the Blind, and is used in the AudioMagazines program, allowing automatic creation of items with barcode values in this defined range. |
| Tag 007 Physical format | When an item is added in Cataloguing, Aurora checks against the Item formats parameters for matching 007 characteristics, set here. This allows only those formats to be offered which match a legitimate defined format. The parameter values must be known separately; when the parameter is saved, the interpretation of the code will be displayed |
| Float Max per location | A cog button presents a table for the creation or management of Float max per location settings. The table shows the current amounts of items on shelf and on loan as well as a total to provide an estimate of what the float max can/should be set to. The float max is now used in auto stock rotation. |
| Checkbox options | |
| No Holdings | The use of this checkbox should be discussed with AIT. It allows the items with this format to be added to a bibliographic record without creating bibliographic holdings record. this is worth using if the record is for a type of item which has very many instances, such as a DAISY player or a pedometer. If holdings records are added for such items, then this bloats the bibliographic details, with the effect that it will slow down search response while the item details are collated for display; by use of this checkbox, the details are recorded in Item details only, and the response is then much faster. |
| On Return ‘Delete item’ | Particularly in some aspects of Library for the Blind operations, materials are created bespoke for the user, e.g. Burn-on-Demand material; this has not continued use, and so on return the item is deleted, and the item recycled. |
| New Items to Float | New items that are added with this format have Float Collection Item ticked in Item details Flags |
| Block desensitization | This must be set for any material that is magnetically sensitive, and loanable via self-service machines. If not set, then the self-service machine will create a magnetic pulse to desensitize the security tag, and this will at the same time completely wipe the recorded data, e.g. for audio or videotaped material. |
| Use for InterLibrary Loans | This option must be set for formats used in the Interlibrary Loan functions. This may be just the one ‘ILL’ format’ or multiples for different purposes. The effect is that selection of a format in the functions is then reduced only to the appropriate options. |
| Bypass setting new item to float | |
| Exclude from overdue notices | This setting allows items with this format to be excluded from notices. |
| Only trap at home entity | |
| Ignore in counts if on loan | Some types of material, e.g. DAISY readers in a Library for the Blind, do not form part of the standard loan limits, and with this setting they may be excluded |
| May be Auto Allicated (e.g. by profile) | This setting allows items of this format to be included or excluded in Allocations processing. |
| Exclusion code only | This option is provided primarily for Libraries for the Blind and allows the format to be defined as being used to record exclusion from Allocation processing only. |
| Use for Vertical Carousel | This setting applies to Vision Australia only and is used to indicate that this format is shelved in the Vertical Carousel. If not ticked, the item will not be presented to the VC for processing. |
| User label format | |
| Talking Book Machine (TBM) | This setting is given where the format represents a TBM, or more recently a DAISY player. |
| Ignore in Instant Turnaround | Where Instant Turnaround is used (in Libraries for the Blind), this setting allows inhibition of the function for the selected format. For instance, a user may have a reservation for a DAISY player, but the library does not want a player returning to be immediately loaned to that user, until the player has been checked or serviced. |
| SIP Loan | |
| Block Loan | |
| Block Reserve | Items with this format are blocked from being reserved. |
| Hide | Item formats have a ‘Hide from public’ checkbox allowing the operator to prevent these formats being displayed in Montage – (implemented 2021 – schema v195) |
| Export | Indicates (primarily in a Library for the Blind) that this format requires a reader, and that in loans allows a check to ensure that the user also has a reader on loan. |
| Requires TBM | |
The standard Command buttons are provided.
Adding a new Item Format #
To add a new Item Format, you must first select the Material Type to which the new format will belong. With the Material Type details then showing in the top panel, the green cross in the lower panel will become enabled, and this is clicked to allow the details of the new format to be entered. Please though take a few minutes before entering the details to review the information available as above – in the case of item format, you will supply the necessary code, and this must be a three-letter code, and must not of course match an existing code. You should also have the details of the required 007 settings for entry of items in Cataloguing. Fill the form in as much as is required and save.
Deleting an item format #
If an item format definition is no longer required, it may be deleted by selection, and then clicking the Delete button. A check is made of items currently defined with this format, and the deletion will only be allowed to proceed if there no items with the associated format.
Operators #
This screen defines the operators (predominantly staff) who will be using the Aurora system.
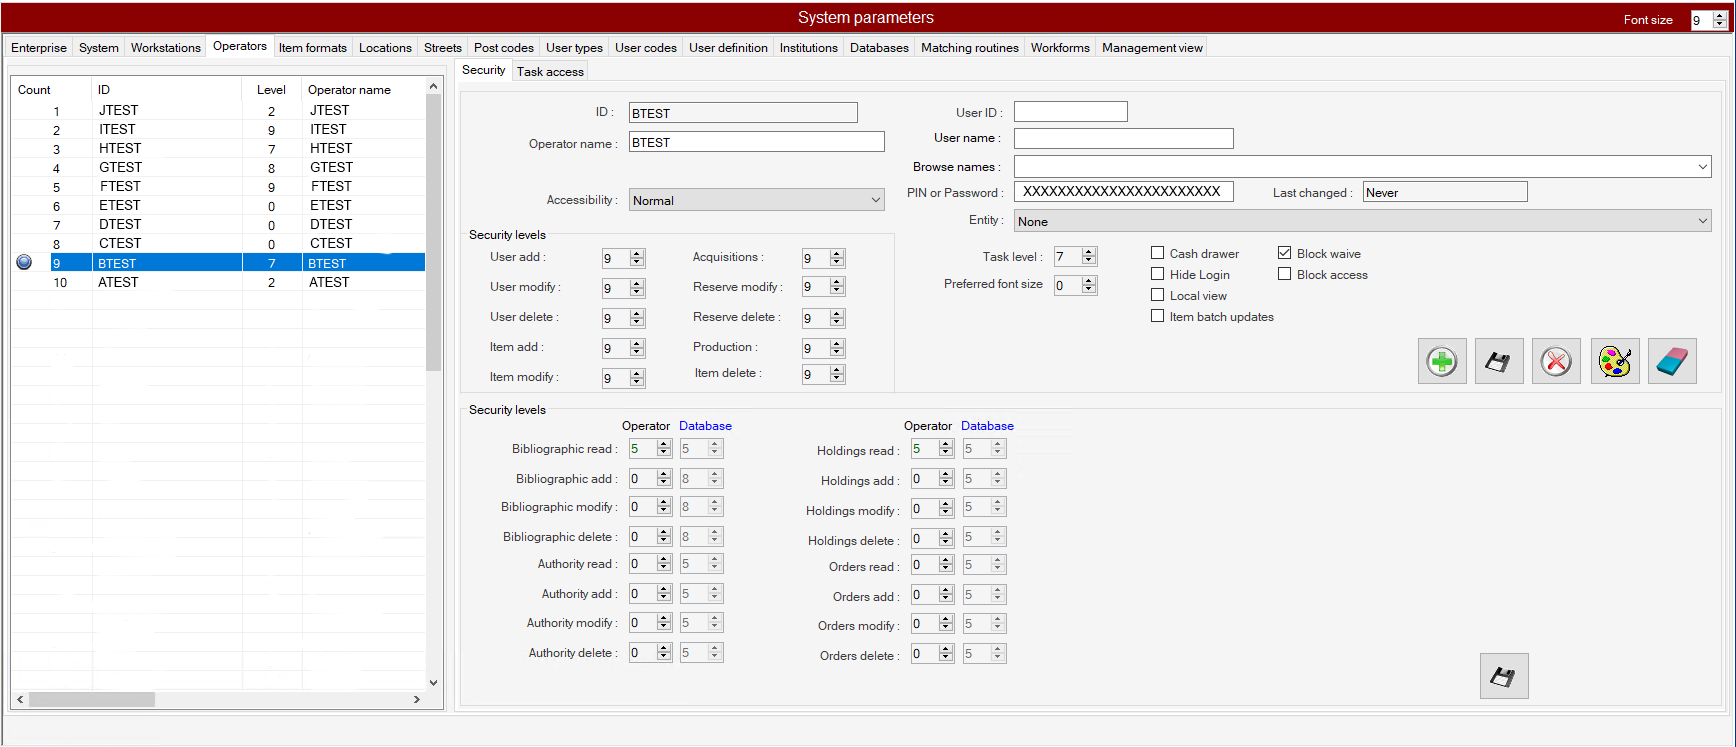
Note that there is a slider control between the major panels – this allows each panel to be expanded for closer examination.
Operators listing #
Each operator must have a unique ID, and be equipped with a PIN, to allow sign-on. Operators may sign on from a picklist on screen, and to allow this, their name is recorded in OP_Name – or as here, the operator descriptions can be generic:
Flash indicators #
Operator entries may have an associated flash indicator:
 – indicates that the operator id is hidden in the login screen. This is usually applied to self-service operator identities to prevent an operator incorrect selecting that id to login.
 – shows that the operator has an associated user id
Operator attributes #
The right hand panel is split, with two separate tabs:
As a general rule regarding the description of these two functions,
- Task access determines what an operator can see/access e.g. what modules are greyed out and what are accessible and
- Security determines what an operator can do with the pages they can access.
Note task level may also be associated with specific enterprise parameters e.g. ReservePriortyTaskLevel – Operator task level required to change reserve priority – this can be set to a specific level and above.
Security #
This panel shows the operator PIN/Password in plain text, and sets the operator Task level: the functions available per task level are shown on the Task access tab.
Two separate panels present details of the operator’s security level:
Security levels (General) Table 1 #
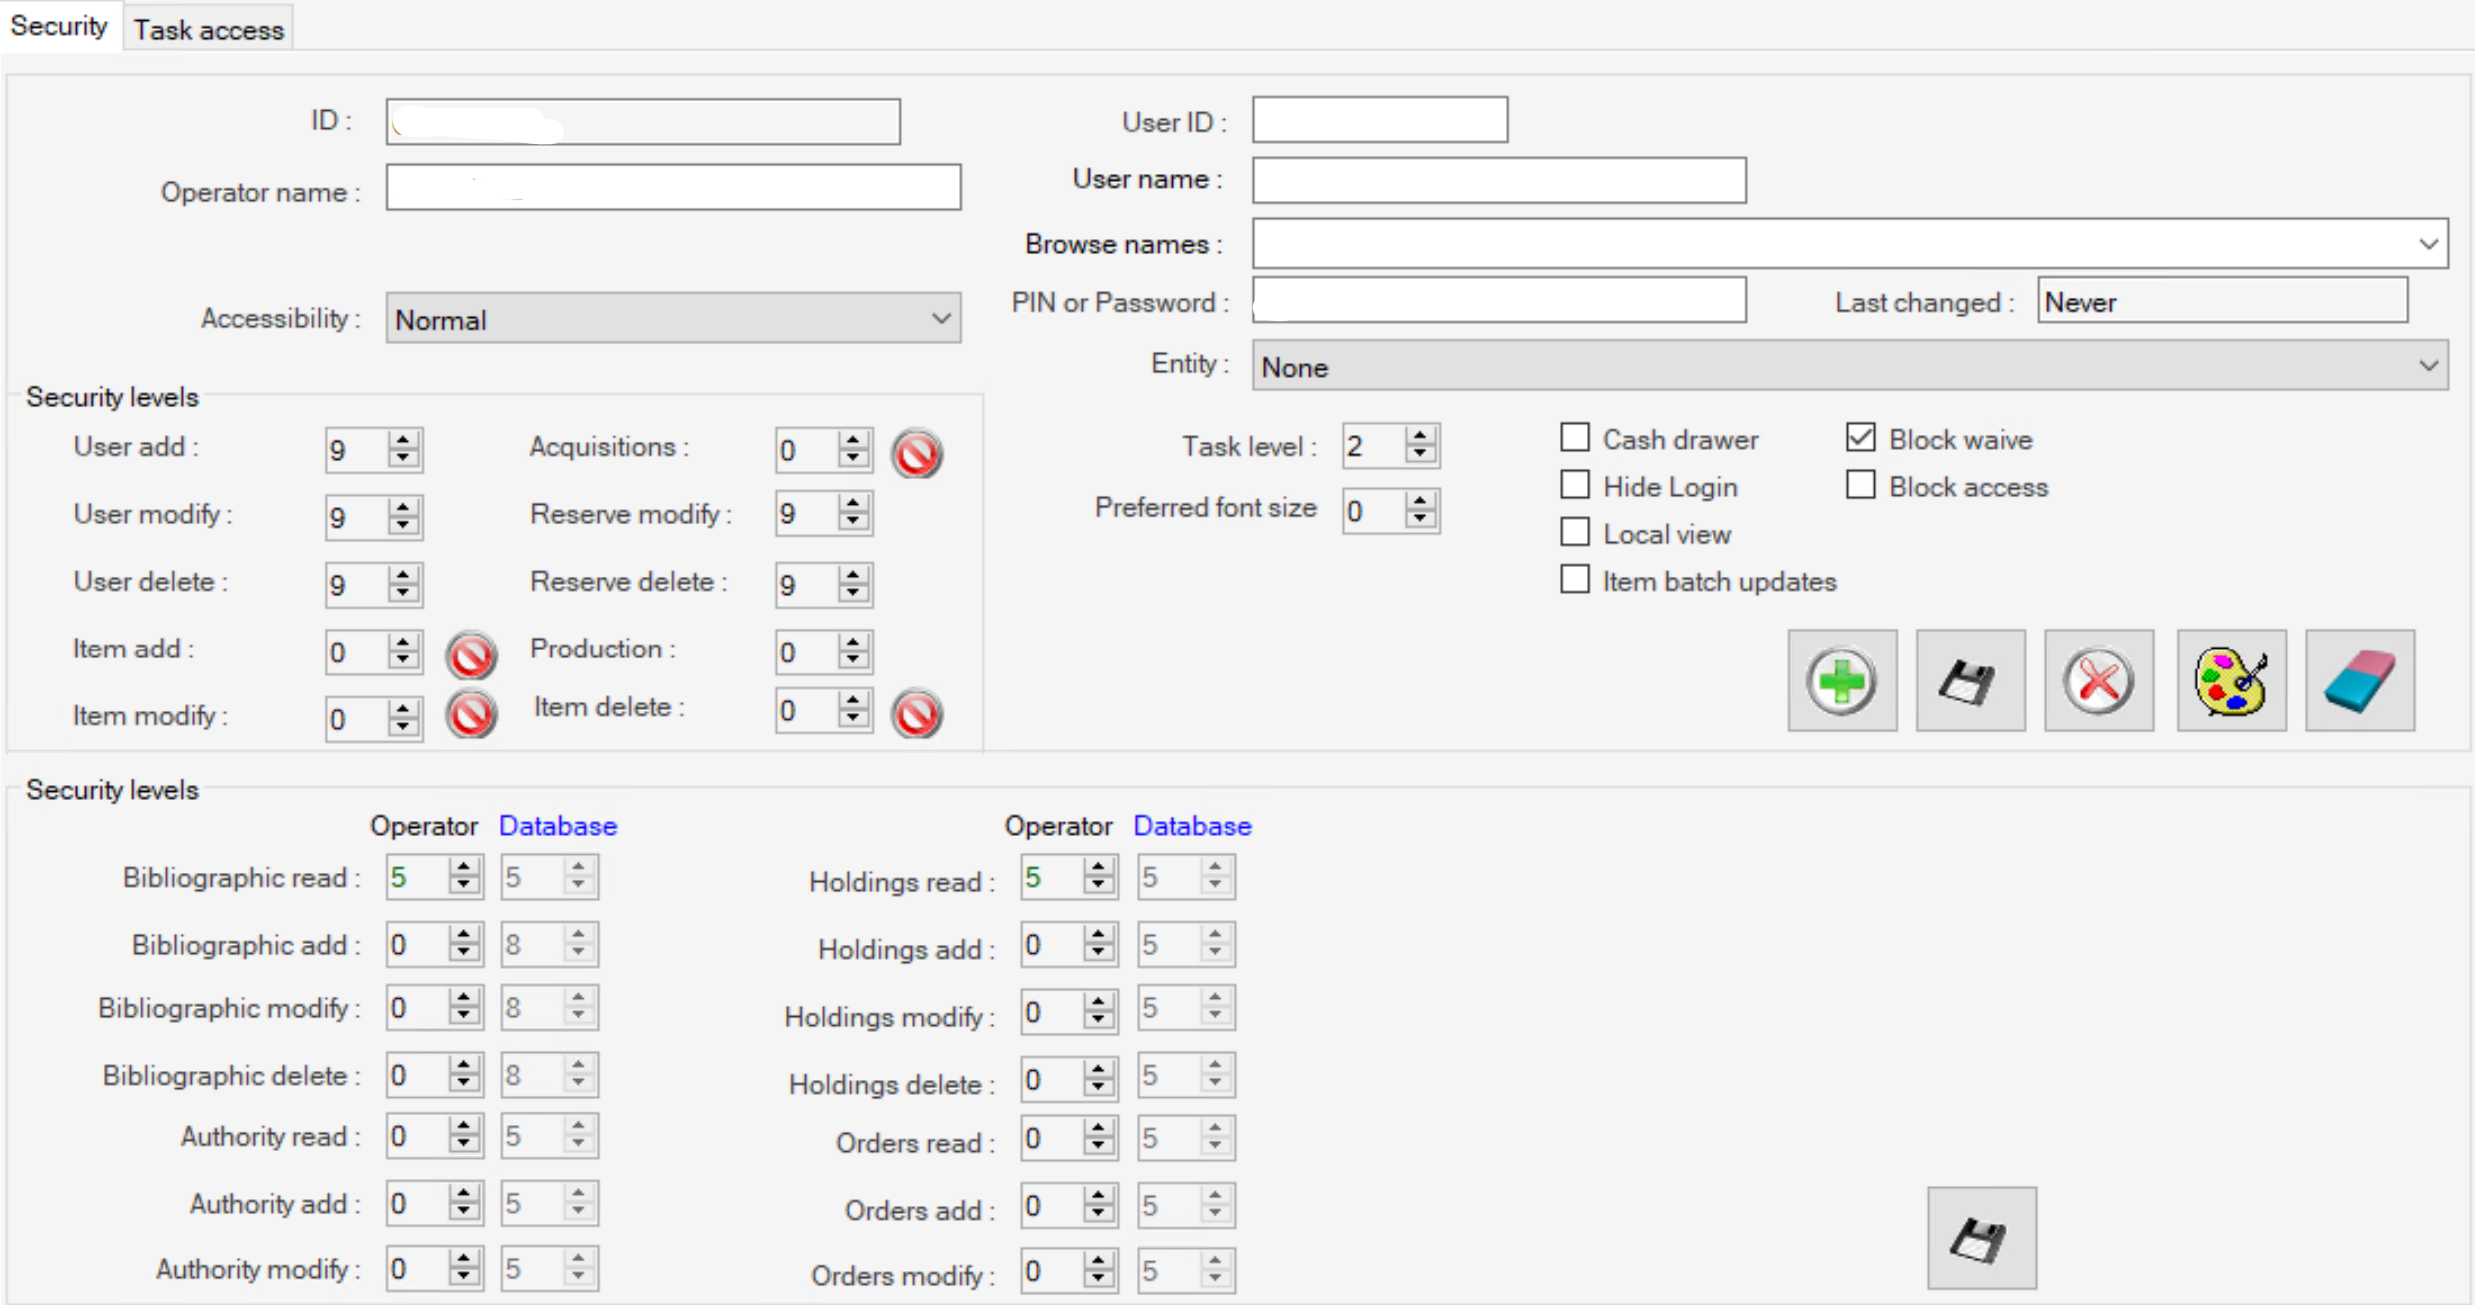
In this general section, each operator is provided with read, add, modify and delete access privileges to
- User maintenance – User add , User Modify, User Delete
- Item maintenance – Item add, Item Delete, Item Modify
- Reservation queue management – Reserve Modify, Reserve Delete
- Production – Used by Libraries for the Blind
- Acquisitions – Acquisitions
For each of these accesses, a sliding scale of authority is applied with 0 being the lowest level e.g. OFF, and 9 being the highest e.g. ON
Where an operator does not have appropriate security to perform a task, a flash is provided when hovering over input box with a tooltip showing what level is required to turn ON the security level
Checkboxes #
Four checkboxes are provided to further define the operator:
| Checkbox | Notes |
|---|---|
| Cash drawer | This controls whether the operator is allowed to open a Cash drawer. |
| Hide login | When this is set, the Operator id is suppressed from Login screen – useful for self-service operator identities. |
| Block waive | This allows an operator to be set as unable/unauthorized to waive a charge. |
| Local view | This restricts the operator’s view of users to those in their own branch. |
| Item Batch Updates | This allows the operator to preform batch updated e.g. batch returns |
| Block Access | This prevents the operator from login |
Security levels (Databases) Table 2 #
This panel defines Security attributes for individual operators; determining their level of privilege for cataloguing access by database by method: read, add, modify, and delete.
In all cases the highest authority is 9 and the lowest 0 (and 0 means that the operator will not have any access to that database). The minimum level required to turn on the access is listed in grey next to the input box.
Public users may also be controlled for access to remote, or internal databases, through application of minimum access level settings.
Note that the Security level of an operator is recorded against a particular action in User History and Record History tables and is also recorded in the Document Record (DDR) when a record is added or updated.
Note that it is necessary to define access levels for each of the databases to which the operator may have access:
- Bibliographic
- Authority
- Holdings
- Orders
Task access #
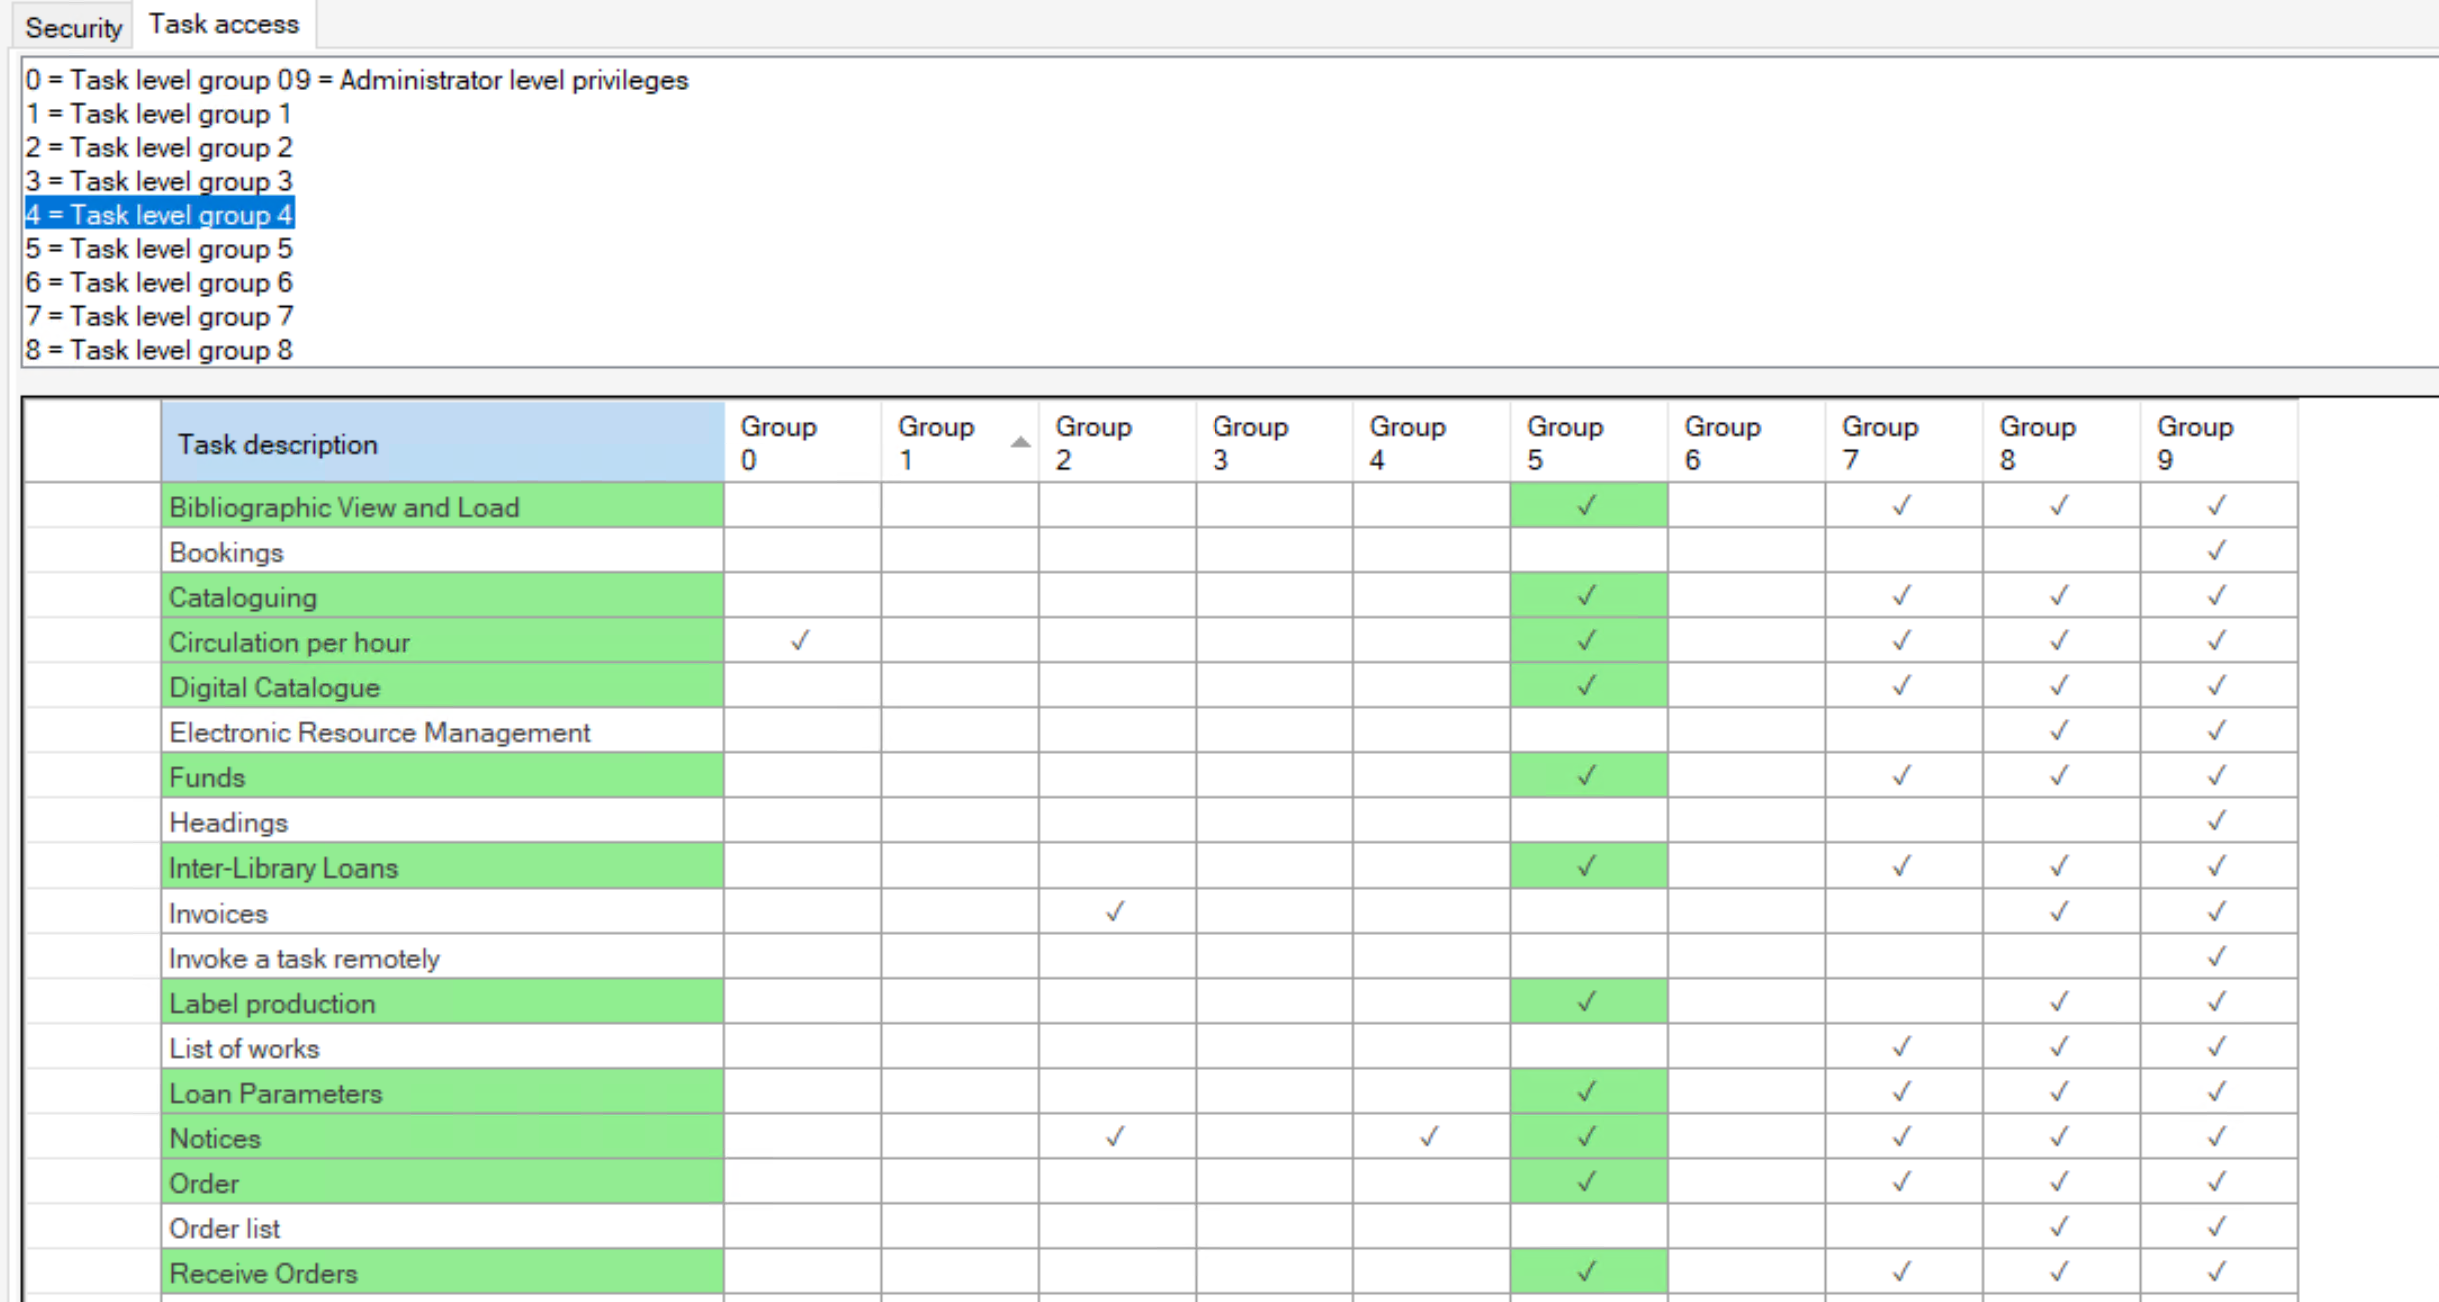
This screen shows the functions available in Desktop, correlated against the available Task Groups. At the top of the screen, the available Task Groups are shown [These may be renamed locally]; and below this the functions, with a tick in the intersection of function row and task group column to indicate that members of the group have access to that function. When a specific operator is selected, the assigned task group is known, and the tasks available are then highlighted in green.
Assignments may be managed using the context sensitive pop-up menu:
#
For each task, a pop-up menu can be invoked. Note that there is only one main option on the menu, but this changes to reflect the chosen Task:
Note that if one task is selected (highlighted in the display), and the mouse is on another task row when right-clicking, then the highlighted task is the one selected. Operators should always visually check the main menu caption.
The main option can then be expanded to show sub-menu options:
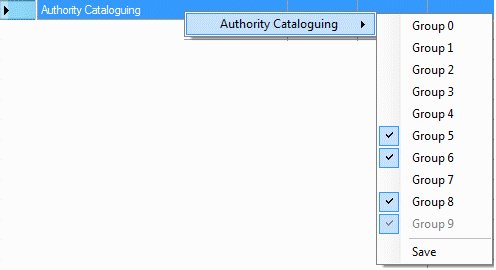
These options show the various task groups available from Group 1 to Group 8 (Group 9 is reserved). A tick shows that the task is enabled for the users of the ticked group. Mouse action can then be used to toggle group access on or off.
The final option on this sub-menu is Save. All changes must be saved within the specific task – if not saved, then the change will be highlighted in the display with a yellow fill:
Workstations #
This tab presents the controls to maintain your licenced workstations.
Opening the tab will list all of the defined workstations, and show their attributes:
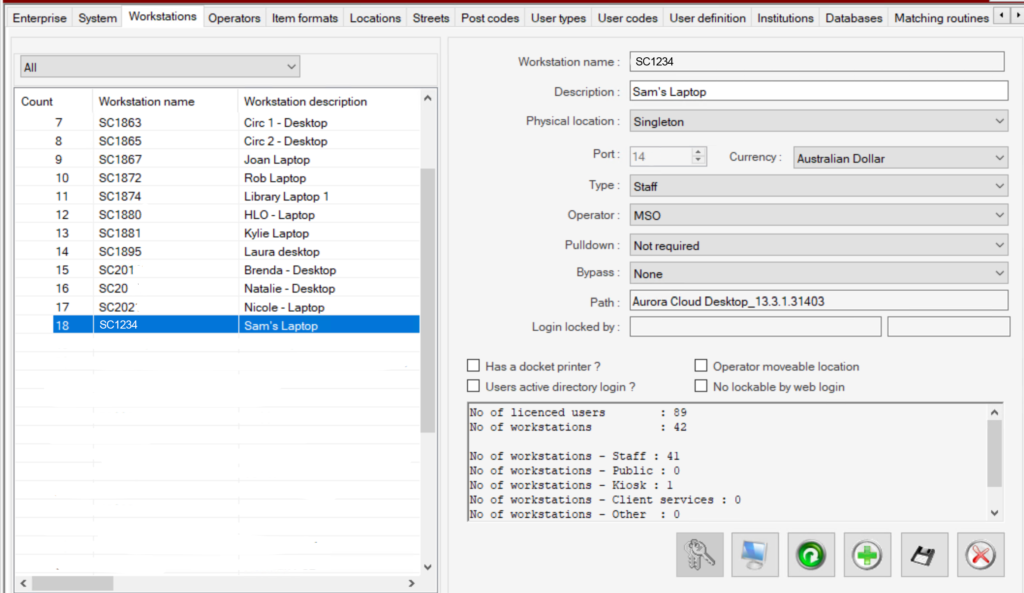
The tab is made up of a number of separate panels:
Workstations List panel – Left hand side #
A Drop down panel at the top of the screen allow the list to display the Libraries within consortias.
This panel lists all the registered workstations. Note that if you add more workstations than you have licenses for, then all workstations will breach the licensed terms and will no longer be valid.
Workstation maintenance panel – Right hand side Top #
You can inspect the details of a workstation by selecting it: the details are then displayed in the maintenance panel on the right. The following details are available:
| Element | Notes |
|---|---|
| Workstation name | This is the computer name which is identified on a network. This must be unique, and will be used in audit trails, etc., to record the activity of a specific workstation. Please make sure the name does not contain a space. |
| Description | This is entirely free text. Enter a suitable description to identify the workstation clearly. |
| Physical location | The Physical Location of a workstation must conform to a location which is defined in the Physical Locations table. If entering data through Administration / System parameters, then a pull-down combo will be invoked allowing selection of Physical Location according to the location’s description. Note that if setting up a new workstation which is to define a new physical location, then the physical location must be identified first. |
| Port | This element is used to identify workstation specific activity in the Circulation audit trail. The element must therefore be unique. |
| Currency | Each workstation uses a designated currency – all currency values should be identical for a given institution and should reflect the setting for the institution as defined in the Inst_Enterprise table. The value entered must be defined in the Inst_Currency table. |
| Type | This setting defines the type of workstation usage, If the field is not present, or is empty, then the system assumes a Staff workstation.
|
| Operator | This field can be set to an operator id, so that the logon automatically prompts for this id. The operator id can be selected from a drop-down combo menu. Note that this field must be selected to allow the details to be saved. |
| Pulldown | The Pulldown is a download that is reference when in offline mode and is designed for circulation workstations to reference to determine debarred Users and Reserves. This field settings determines if the offline reserves/debarred user info needs to be pulled down or not to this specific workstation, and if pulled down whether manually (following a prompt) or automatically: Valid options are:
|
| Bypass | This allows the workstation being set to prevent Reservation SMS notices being sent immediately an item is returned: specifically for use in automated return systems
|
| Path | List the version number of Aurora Desktop the workstation is running. |
| Login Locked by | if a workstation is locked the operator name that has locked the workstation is listed here. |
| Has a docket printer? – Checkbox | This field is set if a docket printer is connected – e.g. to print details of loans as they are made in circulation. |
| Uses active directory login? – Checkbox | This field is used to tell an application to use Windows Active Directory or not. If set to True, the code now tries to match the Windows username in Active Directory: if a match, it then gets the operator’s first and last names and uses these to match on the Operators table. If there is no match, the standard operator login is invoked. |
| Operator movable Location – Checkbox | |
| Not Lockable by web Login |
Workstations can be added and deleted using the Command buttons detailed below.
Workstation Summary panel – Right hand side Bottom (grey) #
The summary panel presents tallies:
- of the number of licenced users (according to the licence file)
- of the number of workstations defined
- of the number of staff workstations
- of the number of public workstations
- of the number of kiosk workstations
- of the number of other workstations
#
The Workstation Maintenance panel uses the three common Command buttons plus two additional specifically for use here:
 Unlock workstation.
 Use this button simply to replace the workstation name, e.g. when replacing the workstation and all other settings remain the same
 Refresh the workstation counts, e.g. following entry of new workstations, or deletion of old
 Add a new workstation
 Save the workstation details
 Delete the existing workstation
Streets #
This tab presents the controls to maintain your Streets parameters. This set of details defines the streets that may be used in the OPAC Join wizard, if your library is using address validation.
When the tab is opened, the institution’s state is checked and used to populate the display:
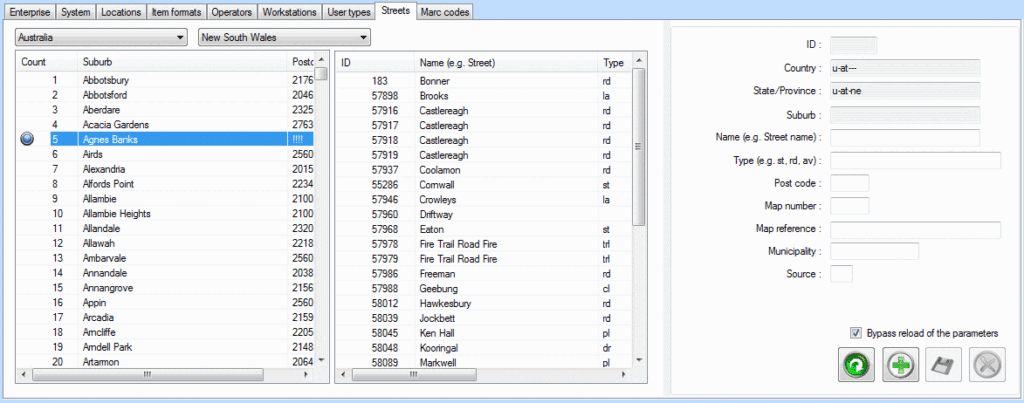
Streets Table (Left hand side) #
Country/State – Combo options allow for selection of country and state. Please note that at present address files are only available for Australia and the states of New South Wales, Queensland and Victoria. Please contact AIT for any other jurisdictions.
Suburbs – The suburbs in the selected state are listed in alphabetical order, showing their postcode, when a suburb row is selected from this display, the Streets display to the right is populated:
Streets – This panel lists all of the registered streets for the selected suburb in alphabetical order. Note that above this panel there is a checkbox ‘Maintain’:
Maintenance (Right hand side) #
A maintenance panel is displayed as the third panel on the right. This allows addition of a new street, or correction of existing details by selecting that street from the display:
| Detail | Description |
|---|---|
| ID | The ID is assigned automatically and cannot be modified. |
| Country | The Country is determined from the institution’s detail. This is a code, using the MARC21 codes for countries, etc. |
| State/Province | The State/Province is determined from the institution’s detail. This is a code, using the MARC21 codes for countries, etc. |
| Suburb | The suburb name should be given in upper case. |
| Name | This is the street name (without the type, see below) |
| Type | The street ‘type’ is given here using abbreviations, e.g. Rd = Road, St = Street, Ave = Avenue |
| Post code | Give here the post code for the street (or part of the street if it extends across post code boundaries |
| Map number | Where the Streets data is derived from geographical data such as Melways, this may include a map number. This is optional. |
| Map reference | Where the Streets data is derived from geographical data such as Melways, this may include a map reference. This is optional. |
| Municipality | Optional |
| Source | M=Melways/Sydways [Blank in existing instances (pre Schema 170)]; P=Australia Post/ Dept of Sustainability and Environment |
Streets Checkbox #
One checkbox is available on the Maintenance panel.
- Bypass reload of the parameters. This is automatically selected by default and allows additions/amendments to be saved without pulling down the full parameter set for the streets, which can be quite large and so time-consuming; this should be checked, especially if adding multiple street entries in one session.
Streets Command buttons #
The Streets Maintenance panel uses the three common Command buttons plus one specifically for use here:
![]() Force a reload of all streets. The checkbox above prevents the full reload of the streets parameters following data entry – this command button allows the full set to be refreshed, e.g. to check the additions just made.
Force a reload of all streets. The checkbox above prevents the full reload of the streets parameters following data entry – this command button allows the full set to be refreshed, e.g. to check the additions just made.
Post Codes #
To be included
User Types #
The User Types table defines the User Types in use in the library and relates them to the User Categories used in Aurora, the Workforms for entry of the User data, and some thresholds used in the Circulation system. See also Loan Control Parameters where the User Types are combined with other parameters to form a loans control matrix.
The screen is divided into two sides
- The User types table on the left
- The maintenance panel on the right when a line is selected on the left.
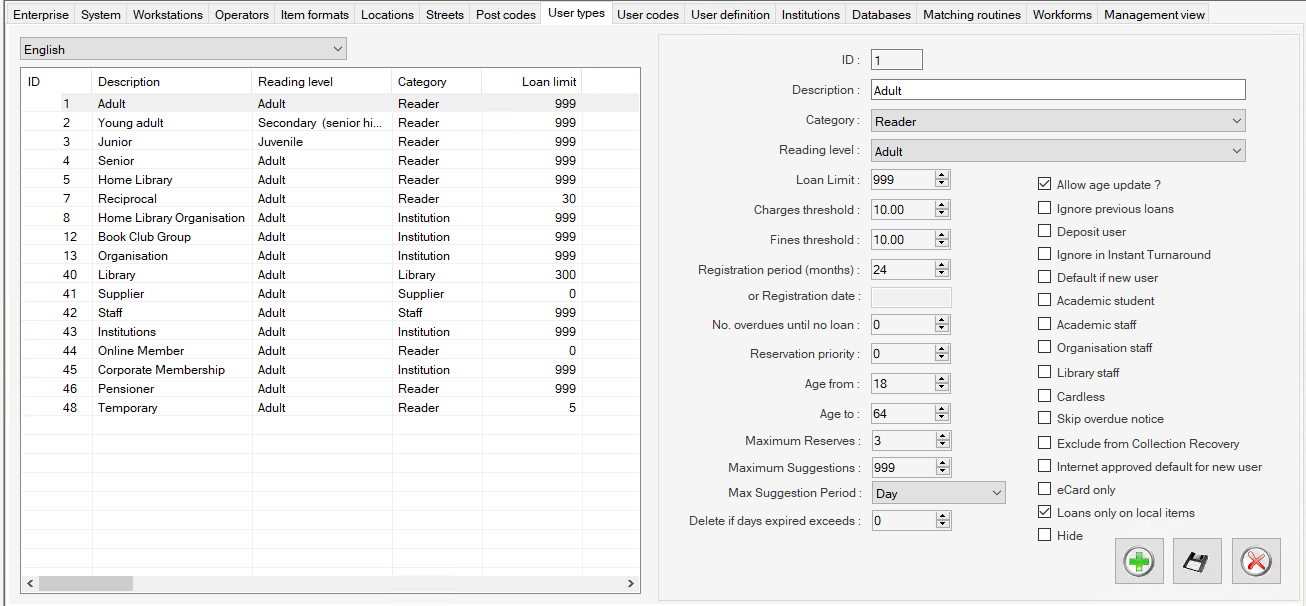
User Type Maintenance Panel (Right side) #
ID #
Each category is defined for the User Type which is determined as a numeric code (UT_ID). This is automatically assigned on creation
Description #
This is a free text field used to describe the User Type
User type Categories #
Aurora’s User Control extends beyond readers to include all individuals and corporate entities which have relationships with the library. These are defined across the Aurora system, and include:
- r readers (i.e. normal public membership)
- p suppliers (e.g. book or materials suppliers)
- s staff (i.e. internal library staff and processes)
- l libraries (for inter-library loan purposes)
- x institutions (such as corporate borrowers)
Reading Level #
The default reading level can be specified from the user type.
Input Boxes #
The table also defines the overall loan limit for the User type, as well as thresholds for charges and fines. If the user reaches or crosses these thresholds, then the system will automatically stop, or debar, the specific user. Note that an absolute system limit for loans is held in the Enterprise table.
- Loan Limit – Set the maximum number of loans available to user type
- Charges Threshold – Set the threshold on which a user type is debarred from loaning
- Fines Threshold – Set the threshold on which a user type is debarred from loaning
- Registration period or registration date– sets the default registration period for a user
- No. Overdues Until no loan – This setting allows definition of a tolerance for overdues. This may be set independently of notices and means for instance that the library can apply settings, to allows books to be overdue without any problem.
- Reserve Priority – by default the reserve priority is set to Normal (0)
- Age from + Age to – works in conjunction with allow age update checkbox to allow auto update of user type
- Maximum Reserves –
- Maximum suggestions –
- Max Suggestion Period – Drop down to choose between None, day, week, month , year
- Delete if expired exceeds –
NOTE – Reserve and loan parameters in user type work in conjunction with the Loan and reserve parameters table
Check Boxes #
| Allow Age Update | This checkbox must be checked to allow users to auto update based on age. Note there can only be one sequence of automatic update e.g. Junior 0-12 YA 13-17 Adult 18-120 and for this to work the age from and age to boxes must have a a vale |
| Ignore previous loans | |
| Deposit user | |
| Ignore in Instant Turnaround | |
| Default if new user | |
| Academic student | |
| Academic staff | |
| Organisational staff | |
| Library Staff | |
| Cardless | |
| Skip overdue notice | If ticked the User type will no receive overdue notices, even if overdue notice is specified for the user tpe in loan parameters. Note they will still receive reminder and renewal notices. |
| Exclude from Collection Recovery | |
| Internet approved default for new user | |
| ecard only | |
| Loans only on local items | |
| Hide |
User codes #
Lists user codes.
The only changes recommended on this page is the addition of XST tags for user type extra statues.
Contact ait directly if you are interest in adding new XST tags
User Definition #
User tag Definitions
Databases #
Lists the database name of the catalogue.
Matching Routines #

This tab currently displays existing match routines.
It is possible to add new matching routines or edit existing however the values have huge impacts on whether a new work is added or bumped. Please contact ait directly if you wish to investigate making changes.
Workforms #
Workforms are used for original Cataloguing and allow the creation of basic template that can set default marc codes and values to start of cataloguing an original work.

Types #
Bibliographic – Sets out the baseline workforms that are used in the addition of new original works in Bibliographic Cataloguing – Mode = Add
Child Holdings – Set out the basic workforms when creating different child holdings
Authority – Set out the basic workforms when creating different Authorities
Workform list (left hand) #
Provides a list of existing workform templates for the type specified above e.g. Bibliographic
Workform List Right click
When a workform is selected a right click context menu is provided.
- Hide – Hides the workform from the cataloguing screen
- Copy – Copies the selected workform so you can edit it to create a new workform NOTE it is suggested when creating a new workform Copy a workform as close to what the new workform will be to reduce the number of changes you will have to make.
- Change
- Workform name – Allows the name to be change in the workform Collum.
- Workform Type – Changes the workform type, this effect what boxes you have to tick in cataloguing for the workform to be displayed
- Export to Excel
Workform Details Table #
When a workform is selected in the Workform list its contents are displayed int he workform details table. From this table the workform is able to be edited via the right click context meny
Workform Details Table Right Click
- Change content – please note that it is important to follow cataloguing rules in what is applied to ensure the work will save when used.
- Sequence – changes the Seq number and order of display
- Label
- Tag – changes tag
- Indicator 1
- Indicator 2
- Default data – examples of use would be inputting the 000/06 value and the 007 value or specific 655 heading that are always used for this type of work.
- Insert – used to insert the tags that will be used regularly for this type of work
- Before
- After
- Delete
- Resequencing – The re-sequences the Sequence (seq) column and created a bigger gap of numbers between each row to allow for more rows to be inserted in-between.
- Export to excel
Reminder: close system parameters and Delete your XML files before opening Bibilographic cataloguing to ensure the new or edited workform appears.
Management View #
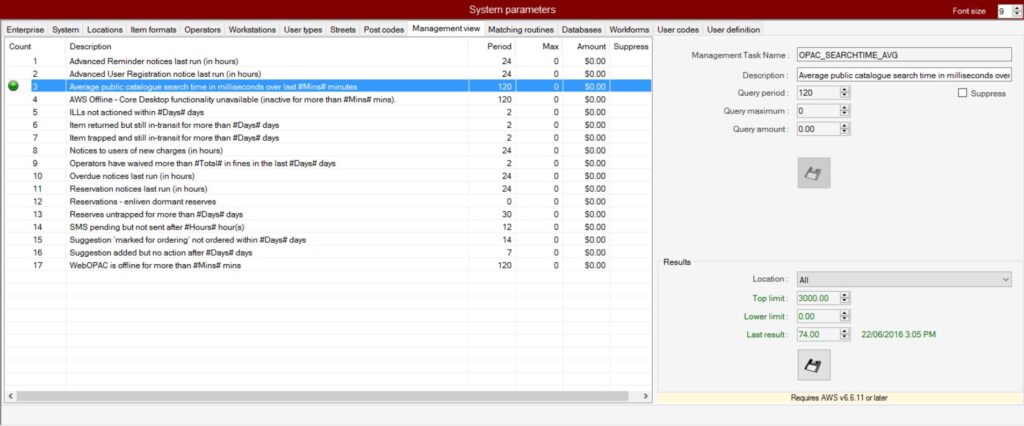
This tab presents the controls to maintain the thresholds related to the management tasks. The results are displayed in the Management overview which can be displayed by activating the overview checkbox in Management tab / options
- The left panel provides a list of the management tasks available and a summary of the current settings.
- The top right panel allows the operator to set a period, integer or amount for the task to query.
- The lower right Results panel allows the operator to set the thresholds, top and lower pertaining to a specific library in a consortium model. This panel also displays the last result recorded. Note: To save these settings requires AWS 6.6.11 or later.
Examples:
The task ‘Operators have waived more than #Total# in fines in the last #Days# days’, may have values of Query period 2 and Query amount 10.00. This would create an alert in the overview panel if more than $10.00 was waived in the last 2 days.
The task highlighted ‘Average public catalogue search time in milliseconds over last #Mins# minutes’ has a period of 120 minutes, meaning that the average is taken over the last 3 hours. The threshold for the number of milliseconds is set to 3000 or 3 seconds. If the average time taken for the OPAC to respond is over 3 seconds and alert will be posted in overview.
