
Upload Marc Records #
The Upload Marc page allows operators to easily store and load marc records.
Access via Tech Services > Upload Marc.
All records on the upload marc page must be loaded against a supplier – to create new suppliers see the suppliers page.
Uploading Marc process #
- Upload Marc screen opens on a table of suppliers.
- Select the supplier to load the Marc file against.

Buttons on screen #
 export list button
  (3 Dots) more information | displays more supplier information that is not able to fit on the grid.
Row colour identification #
- Yellow row – The Matching routine on the supplier has not been saved – navigate to the suppliers screen and select a matching routine and save.
- Light Grey & White row – Supplier NOT marked as eResources.
- Dark Grey row – Supplier IS marked as eResources.
Suppliers tab – right click context menu #
- View supplier uploaded files – navigates to the Uploaded Resources tab.
- Reload supplier list – reloads the suppliers list to display any supplier changes..
- Go to this supplier screen – navigates to the supplier screen to edit the supplier information.
- Click on the ‘Upload Resources’ tab.
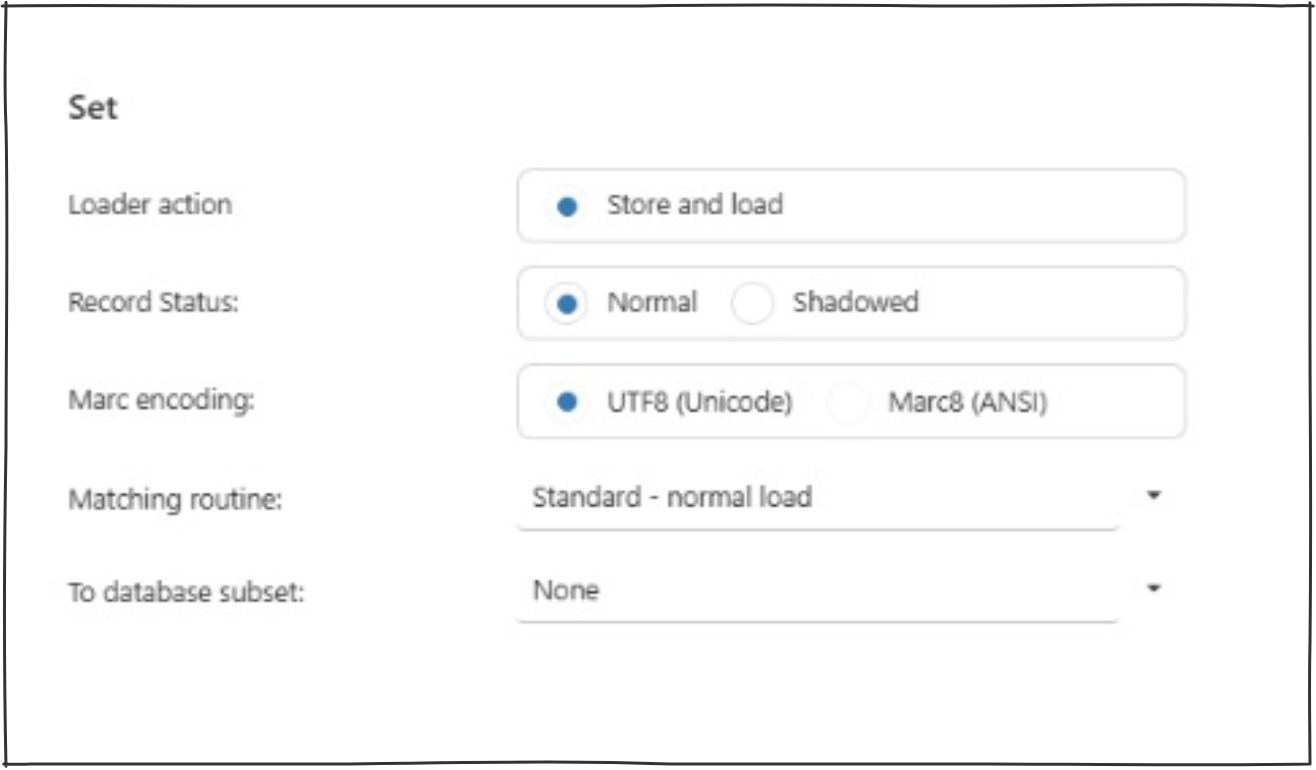
- Complete the ‘Set’ section.
A range of conditions must be set before uploading a Marc record
- Loader action – Information for Store and load.
- Record Status – Choose between Normal and Shadowed (Shadowed will mean the works will not display on Montage).
- Marc encoding – Choose between UTF8(Unicode) and Marc8(Ansi).
- Matching Routine – Select from the drop down list of options for matching routine. This determines the condition on which a record is determined as having a duplicate in the database already.
- To Database Subset – Select from the drop down list of options for the database subset. This is used to separate out collections and can be used on Montage.
- Check the Supplier section is correct (this was selected on the ‘Suppliers’ tab).
- Complete the ‘Select records to upload’ section.
- Select a file to upload.
- Click on ‘Check Marc’. If no errors proceed to step 9.
- Click on ‘Upload’.
- Once success message appears click on ‘Refresh’.
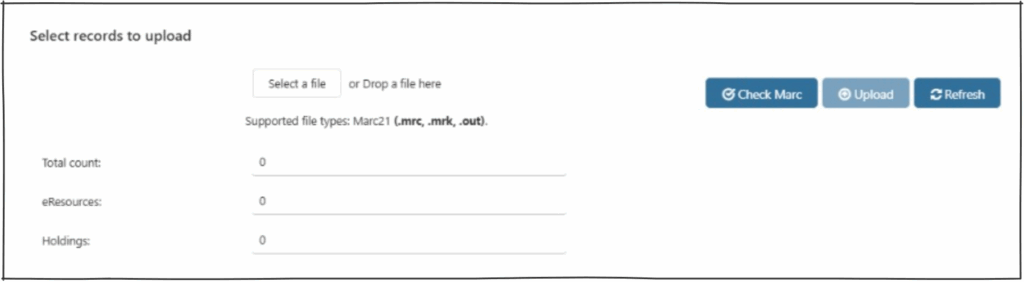
Counts #
- Total count – After a file is “checked” this will list the number of works in the file.
- eResources – After a file is “checked” this will list the number of works that are eResources.
- Holdings – After a file is “checked” this will list the number of holdings in the Marc file.
Buttons on screen #
 Select a File – Click to locate and select a Marc file to upload.
 Check Marc – Click after a Marc file has been selected, to check if the file can be uploaded.
 Upload – Will only become available after the file has been checked, upload loads the files to the database.
 Refresh Button – Click after the file has been uploaded, to check if all files have been loaded completely. This will change the status of the record.
- Results displayed in table.
- Use the right click context menu to view the uploaded works.
Results Table #

The results table lists the files that have been uploaded in the past for the selected supplier.
- The results table lists the files that have been uploaded in the past for the selected supplier.
- Date – The date the file was loaded.
- File Name – The name of the file that was loaded. Note the file name must be unique.
- Status – The current status of the file.
- Upload successful, Task submitted – The file has been uploaded, to view the works click refresh.
- Loaded – completely – All works completely uploaded.
- Records Count – Count of the number of records in the file.
- Records Unloaded – Count of the number of records stored but not loaded (The column is changed to 0 after all the records are uploaded and refresh is clicked).
- Records Loaded – Count of the number of records successfully loaded in the file.
- Records Rejected – Count of the number of records rejected in the file during load.
Right click context menu #
View uploaded works in this file – The screen will navigate to the works uploaded tab. The works will display in a grid with information including the Bib ID. Operators can use right click context menu, from this screen, to navigate to the catalogue page.
Messages #
 This Marc record has no errors and can be uploaded.
 File uploaded successfully.
 Task has already been uploaded to the system.
 The file contains works not able to be uploaded.
Works Uploaded Tab #
Uploaded works for a supplier will display in the ‘Works uploaded’ tab. By default it will display the last file uploaded. To see a specific file use the right click context menu on results table on the Uploaded Resources tab. Operators are able to view the details of each work that is added to the database from each individual file.
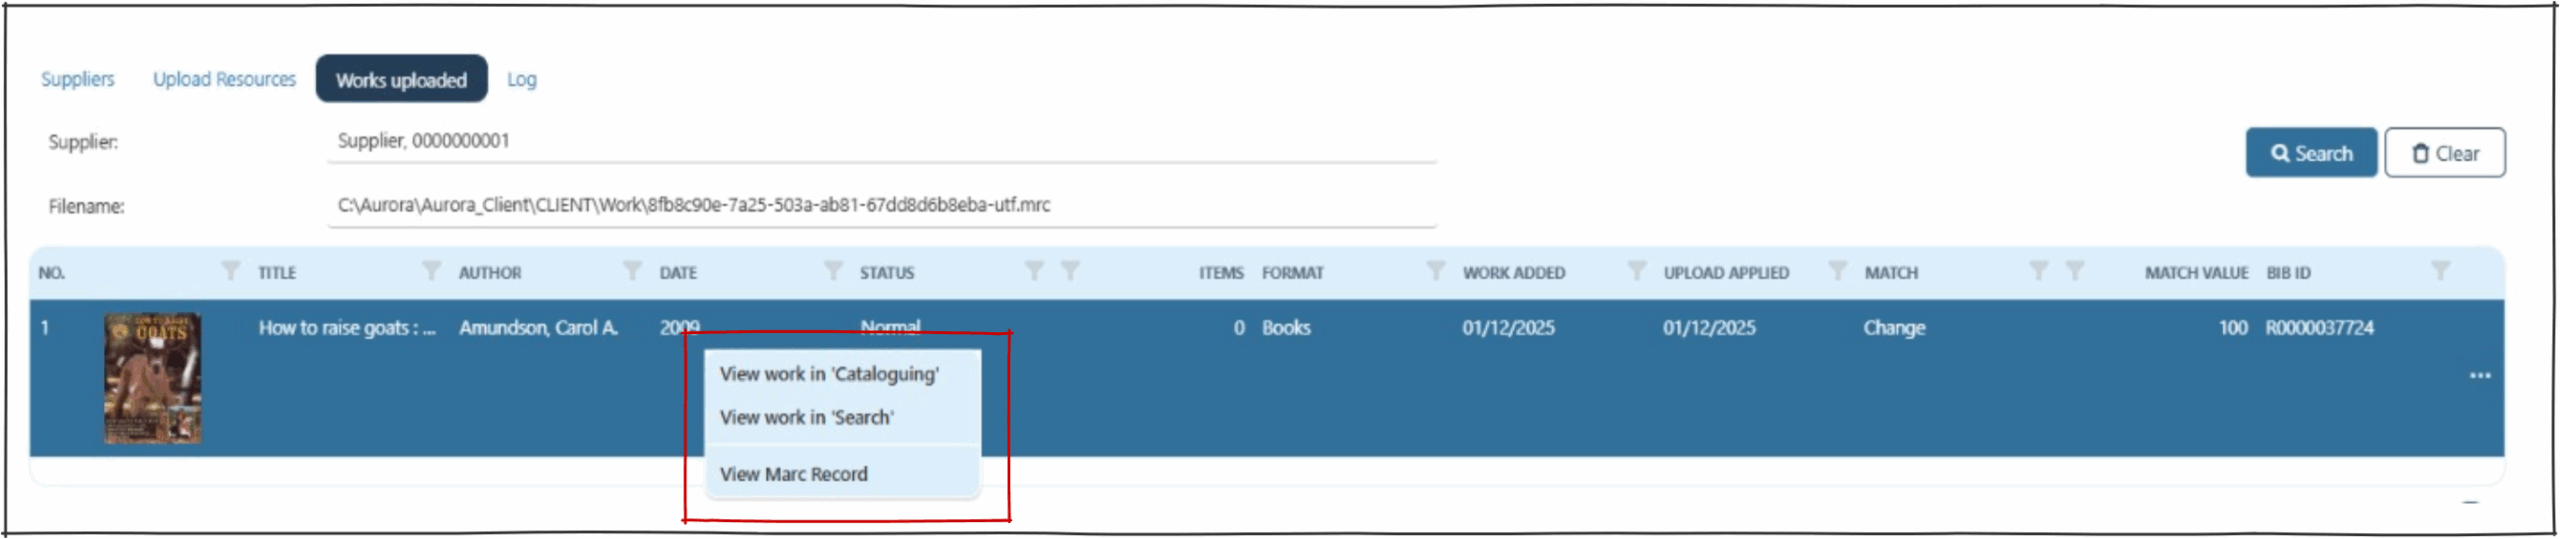
- View work in Cataloguing – Opens the catalogue screen for this work.
- View work in search – Opens the search screen for this work.
- View Marc record – Displays the marc record in the log tab.